Literate Programming at the dawn of LLMs

Since the beginning of the year, the industry’s main focus seems to revolve around “prompting.” We’ve seen the emergence of new job titles, new job descriptions, and even the introduction of “prompting wizards,” all of which are essentially part of branding and marketing strategies.

Prompting involves articulating a problem and providing clear instructions in the hope that the person or system reading it will produce the intended outcome. The recent shift lies in the recipient of these instructions: rather than a person taking action to solve the problem and follow the instructions, it’s now a thing (currently some form of AI model) that carries out the task.

What I find amusing, after 20 years of professional experience in software development and engineering management, is that we’re finally getting engineers to generate a substantial amount of text instead of solely focusing on writing code. This appears to signify quite a significant paradigm shift to me.

Prompting and Literate Programming

I recently had something of an epiphany while investigating the current state of Literate Programming: could Literate Programming not become a powerful software development paradigm with the advent of LLMs?

I mean, for 39 years, literate programming programmers have been essentially doing just this: “prompting” their software development. They have been describing their problems and outlining instructions before implementing the actual code, often in the format of a book or notebook. The only difference is that they were the ones doing 100% of the coding afterward (either themselves or with the help of an implementation development team).

Intuitively, it seems that this same format and these same skills are precisely what’s needed to best leverage LLMs in coding computer software. LLMs will undoubtedly become very effective tools, but they are just that: tools that need to be learned, experimented with, and mastered to extract the best results from them.

GitHub’s Copilot

In this blog post, I aim to explore how literate programming can influence and enhance the utilization of LLMs. The current leading LLM tool for software developers is undoubtedly GitHub’s Copilot, integrated into VS Code. It boasts three main features:

  1. Code completion
  2. Completions Panel (providing up to 10 distinct auto-completion suggestions)
  3. Chat (recently made available to the general public)

With all of these capabilities integrated into an IDE like VS Code, it forms a package that significantly accelerates the software development process.

The next question arises: will Copilot grasp, and potentially benefit from, the literate programming process in the suggestions it provides? This is what I’m aiming to explore – to observe how it reacts, what proves effective, and what may not.

To put it to the test, I’ve developed a straightforward command-line tool in Python designed to function as a basic calculator. The remainder of this post comprises a series of screenshots accompanied by my comments at each step.

literate-copilot

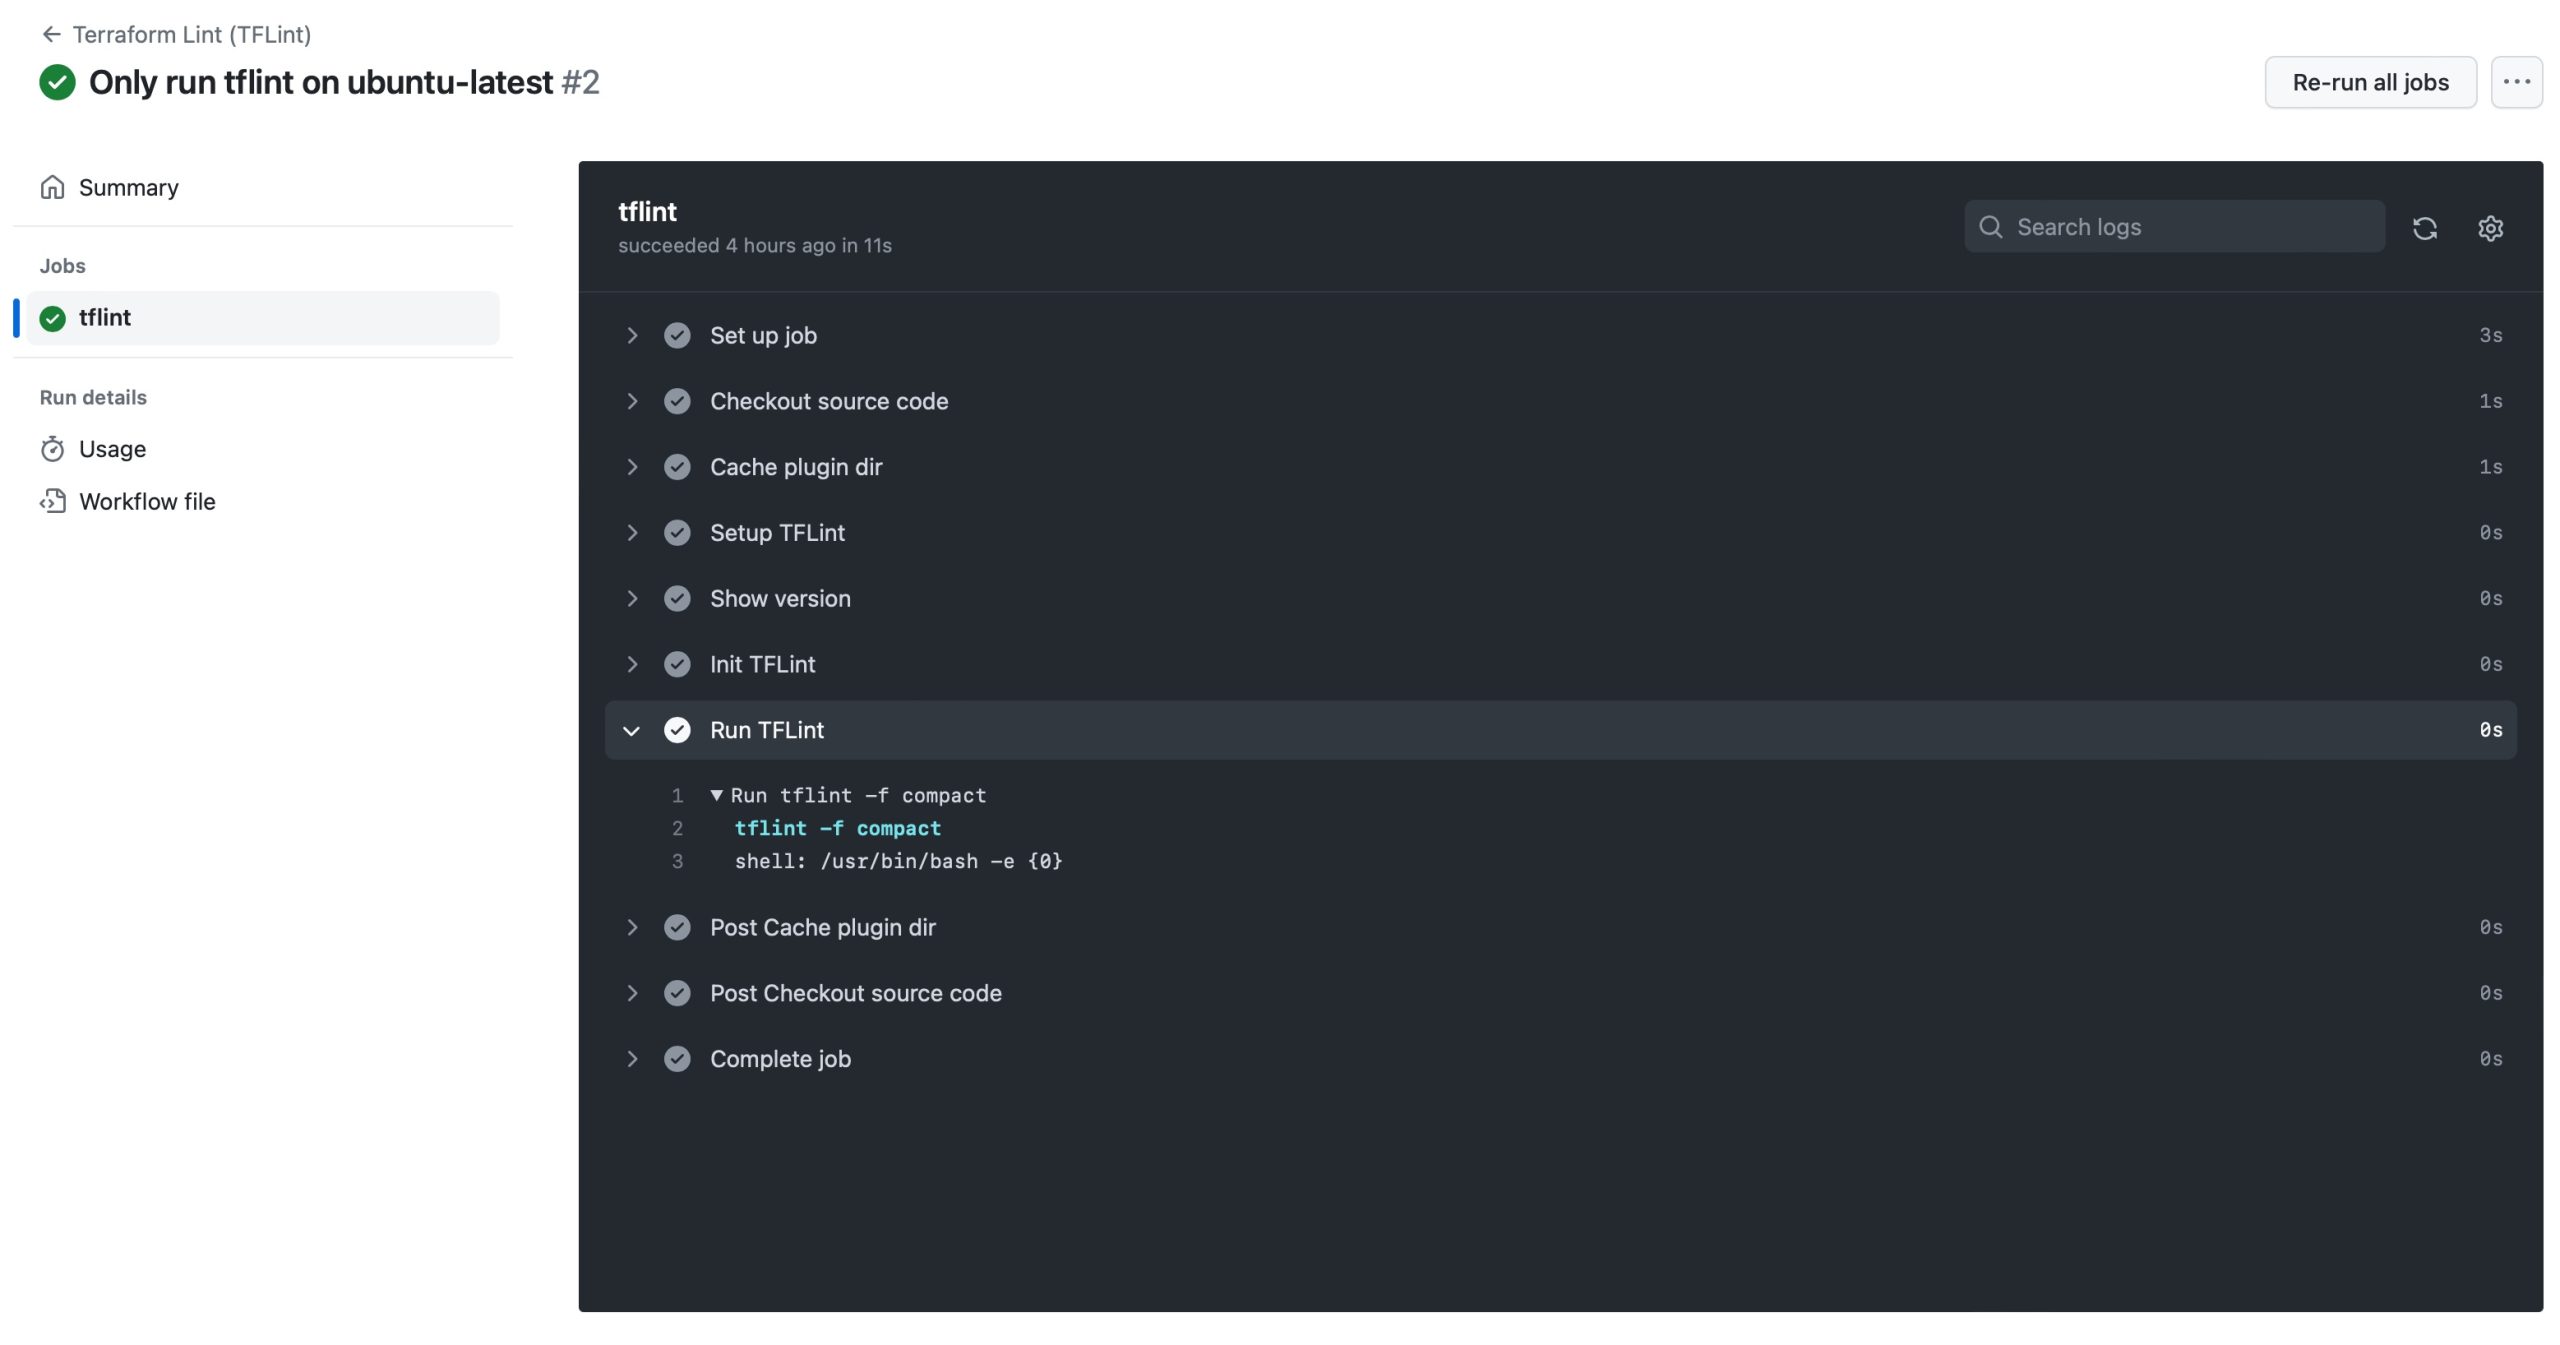
Before diving in, Is still needed to create a new GitHub project, and to use nbdev_new to create a new nbdev project, and then to configure it.

Before starting to develop the CLI tool, I wanted to see if GitHub Copilot was self aware of its own capabilities:

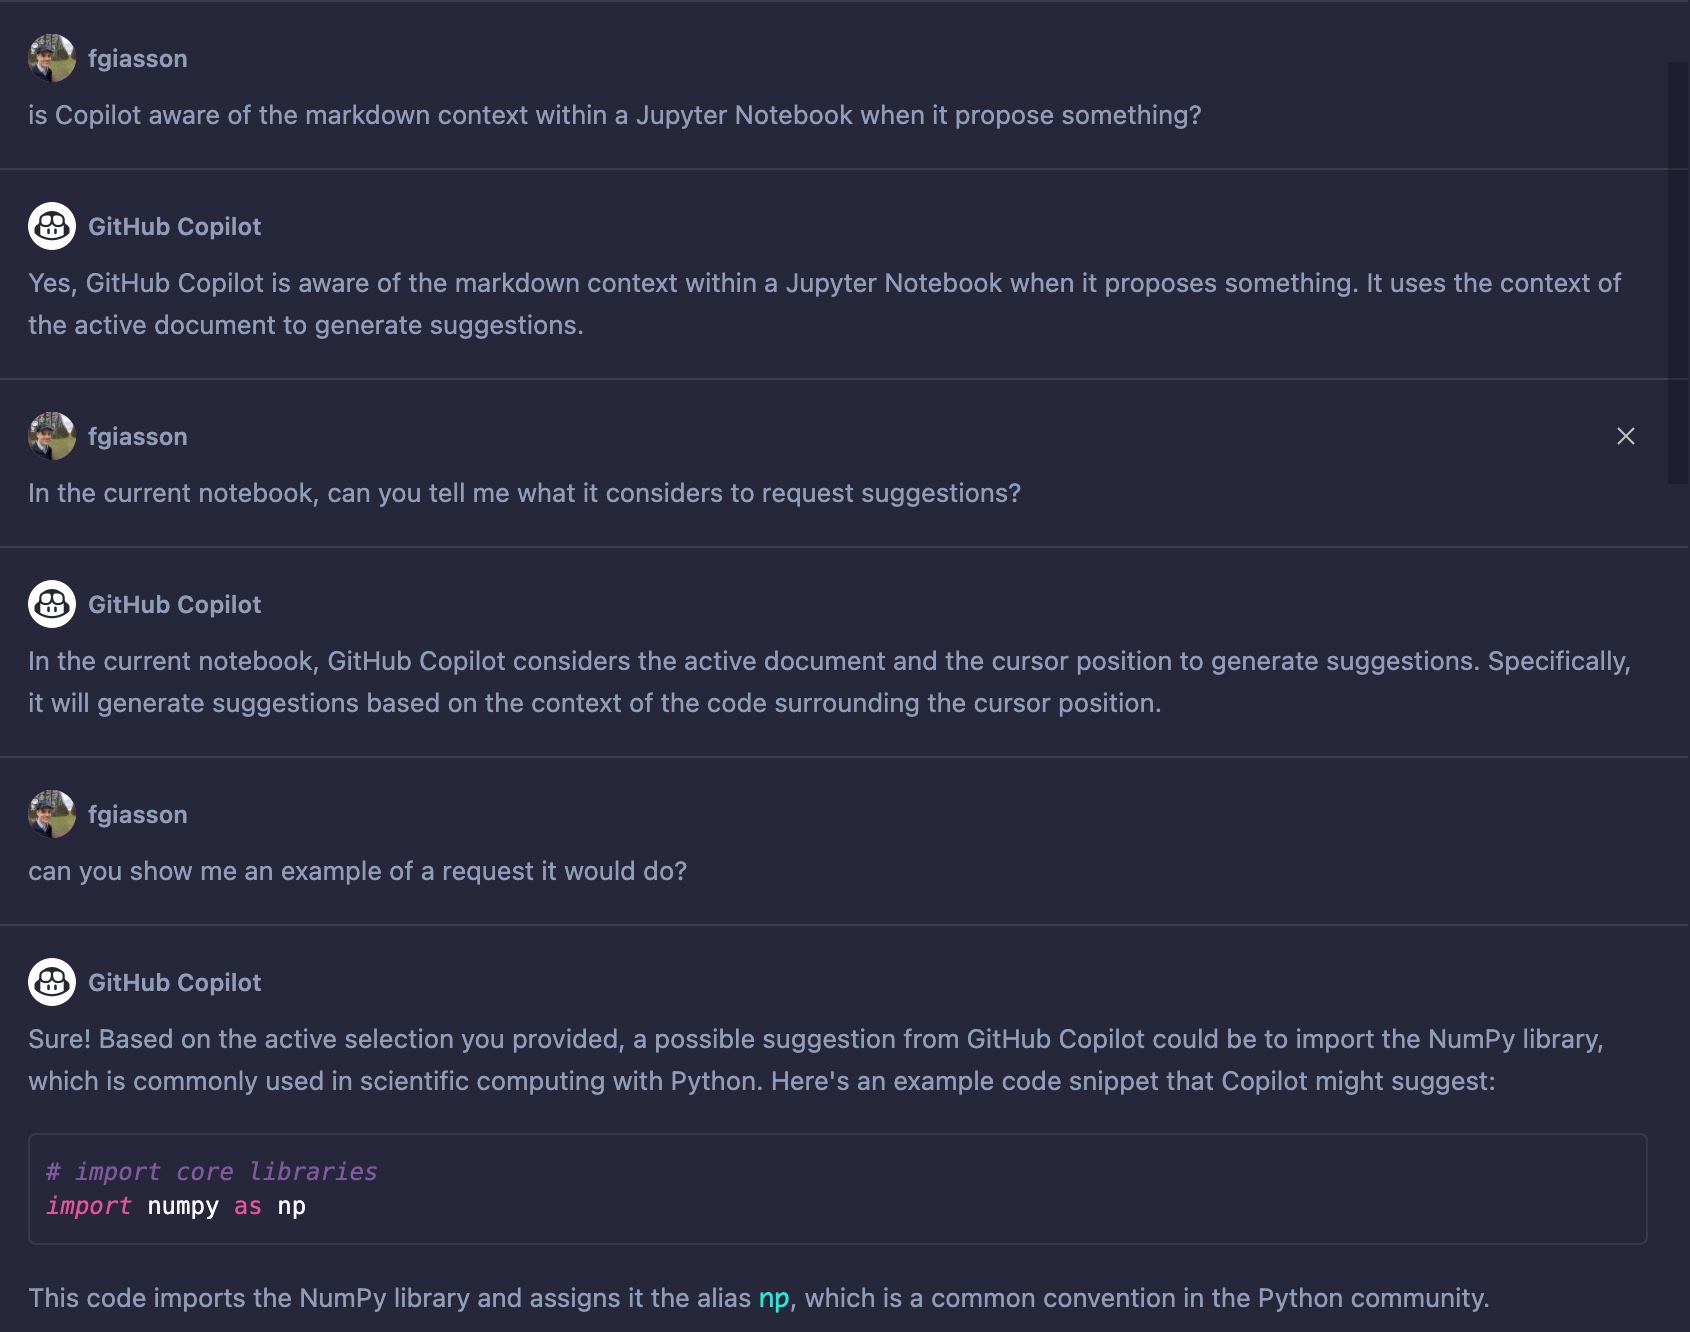
It’s hard to discern from this interaction whether it’s generating content or not, but at the very least, it seems promising. Let’s see if we can further explore this level of contextual awareness.

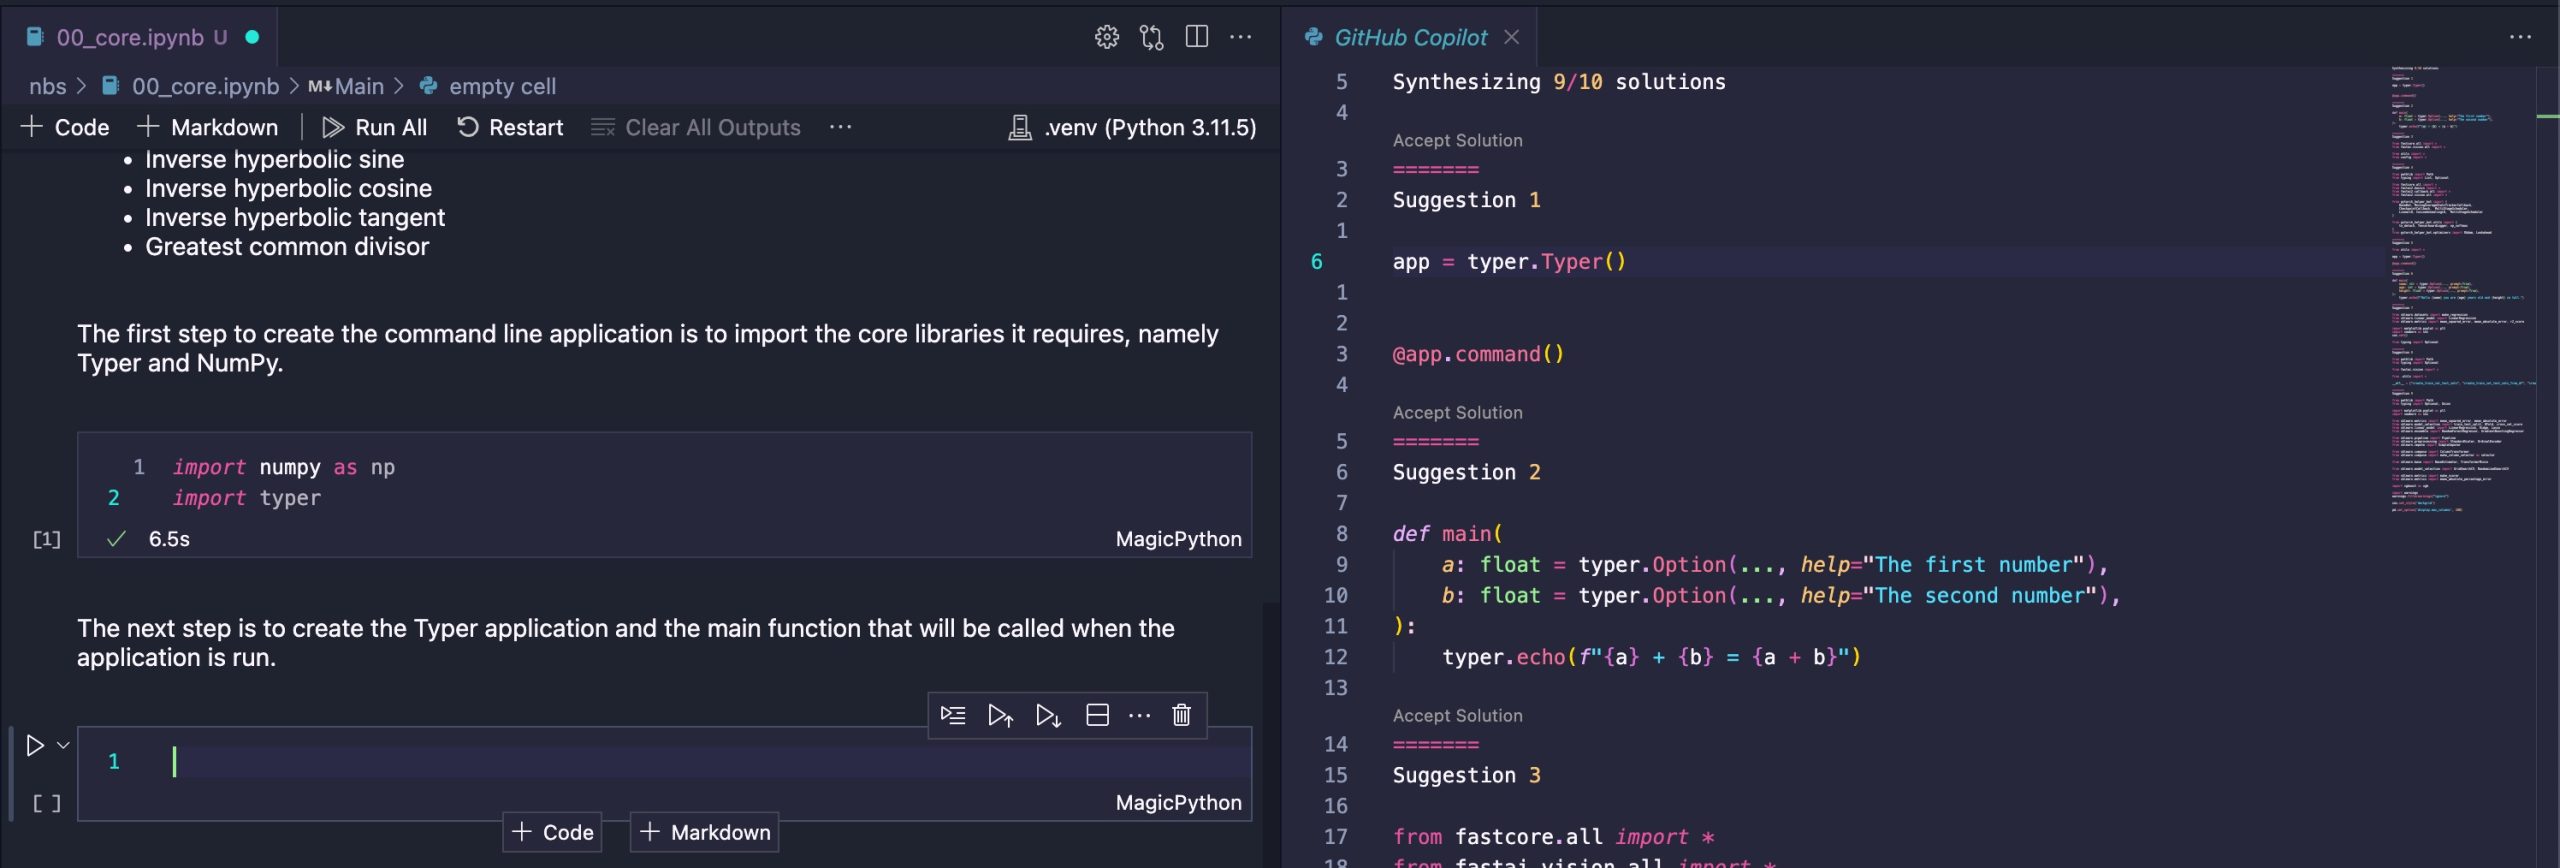
The initial step I took was to compose the introduction for the tool, right here in this Jupyter notebook. It outlines the purpose of the tool and the extensive list of calculator operations we aim to implement. I obtained the imports from the prior interaction with Chat. I manually added typer as this is the library I intend to use for building the command-line utility.

Following that, I proceeded to discuss creating a Typer application and its functionalities, etc. In the subsequent code block, I deliberately refrained from writing anything, as I didn’t want Copilot to auto-generate code within this block. I was interested in evaluating if it had an understanding of the entire notebook’s context, not just within a specific code block. This is why I opened the Suggestions Panel to assess if it would suggest anything relevant given the current context.

What I received was particularly interesting, as the initial suggestion aligns perfectly with the next step. It overlooks the #| export nbdev instruction, but that’s perfectly acceptable, as it’s rather obscure.

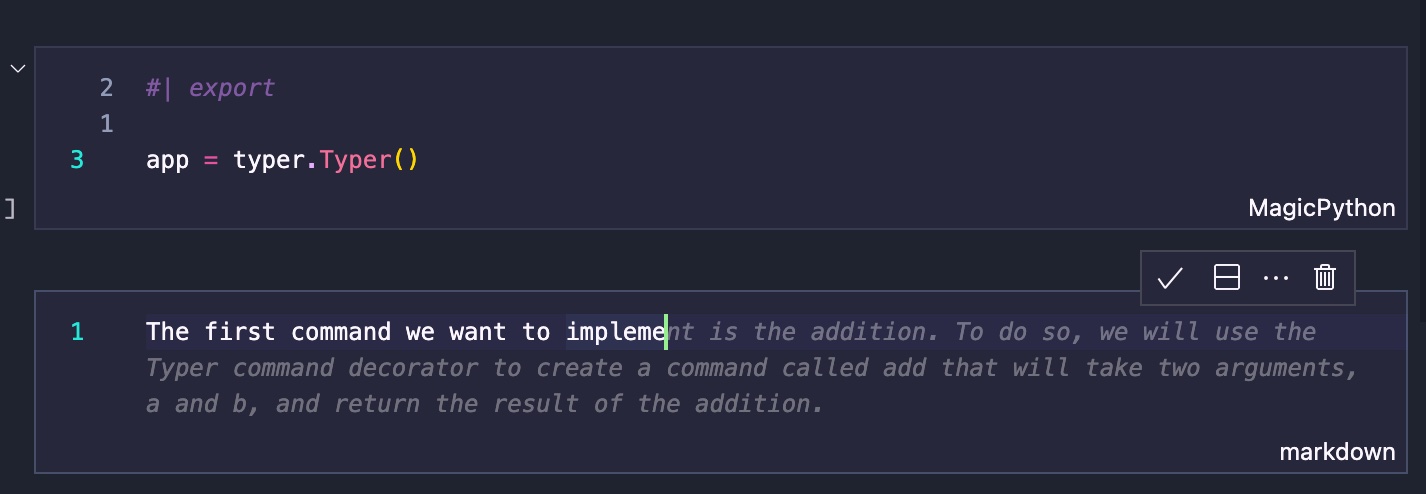
Next, I began detailing the subsequent steps by creating a new Markdown cell. At this point, Copilot’s auto-completion capabilities come into play. This is particularly interesting, as it essentially anticipates what I was about to write, drawing from the extensive list of calculator commands I plan to implement. In this case, it starts with the first command on that list, which is addition. This suggests to me that it leverages the entire notebook as the context for its suggestions.

For context, here is the full list of operations we want to implement:

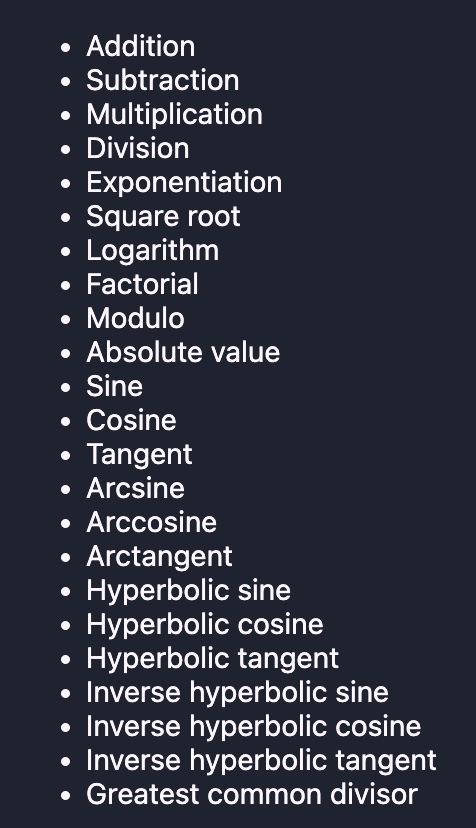
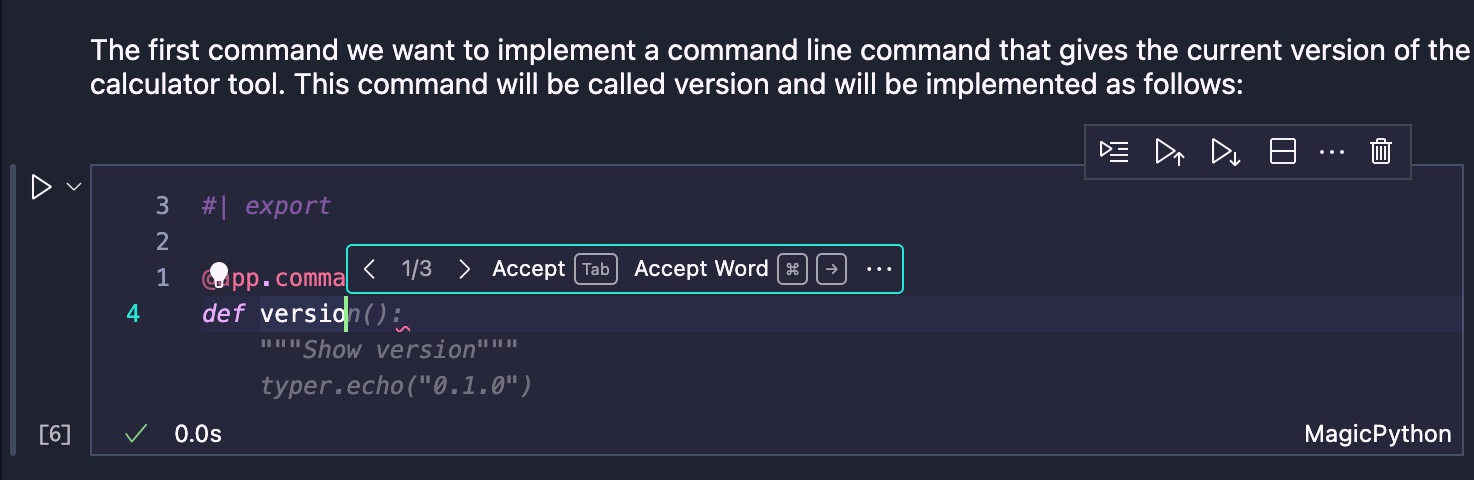
However, this was actually not the first command we wanted to implement. The first one we wanted to implement is the version of the command line tool that we display to the users if they ask for it.

Then the next step is to start implementing the long list of calculator operations, starting with addition:

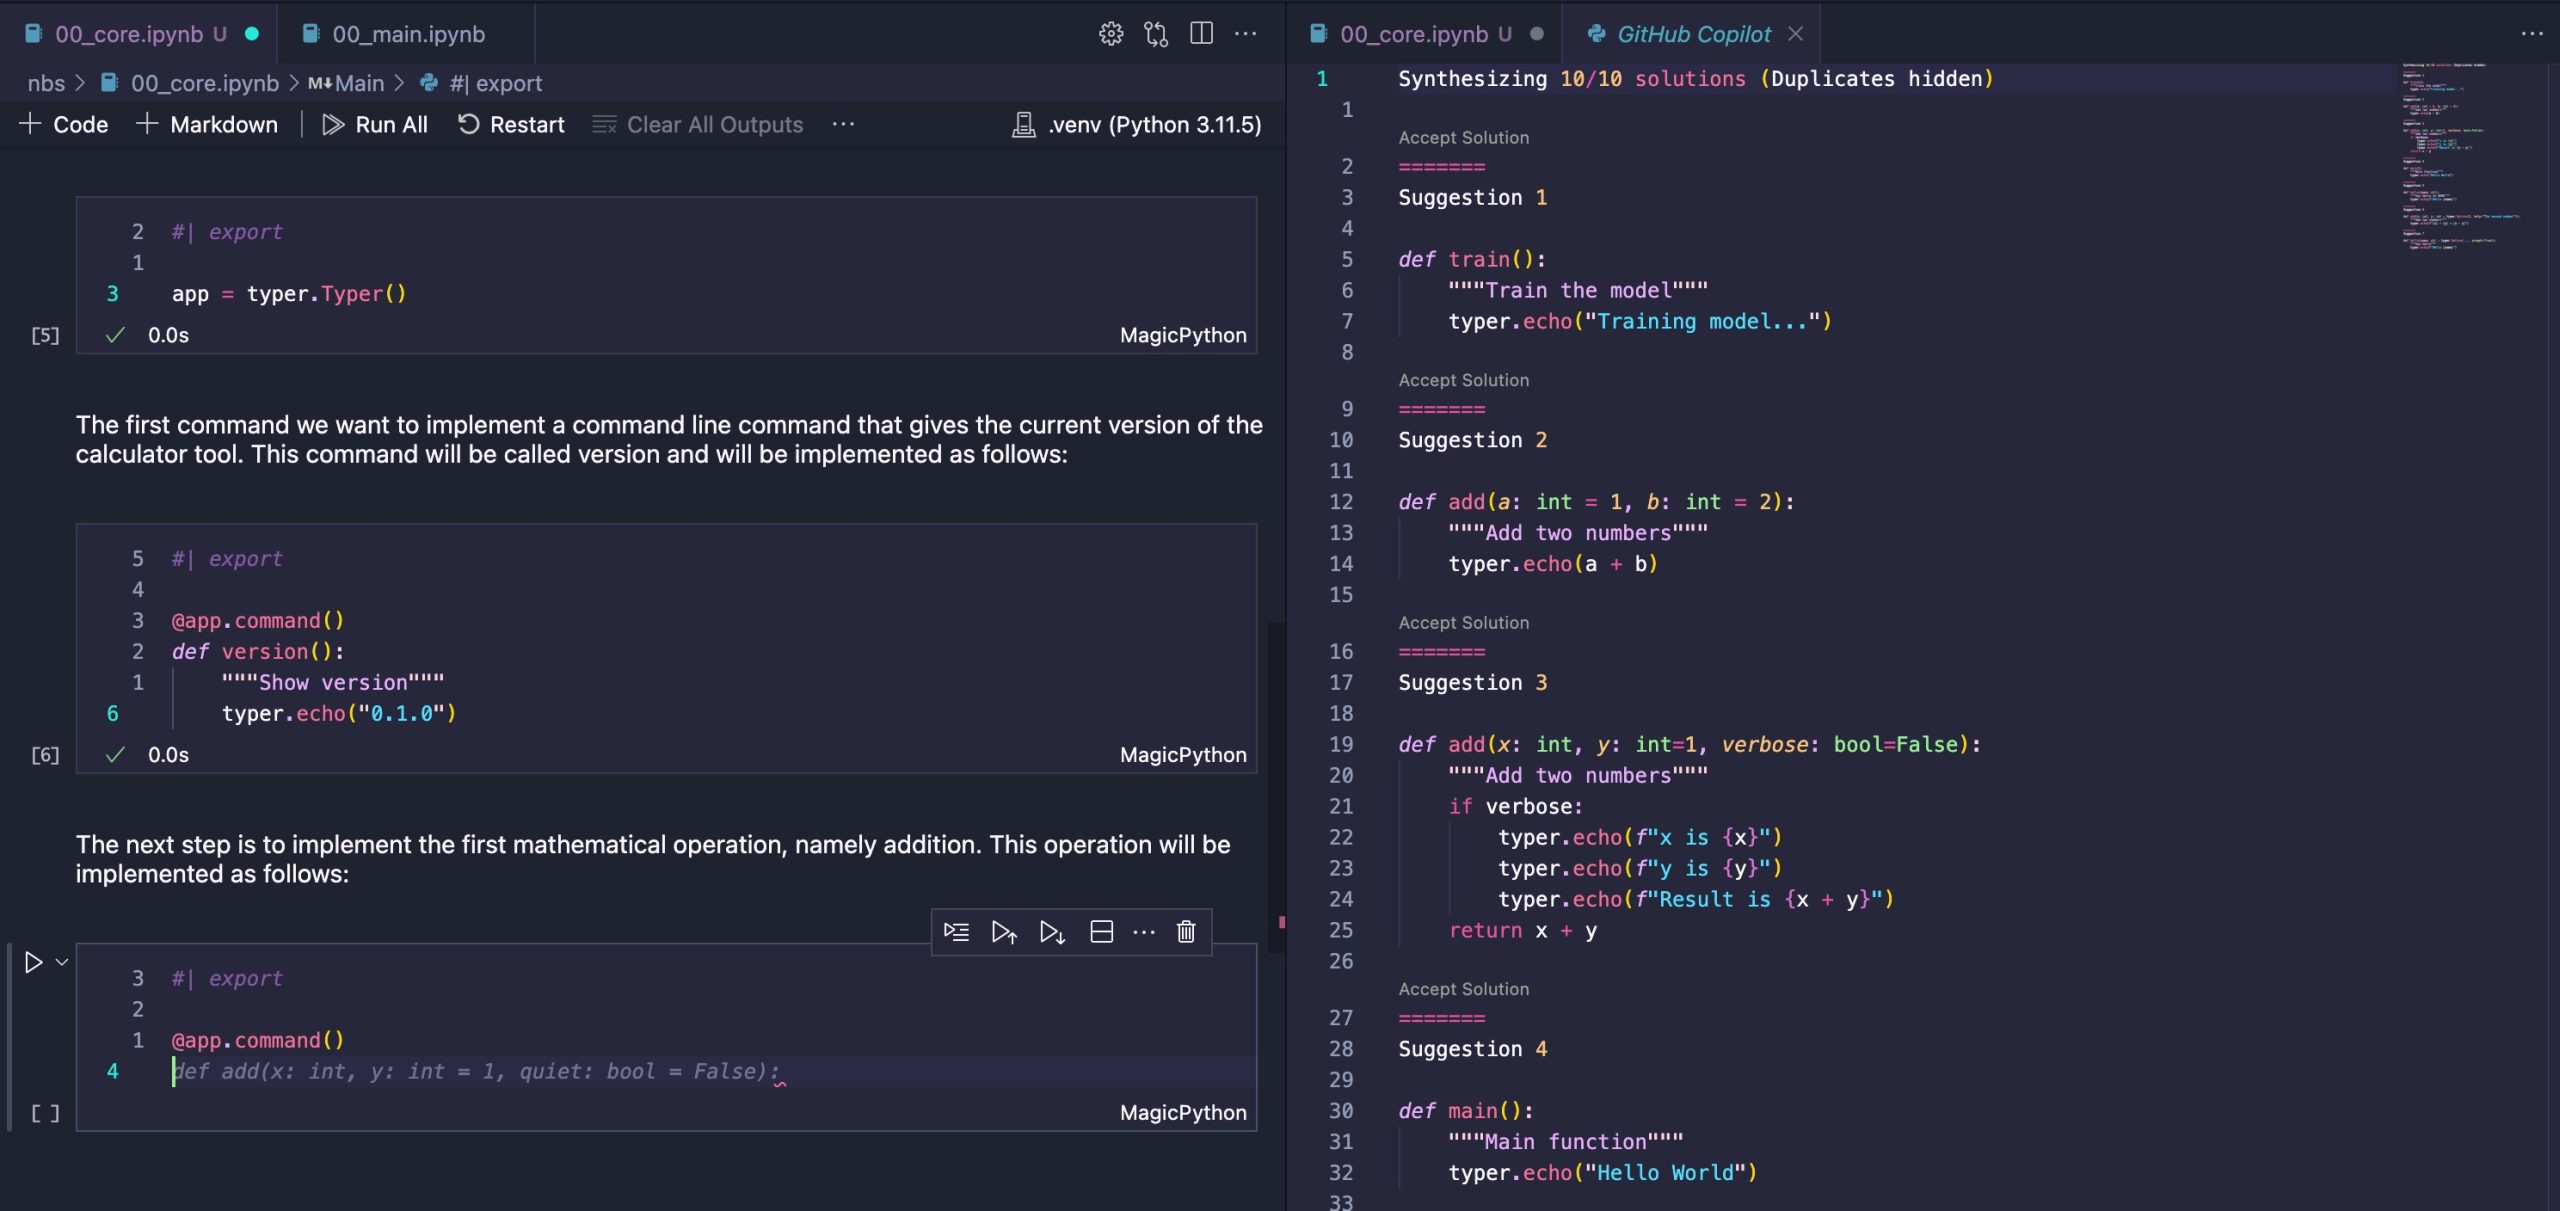
Why was the quiet parameter suggested? To dig a bit further into its thought process, I decided to open the Completions Panel. Suggestion 3 sheds light on what it had in mind. However, for a basic calculator, this isn’t very useful since the outcome of adding two numbers is quite straightforward. I’ll go ahead and accept .

Now, let’s compile this command-line application to ensure it functions as intended:

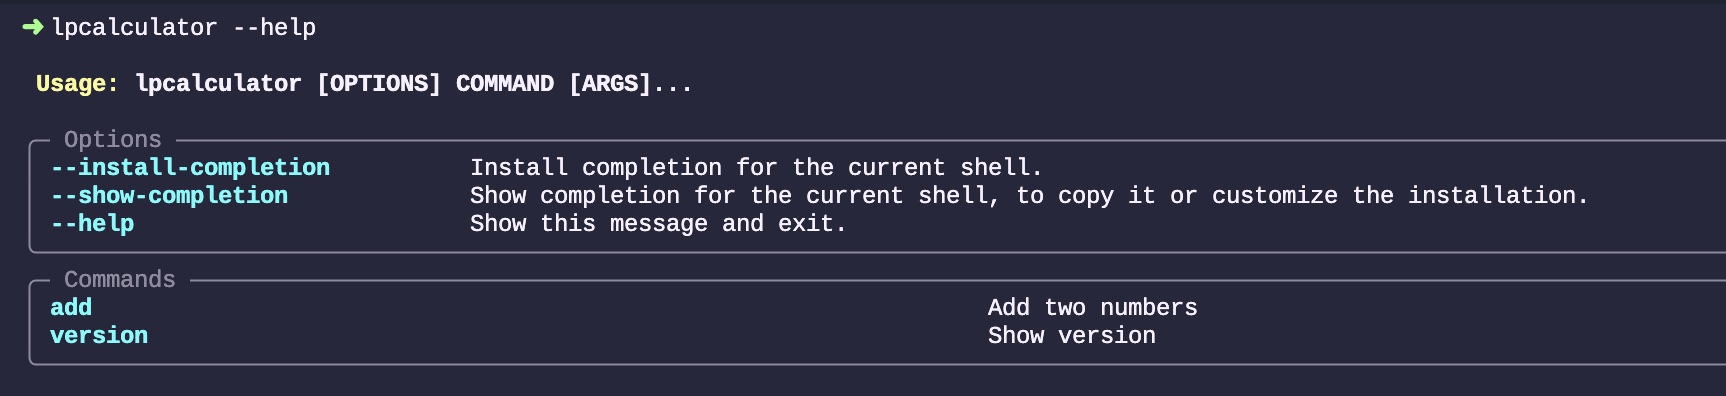
By blindly accepting the code proposed by Copilot, here is how the add command works:

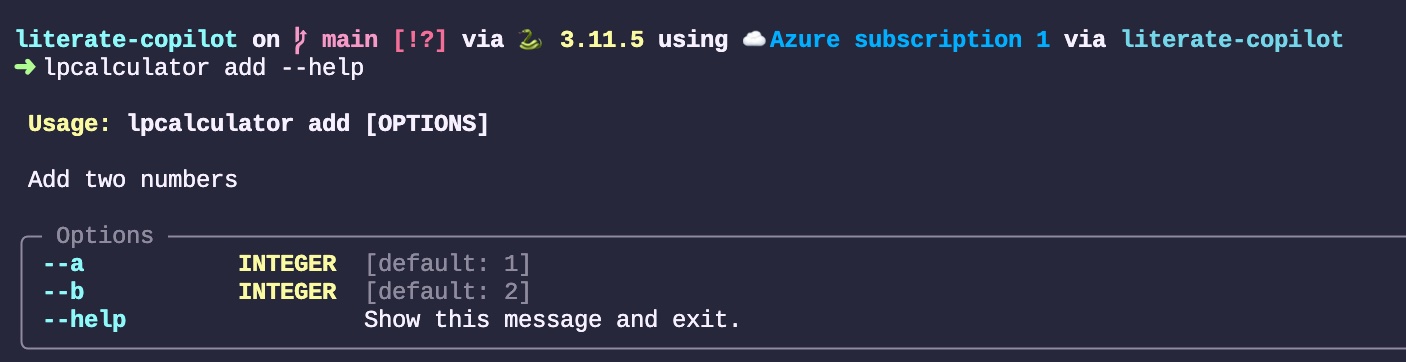
Let’s see if it works as intended:

Yes, it does. It’s not the most convenient method for adding two numbers; it’s a bit complex and verbose, but it will suffice for now.

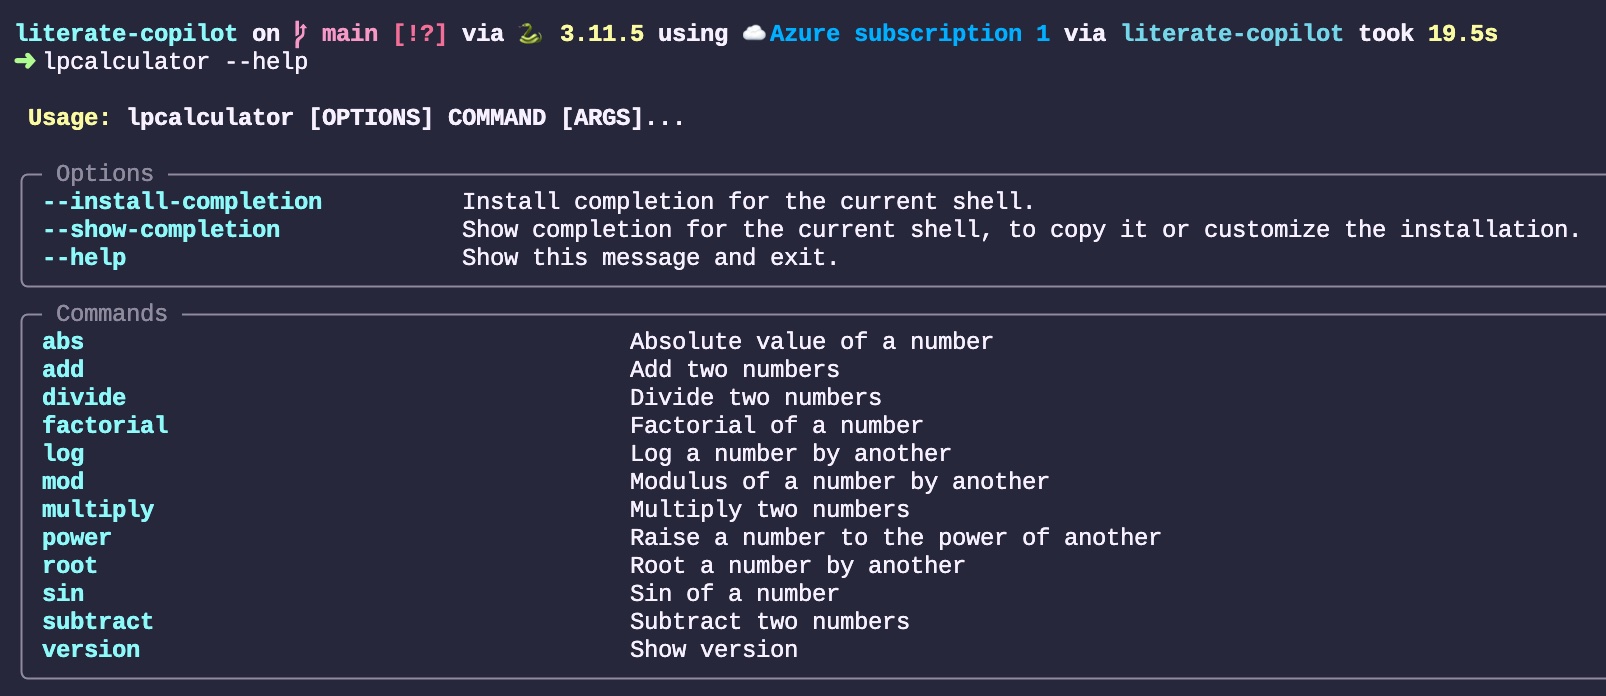
Afterwards, I added the entire list of operators in the same manner, by appending code block after code block, and it successfully implemented each of them. There was a point around number 7 or 8 where it lost the order, but simply starting to type the right term got it back on track. For example, typing def si will continue with defining the Sin function accordingly. Here is the current list that has been implemented so far:

Adding Tests

Now that we have all these functions, I’d like to give Copilot a try at generating tests for each of them. To do this, I posed a very simple question to the newly generated release of Copilot Chat while having the 00_main.ipynb file open:

I would like to add tests for each of those commands.

By “those commands”, I was referring to what was currently displayed in the Workspace on my right, hoping that it would contextualize the request within the Workspace. The result Chat provided me with is:

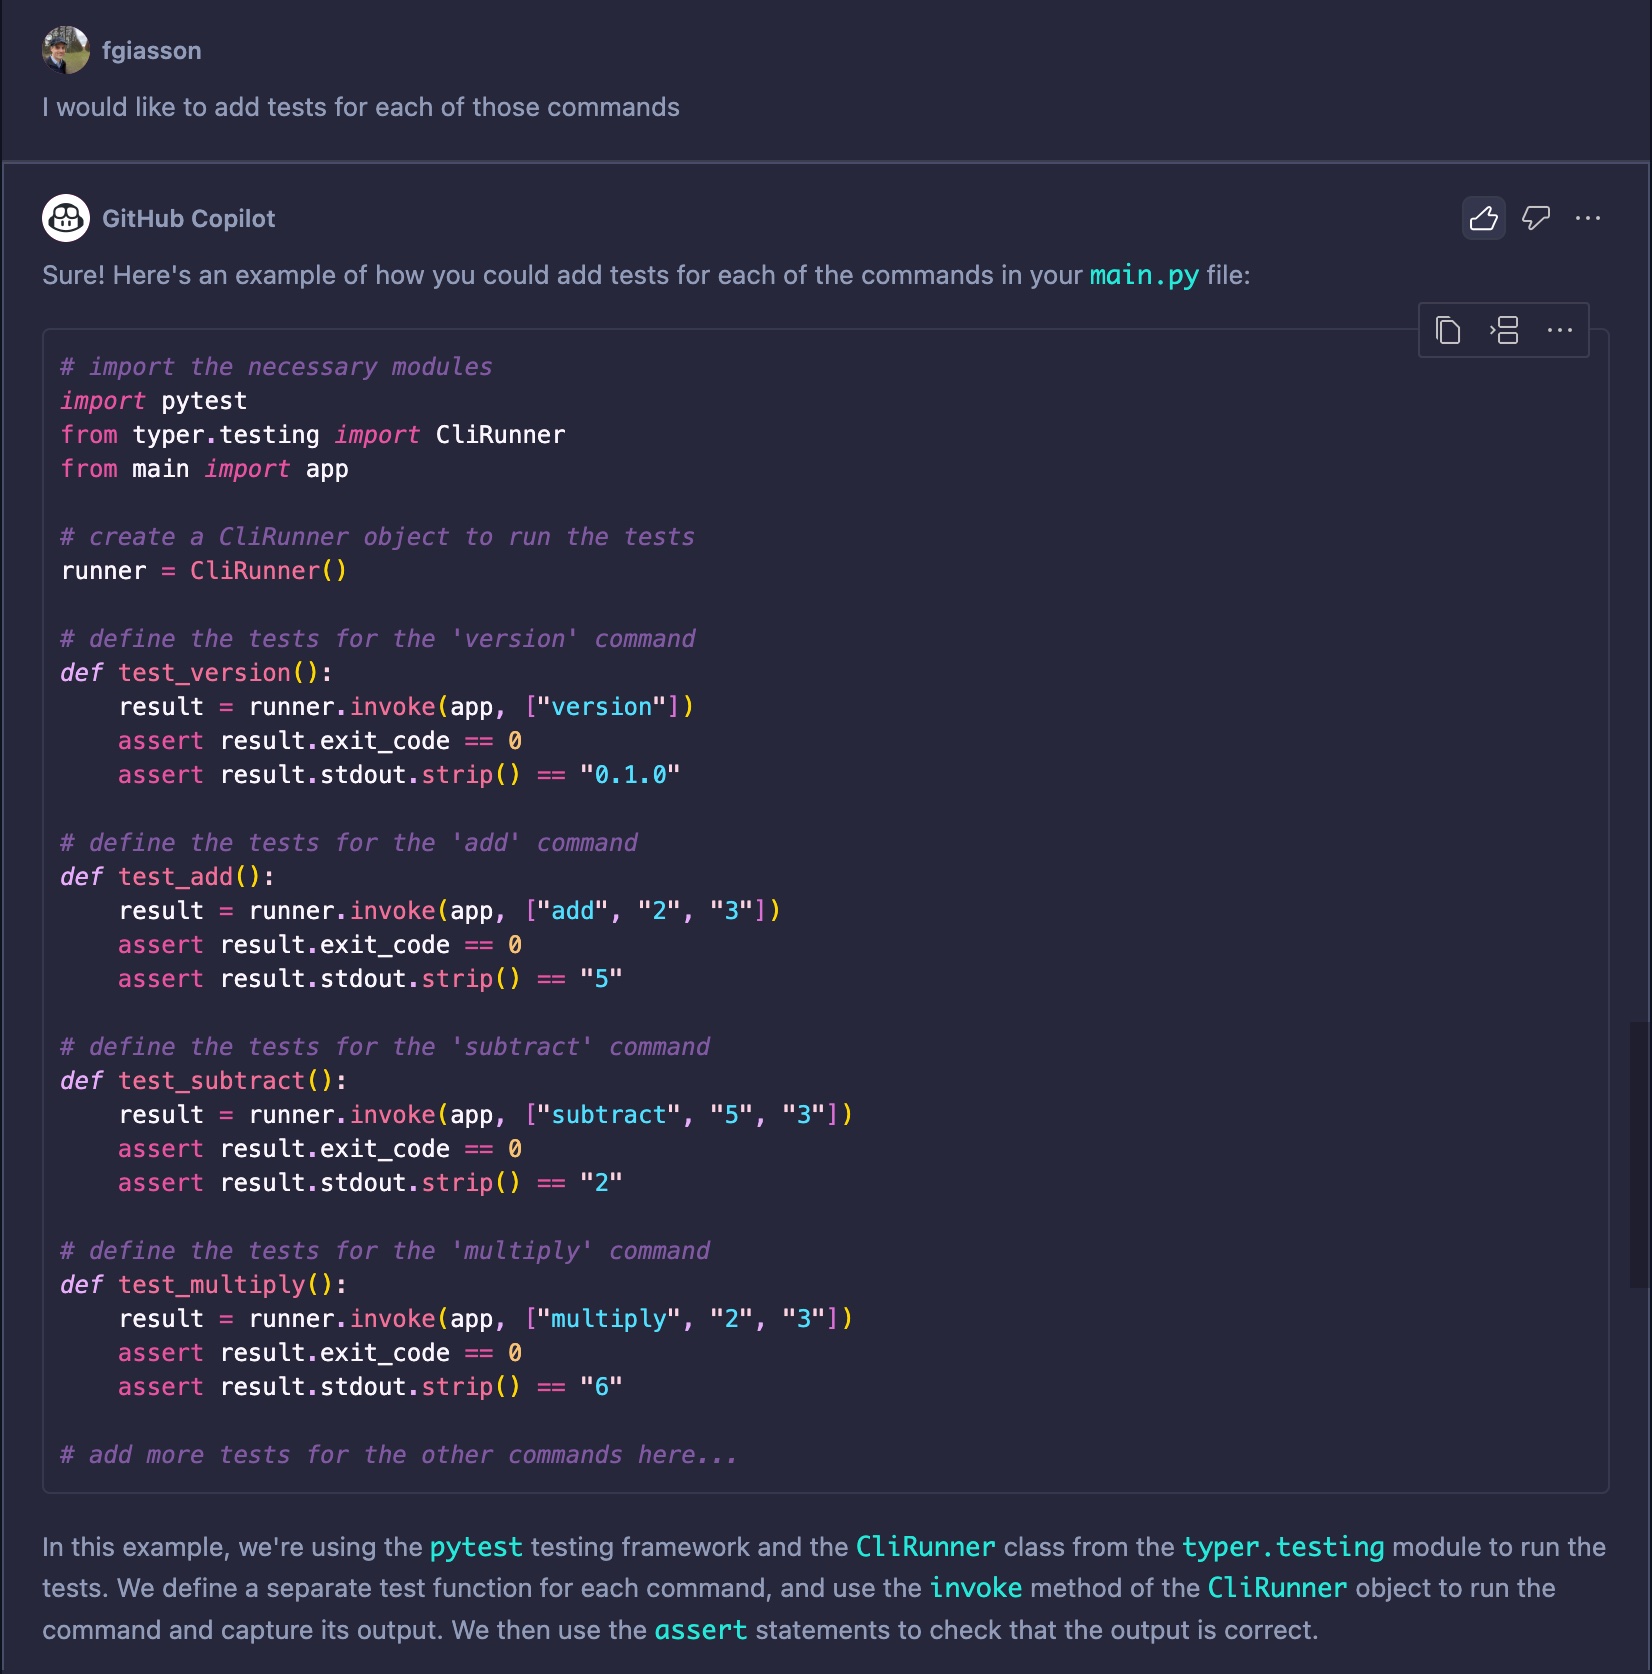
It is even aware that it is missing some from the list described in the introduction and continue to list them starting at the right place (divide):

As you can see, it is fully aware of the context. It will produce one test per command, understanding that the commands print output to the terminal and that the functions do not return actual numbers. It will also attempt to use a CliRunner to execute the tests. While it doesn’t work out of the box, it’s certainly a step in the right direction.

Conclusion

This concludes the tests. It’s clear that Copilot is aware of a Workspace and contextualizes its suggestions accordingly. When working in a Jupyter notebook, it takes into account every code block.

This little experiment suggests to me that adopting a literate programming workflow and its principles can lead to better and more effective suggestions from LLMs like Copilot.

For thousands of years, humans have been expressing their thoughts in a sequential manner, from top to bottom. We’ve developed highly effective systems to organize these writings (you can explore the BIBO ontology for a glimpse into this). These systems have evolved and been refined up to the present day.

To me, this is the essence of Literate Programming. It’s about developing computer software in a more natural, thoughtful, and systematic human way.

Not many people in the industry share this perspective. However, what I’ve begun to explore in this blog post is how LLMs, along with integrated tools like GitHub’s Copilot, could potentially shift that perception. How Literate Programming could emerge as one of the top programming frameworks for effectively utilizing tools like Copilot.

Profiling Python Code in Jupyter while doing Literate Programming with nbdev

As you may know if you followed this blog in the last few weeks, I started to experiment doing literate programming in Python using nbdev. This means that most of the Python code I do today is first written in a Jupyter Notebook (in VSCode), and eventually get their ways into a .py module file.

Often time, I like to profile a function here and there to better understand where execution time is spent. I do this in my normal development process, without thinking about early optimization, but just to better understand how things works at that time.

This week I wanted to understand what would be the easiest way to quickly profile a function written in a Jupyter Notebook, without having to tangle the code blocks and work at the level of the .py module.

Line Profiler

The solution that worked best for me with my current workflow is to use the line_profiler Python library. I won’t go in details about how it works internally, but I will just show an example of how it can be used and expose the results.

Let’s start with the code. Here is a piece of code that I am currently working on, that I will release most likely next week, which is related to a small experiment that I am doing on the side.

What this code does is to read a RSS or Atom feed, from the local file system, parse it, and returns a feed namedtuple and a list of articles namedtuple. Subsequently, those will be used down the road to easily get into a SQLite database using executemany().

Each of those block are individual code block within the notebook, with explanatory text in between, which I omitted here.

from line_profiler import profile

@profile
def detect_language(text: str):
    """Detect the language of a given text"""

    # remove all HTML tags from text
    text = re.sub('<[^<]+?>', '', text)

    # remove all HTML entities from text
    text = re.sub('&[^;]+;', '', text)

    # remove all extra spaces
    text = ' '.join(text.split())

    # return if the text is too short
    if len(text) < 128:
        return ''

    # limit the text to 4096 characters to speed up the 
    # language detection processing
    text = text[:4096]

    try:
        lang = detect(text)
    except:
        # if langdetect returns an errors because it can't read the charset, 
        # simply return an empty string to indicate that we can't detect
        # the language
        return ''

    return lang
Feed = namedtuple('Feed', ['id', 'url', 'title', 'description', 'lang', 'feed_type'])
Article = namedtuple('Article', ['feed', 'url', 'title', 'content', 'creation_date', 'lang'])
def parse_feed(feed_path: str, feed_id: str):
    parsed = feedparser.parse(feed_path)

    feed_title = parsed.feed.get('title', '')
    feed_description = parsed.feed.get('description', '')

    feed = Feed(feed_id,
                parsed.feed.get('link', ''),
                feed_title, 
                feed_description,
                detect_language(feed_title + feed_description),
                parsed.get('version', ''))

    articles = []
    for entry in parsed.entries:
        article_title = entry.get('title', '')
        article_content = entry.description if 'description' in entry else entry.content if 'content' in entry else ''
        articles.append(Article(entry.get('link', ''),
                                feed_id,
                                article_title,
                                article_content,
                                entry.published if 'published' in entry else datetime.datetime.now(),
                                detect_language(article_title + article_content)))
    return feed, articles

Let’s say that we want to profile the detect_language() function when calling the parse_feed() function. To do this, the first thing we did is to decorate the detect_language() function with the @profile decorator from from line_profiler import profile. Once this is done, we have to load the line_profiler external library using the %load_ext magic command in Jupyter. To do this, we simply have to create the following Python code block and execute the cell to load the module in the current running environment:

%load_ext line_profiler

Once it is loaded, we can create another Python code block that will execute the %lprun command which is specific to Jupyter:

%lprun -f detect_language parse_feed('/Users/frederickgiasson/.swfp/feeds/https---fgiasson-com-blog-index-php-feed-/13092023/feed.xml', 'https---fgiasson-com-blog-index-php-feed-')

Once this cell is executed, line_profiler will be executed and the profiling of the detect_language() function will occurs. Once finished, the following output will appears in the notebook:

Timer unit: 1e-09 s

Total time: 0.215358 s
File: /var/folders/pz/ntz31j490w950b6gn2g0j3nc0000gn/T/ipykernel_65374/1039422716.py
Function: detect_language at line 3

Line #      Hits         Time  Per Hit   % Time  Line Contents
==============================================================
     3                                           @profile
     4                                           def detect_language(text: str):
     5                                               """Detect the language of a given text"""
     6                                           
     7                                               # remove all HTML tags from text
     8        11     136000.0  12363.6      0.1      text = re.sub('<[^<]+?>', '', text)
     9                                           
    10                                               # remove all HTML entities from text
    11        11      78000.0   7090.9      0.0      text = re.sub('&[^;]+;', '', text)
    12                                           
    13                                               # remove all extra spaces
    14        11     118000.0  10727.3      0.1      text = ' '.join(text.split())
    15                                           
    16                                               # return if the text is too short
    17        11      15000.0   1363.6      0.0      if len(text) < 128:
    18         1          0.0      0.0      0.0          return ''
    19                                           
    20                                               # limit the text to 4096 characters to speed up the 
    21                                               # language detection processing
    22        10      12000.0   1200.0      0.0      text = text[:4096]
    23                                           
    24        10       6000.0    600.0      0.0      try:
    25        10  214980000.0    2e+07     99.8          lang = detect(text)
    26                                               except:
    27                                                   # if langdetect returns an errors because it can't read the charset, 
    28                                                   # simply return an empty string to indicate that we can't detect
    29                                                   # the language
    30                                                   return ''
    31                                           
    32        10      13000.0   1300.0      0.0      return lang

As we can see, most of the time spent is used detecting the language using langdetect.

Conclusion

It is as simple as that thanks to line_profiler which is just simple, effective and well integrated in Jupyter. This is perfect for quickly profiling some code on the fly.

ReadNext 0.0.4: Local Embedding Model

I just release ReadNext version 0.0.4. The primary goal of this new version is to remove the dependency on the Cohere Embedding web service endpoint by using a local embedding model by default. To enable that, ReadNext got integrated with Hugging Face and is currently uses the BAAI/bge-base-en model.

Local vs. Remote

This new change remove dependency on one external service which makes it more stable. The processing time is a little bit longer with the local model, but it also depends on the capabilities of your local computer.

In terms of performance, the two systems are comparable. In my experience, about 80% of the propositions are the same, and the remaining 20% that are different yeld no major difference in accuracy. However, I do prefer the BAAI/bge-base-en propositions a little better for what I experienced so far.

You may want to experiment with both to see what works best for you. The only thing you have to do is to change the EMBEDDING_SYSTEM environment variable and to reload your terminal instance.

New Configurations

Two new configuration options have been added to this version:

  1. EMBEDDING_SYSTEM: This is the embedding system you want to use. One of: BAAI/bge-base-en(local) or cohere.
  2. MODELS_PATH: This is the local path where you want the models files to be saved on your local file system (ex: /Users/me/.readnext/models/)

If you already have ReadNext installed on your computer, please make sure to add those two new environment variables to you environment.

New Commands

Two new commands have been added as well. They have been added to help understanding the current status of the ReadNext tool. Those two commands are:

  1. readnext version: this gives the version of ReadNext that you are currently using
  2. readnext config: this gives the configuration parameters, and their values, currently used to run that instance of ReadNext

Literate Programming

While at it, I decided to migrate ReadNext’s Python codebase to use nbdev to continue its development using literate programming

All the literate files (notebooks in this case) where the code is tangled and the documentation weaved from are accessible in the nbs folder. The tangled codebase is available in the readnext folder. Finally, the weaved documentation is available as GitHub pages here.

How to Deploy Hugging Face Models in Azure using Terraform and Docker

In a previous blog post, I explained how we can easily deploy Hugging Face models in Docker containers. In this new post, I will explain how we can easily deploy that container in Azure using Terraform. At the end of this article, we will have end-to-end process that creates a translation service, containerize, deploy in the cloud and that is readily available on the Web in a single command in your terminal.

Create Free Azure Account

If you don’t currently have access to an Azure account, you can easily create one for free here. You get a series of popular services for free for 12 months, 55 services free forever and 200$ USD in credit for a month. This is more than enough to run the commands in this tutorial. Even if none of those benefits would exists, it won’t be that much of a problem since you could create and tears down the services within a minute with terraform destroy which would incurs a few cents of usage.

Finally, make sure that you install the Azure CLI command line tool.

Install Terraform

The next step is to install Terraform on your local computer.

Terraform is an infrastructure-as-code (IaC) tool that allows users to define and manage their cloud infrastructure in a declarative manner (i.e. the infrastructure that is described in a Terraform file is the end-state of that infrastructure in the Cloud). It automates the process of provisioning and managing resources across various cloud providers, enabling consistent and reproducible deployments.

Using Terraform

This blog post is not meant to be an introduction to Terraform, so I will only cover the key commands that  I will be using. There are excellent documentation by HashiCorp for developers and there are excellent books such as Terraform: Up and Running: Writing Infrastructure as Code by Yevgeniy Brikman.

The commands we will be using in this post are:

  • terraform plan: It is used to preview the changes that Terraform will make to the infrastructure. It analyzes the configuration files and compares the desired state with the current state of the resources. It provides a detailed report of what will be added, modified, or deleted. It does not make any actual changes to the infrastructure.

  • terraform apply: It is used to apply the changes defined in the Terraform configuration files to the actual infrastructure. It will do the same as terraform plan, but at the end of the process it will prompt for confirmation before making any modifications. When we say yes, then all hells are breaking loose in the Cloud and the changes are applied by Terraform.

  • terraform destroy: It is used to destroy all the resources created and managed by Terraform. It effectively removes the infrastructure defined in the configuration files. It prompts for confirmation before executing the destruction.

Terraform file to deploy Hugging Face models on Azure

Now, let’s analyze the terraform file that tells Terraform how to create the infrastructure required to run the translation service in the Cloud.

Terraform Block

This terraform block is used to define the specific versions of Terraform and its providers. This ensure the reproducibility of the service over time, just like all the set versions of the libraries used for the translation service in Python.

terraform {
  required_version = ">= 1.5.6" 

  required_providers {
    azurerm = {
      source  = "hashicorp/azurerm"
      version = ">= 3.71.0"
    }
    null = {
      source  = "hashicorp/null"
      version = ">= 3.2.1"
    }    
  }
}

AzureRM Provider Block

This block configures the AzureRM provider. The skip_provider_registration prevents the provider from attempting automatic registration. The features {} specifies that no additional features for the provider are required for this demo.

provider "azurerm" {
  skip_provider_registration = "true"
  features {}
}

Resource Group Block

This block creates an Azure Resource Group (ARG) named translationarg in the eastus region. The resource group is what is used to bundle all the other resources we will require for the translation service.

resource "azurerm_resource_group" "acr" {
  name     = "translationarg"
  location = "eastus"
}

Container Registry Block

This block creates an Azure Container Registry (ACR) named translationacr. It associates the ACR with the previously defined resource group, in the same region. The ACR is set to the “Standard” SKU. admin_enabled allows admin access to the registry.

resource "azurerm_container_registry" "acr" {
  name                     = "translationacr"
  resource_group_name      = azurerm_resource_group.acr.name
  location                 = azurerm_resource_group.acr.location
  sku                      = "Standard"
  admin_enabled            = true
}

Null Resource for Building and Pushing Docker Image

This block uses the Null Provider and defines a null_resource used for building and pushing the Docker image where the translation service is deployed. It has a dependence on the creation of the Azure Container Registry, which means that the ACR needs to be created before this resource. The triggers section is set to a timestamp, ensuring the Docker build is triggered on every Terraform apply. The local-exec provisioner runs the specified shell commands for building, tagging, and pushing the Docker image.

resource "null_resource" "build_and_push_image" {
  depends_on = [azurerm_container_registry.acr]

  triggers = {
    # Add a trigger to detect changes in your Docker build context
    # The timestamp forces Terraform to trigger the Docker build,
    # every time terraform is applied. The check to see if anything
    # needs to be updated in the Docker container is delegated
    # to Docker.
    build_trigger = timestamp()
  }

  provisioner "local-exec" {
    # Replace with the commands to build and push your Docker image to the ACR
    command = <<EOT
      # Build the Docker image
      docker build -t en-fr-translation-service:v1 ../../
      
      # Log in to the ACR
      az acr login --name translationacr
      
      # Tag the Docker image for ACR
      docker tag en-fr-translation-service:v1 translationacr.azurecr.io/en-fr-translation-service:v1
      
      # Push the Docker image to ACR
      docker push translationacr.azurecr.io/en-fr-translation-service:v1
    EOT
  }
}

Container Group Block

This block creates an Azure Container Group (ACG). This is the resource used to create a container instance from a Docker container. It depends on the null_resource above for creating the image of the container and to make it available to the ACG.

The lifecycle block ensures that this container group is replaced when the Docker image is updated. Various properties like name, location, resource group, IP address type, DNS label, and operating system are specified. The image_registry_credential section provides authentication details for the Azure Container Registry. A container is defined with its name, image, CPU, memory, and port settings. Those CPU and Memory are required for the service with the current model that is embedded in the Docker container. Lowering those values may result in the container instance to die silently with a out of memory error.

resource "azurerm_container_group" "acr" {
  depends_on = [null_resource.build_and_push_image]

  lifecycle {
    replace_triggered_by = [
      # Replace `azurerm_container_group` each time this instance of
      # the the Docker image is replaced.
      null_resource.build_and_push_image.id
    ]
  }

  name                = "translation-container-instance"
  location            = azurerm_resource_group.acr.location
  resource_group_name = azurerm_resource_group.acr.name
  ip_address_type     = "Public"
  dns_name_label      = "en-fr-translation-service"
  restart_policy      = "Never"
  os_type             = "Linux"

  image_registry_credential {
     username = azurerm_container_registry.acr.admin_username
     password = azurerm_container_registry.acr.admin_password
    server   = "translationacr.azurecr.io"
  }

  container {
    name   = "en-fr-translation-service-container"
    image  = "translationacr.azurecr.io/en-fr-translation-service:v1"
    cpu    = 4
    memory = 8

    ports {
      protocol = "TCP"
      port     = 6000
    }
  }

  tags = {
    environment = "development"
  }
}

Deploying the English/French Translation Service on Azure

Now that we have a Terraform file that does all the work for us, how can we deploy the service on Azure?

As simply as running this command line from the /terraform/deploy/ folder:

terraform apply

Once we run that command, Terraform will analyze the file, and show everything that will changes in the Cloud infrastructure. In this case, we start from scratch, so all those resources will be created (none will change nor be destroyed):

All the resources will then be created by Terraform. Those resources are created by communicating with Azure’s web service API. The output of each step is displayed in the terminal. The entire process to deploy four resources took about 12 minutes, 4 of which is to create the Docker image and 3 to create the Cloud resources and deploy the service. Most of the time is spent dealing with the somewhat big translation models that we baked in the Docker image:

Testing the Translation Service on Azure

The next step is to test the service we just created on Azure.

curl "http://en-fr-translation-service.eastus.azurecontainer.io:6000/translate/fr/en/" -H "Content-Type: application/json" -d '{"fr_text":"Bonjour le monde!"}'

The result we get from the service:

{
  "en_text": "Hello, world!"
}

It works! (well, why would I have spent the time to write this post if it didn’t?)

A single command in your terminal to:

  1. Package a translation service and powerful translation models into a container image
  2. Creating a complete cloud infrastructure to support the service
  3. Deploy the image on the infrastructure and start the service

If this is not like magic, I wonder what that is.

Destroying Cloud Infrastructure

The last step is to destroy the entire infrastructure such that we don’t incur costs for those tests. The only thing that is required is to run the following Terraform command:

terraform destroy

Just like with terraform apply, Terraform will check the current state of the cloud infrastructure (which is defined in the terraform.tfstate JSON file), will show all the resources that will be destroyed, and ask the user to confirm that they want to proceed by answering yes:

Linter

I would recommend that you always run your Terraform through a linter. There are several of them existing, none of them are mutually exclusive. Three popular ones are tflint, Checkov and Trivy. Checkov and Trivy are more focused on security risks. 

For this blog post, I will only focus on tflint. Once you installed it, you can run it easily from your terminal:

tflint

If I run that command from the /terraform/deploy/ folder, and if I remove the Terraform version from the Terraform block, tflint will return the following error:

You can then follow the link to the Github documentation to understand what the error means and how to fix it.

Run Linter every time you update your repository

The final step is to create a new Github Action that will be triggered every time the main is modified. I simply had to use the setup-tflint action from the marketplace, add it to my repository, and to push it to  GitHub to run it every time the main branch is modified. 

Here is what it looks like when it runs:

Conclusion

This is what finalizes the series of blog posts related to the creation of an English/French translation web service endpoint using Hugging Face models.

As we can see, the current state state of the DevOps and machine learning echo system enables us to create powerful web services, in very little amount of time, with minimal efforts, while following engineering best practices.

None of this would have been as simple and fast just a few years ago. Just think about the amount of work necessary, by millions of people and thousands of business over the years to enable Fred to spawn a translation service in the Cloud, that anyone can access, with a single command in my laptop terminal.