Data Reliability Engineering

I am happy to be able to share about one of the things that I have been up to since I started working at Dayforce. What Is that thing?

Data Reliability Engineering

I had the opportunity to put in place a new functional area called Data Reliability Engineering. This may look good, but you may wonder what this thing is about.

Data Reliability Engineering (DRE) can be seen as a child of Site Reliability Engineering (SRE). The foundation of DRE is SRE. Organizationally speaking, we embedded DRE in the SRE organization at Dayforce.

DRE is SRE for Machine Learning and Data systems.

A DRE team focuses on, and is responsible for, ensuring that data pipelines, storage, and retrieval systems are reliable, robust, and scalable. It borrows principles from software engineering, DevOps, and site reliability engineering (SRE), to apply them to data-intensive systems.

The goal of the team is to ensure that data, which is a critical business asset, is consistently available, accurate, and timely available for different processes such as auditing, machine learning data training, analysis, and to different stakeholders such as data scientists, ML engineers, data analysts, etc.

A DRE team makes sure that the right Data Service-Level Indicators (DSLIs) are in place, that the Data Service-Level Objectives (DSLOs) and Agreements (DSLAs) are respected and constantly monitored. It also helps with the automation of the data movements, to increase the observability of the data pipelines and data systems, with the management of incidents incurring data availability and supporting teams with all the above.

Overall, it ensures that the data used to generate analytics reports, machine learning models or any Dayforce features is accurate, reliable, and available on time.

A data reliability engineer (DRE) is a professional responsible for implementing and managing data reliability engineering principles. They act as the guardians of data integrity and availability within the organization.

The DRE team act as trusted advisors for the company, actively participating in data platform infrastructure design and scalability considerations. It is responsible for implementing and managing data reliability engineering principles. It acts as the guardian of data integrity and availability within the organization.

Move Fast by Reducing the Cost of Failure

DRE helps teams to move fast by reducing the cost of failure of Machine Learning and Data projects. Some will say that it makes it a slow start, but it pays off in the long run. We focus on development velocity in the long term, not the short, burst of work to ship features.

DRE (and SRE) helps improve the product development output.

How? By reducing the MTTR (Mean Time To Repair). That way, developers will not have to waste time cleaning up after those issues. The further down the road we discover bugs to fix, the more expensive they are.

The reliability teams are not here to slow projects down, it is quite the opposite: they are here to improve their long-term velocity, while increasing their reliability.

Data Engineer vs. Data Reliability Engineer

Data Engineers are responsible for developing data pipelines and appropriately testing their code.

Data Reliability Engineers are responsible for supporting the pipelines in production by monitoring the infrastructure and data quality.

In other words, Data Engineering teams usually perform unit and regression tests that address known or predictable data issues before the code goes to production. DRE teams instrument the production environment to detect unknown problems before impacting the end-users.

What do we do?

DRE teams have the goal of setting and maintaining standards for the accuracy and the reliability of production data, while enabling velocity for data and analytics and machine learning engineers. The DRE team is more than just reacting to machine learning and data outages, they are in charge of preemptively identifying and fixing potential problems, and producing automated ways of testing and validating data, automatically detecting PII (Personal Identifiable Information) in different areas of the ecosystem, etc.

Areas that DREs would have purview over, include:

  • Data lifecycle procedures (e.g., when, and how data gets deprecated)
  • Data SLI (Service Level Indicator), Data SLA (Service Level Agreements), Data SLO (Service Level Objective) definition and documentation
  • Data observability strategy and implementation
  • Data pipeline code review and testing
  • Helps with the automation of data movement
  • Helps with the management of data incidents
  • Data outage triage and response process
  • Automating data related processes in the infrastructure to constantly remove toil
  • Data ownership strategy and documentation
  • Education and culture-building (e.g., internal roadshow to explain data SLAs)
  • Developing guardrails around data processes to increase data reliability, availability, and privacy
  • Monitoring costs of data activities (pipelines, storage, compute, network, etc.)
  • Track the lineage of the data
  • Perform change management when data tooling changes
  • Ensure cross-team communication regarding data activities
  • Ensure PII (Personal Identifiable Information) is properly handled in the data ecosystem
  • Ensure the business is compliant with all regulations regarding data (i.e., GDPR, etc.)
  • Ensure that the Machine Learning models are versioned, reproducible, evaluated, monitored and comply with overall software engineering best practices

DRE teams do not just put out fires. They put the guardrails in place to prevent the fires from happening. They enable agility for ML engineers, analytics engineers, and data scientists, keeping them moving quickly knowing that safety guards are in place to prevent changes to the data model from impacting production. Data teams are always balancing speed with reliability. The Data Reliability Engineer owns the strategies for achieving that balance.

Literate Programming: for DevOps, MLOps and Infrastructure as Code in General

Software developers generally tells me that they don’t have to document most of anything since the code is the documentation: just read it. This is when I reply: the code tells me the how you did it (if lucky) the words around the code should tell me the why.

With the recent (last 15 years) emergence of Infrastructure as Code (IaC), new important specialized developer roles such as DevOps and now MLOps, I will argue that literate programming concepts are becoming more and more important to the software industry.

Infrastructure as Code

In the last fifteen years, we saw the emergence of several Domain Specific Languages (DSL) to help system administrators to manage and provision their infrastructure. Those DSL revolutionized the way infrastructures were created and cared for.

Infrastructures were now entirely defined in plain text files. Those files could be versioned, they would get special treatments in IDEs, complete infrastructure could be rollbacked, etc.

But, there is one special characteristics that IaC has: the side effects of the “infrastructure code” are huge because a single line can lead to provision, or destroy, huge number of hardware resources which can have dramatic physical or monetary impacts.

Importance of Documentation

In this context, I argue about the importance of literate programming principles to code and maintain IaC. Some of the DSL are very opaque, a very small change can have dramatic side effects. IaC also has deal with versions of several tens, if not hundred, pieces of software that have to work together. IaC creates very complex networks of computers in different regions of the World.

None of that is self evident in code written in those DSL. The why needs to be documented very carefully, and documentation needs to be as close as possible to the DSLs code because every time something changes in the infrastructure, the change needs to be reflected in the text that describes the rational of that piece of infrastructure. And finally, both the how and the why will be carefully peer reviewed in a pull request. 

Org-mode: Agnostic Literate Programming Framework

Considering that there exists a specific DSL per framework (Terraform, Ansible, Docker, Puppet, Chef, etc.) it is important to have a literate programming framework that is language agnostic (unlike CWeb, nbdev, etc.). This is why I strongly support Org-mode. If the DevOps/MLOps developers works within Emacs, they have all the power of all the major modes already existing in Emacs to manipulate the code of those DSL within the code blocks. If they don’t, they can always use their favorite IDE with a Org-mode command line utility like OrgWeb.

Few Examples

Let’s take a look at what it looks like in the wild. Here are two examples, one that describes a Dockerfile and a series of Ansible playbooks, properly rendered in GitHub.

Literate Dockerfile

The first example is orgweb’s Docker.org file where the Dockerfile if generated. As you can see, everything of importance about the generated Docker image is stated. The version of Alpine Linux used, which version of Emacs is shipped with, the reason why we choose Alpine in the first place, etc.

Then it explains why the Dockerfile needs to install the tf-dejavu package, and what happens if it is not installed. And then it explains why the install.el and site-start.el files are being copied over and what they are used for. And finally, why install.el is being run while building the image.

Literate Ansible

Here is another example from a project I stumbled upon recently. This repository is a set of Ansible playbook to provision a series of infrastructure resources such as a docker registry, longhorn, etc.

How to Deploy Hugging Face Models in Azure using Terraform and Docker

In a previous blog post, I explained how we can easily deploy Hugging Face models in Docker containers. In this new post, I will explain how we can easily deploy that container in Azure using Terraform. At the end of this article, we will have end-to-end process that creates a translation service, containerize, deploy in the cloud and that is readily available on the Web in a single command in your terminal.

Create Free Azure Account

If you don’t currently have access to an Azure account, you can easily create one for free here. You get a series of popular services for free for 12 months, 55 services free forever and 200$ USD in credit for a month. This is more than enough to run the commands in this tutorial. Even if none of those benefits would exists, it won’t be that much of a problem since you could create and tears down the services within a minute with terraform destroy which would incurs a few cents of usage.

Finally, make sure that you install the Azure CLI command line tool.

Install Terraform

The next step is to install Terraform on your local computer.

Terraform is an infrastructure-as-code (IaC) tool that allows users to define and manage their cloud infrastructure in a declarative manner (i.e. the infrastructure that is described in a Terraform file is the end-state of that infrastructure in the Cloud). It automates the process of provisioning and managing resources across various cloud providers, enabling consistent and reproducible deployments.

Using Terraform

This blog post is not meant to be an introduction to Terraform, so I will only cover the key commands that  I will be using. There are excellent documentation by HashiCorp for developers and there are excellent books such as Terraform: Up and Running: Writing Infrastructure as Code by Yevgeniy Brikman.

The commands we will be using in this post are:

  • terraform plan: It is used to preview the changes that Terraform will make to the infrastructure. It analyzes the configuration files and compares the desired state with the current state of the resources. It provides a detailed report of what will be added, modified, or deleted. It does not make any actual changes to the infrastructure.

  • terraform apply: It is used to apply the changes defined in the Terraform configuration files to the actual infrastructure. It will do the same as terraform plan, but at the end of the process it will prompt for confirmation before making any modifications. When we say yes, then all hells are breaking loose in the Cloud and the changes are applied by Terraform.

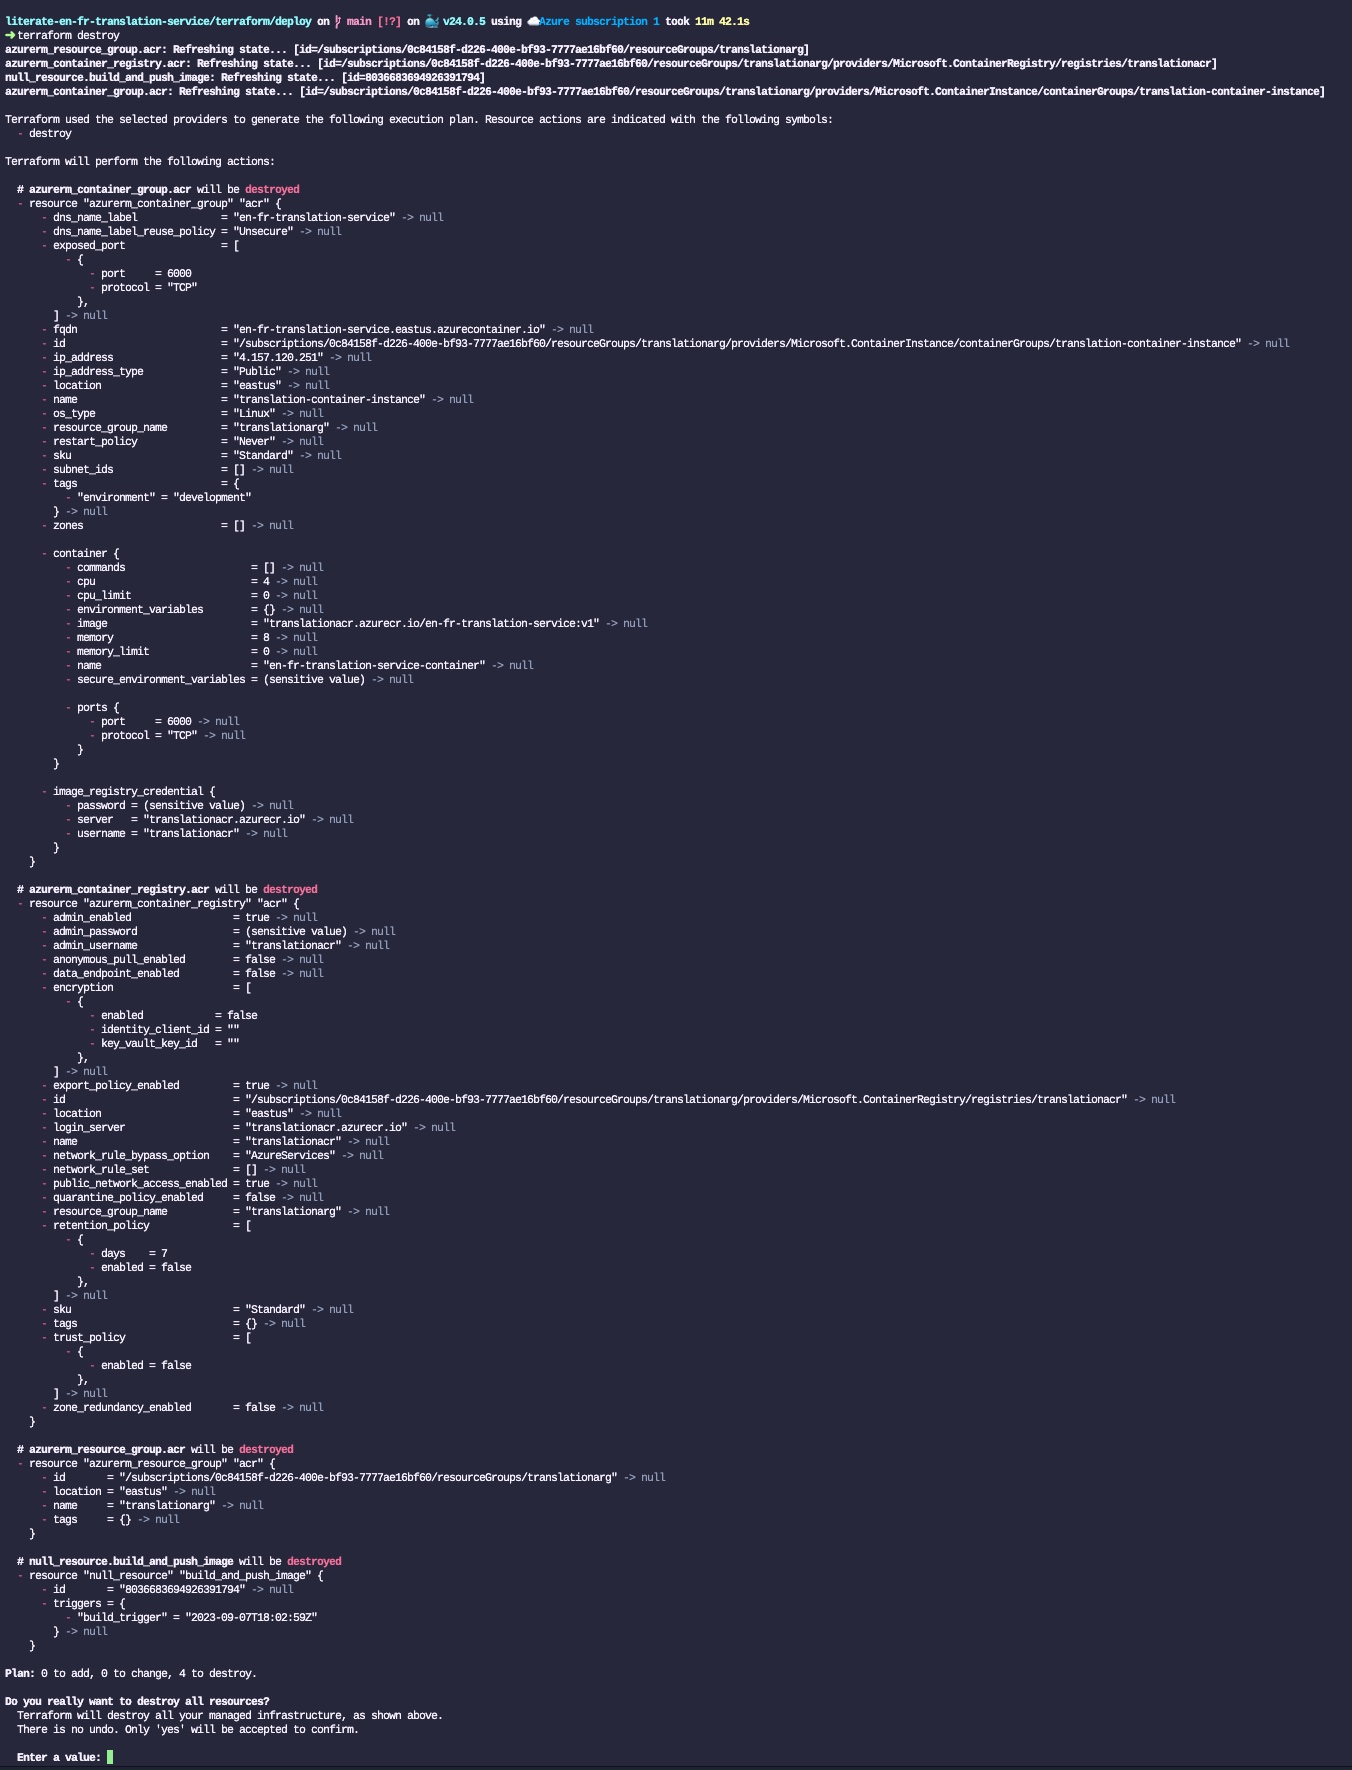
  • terraform destroy: It is used to destroy all the resources created and managed by Terraform. It effectively removes the infrastructure defined in the configuration files. It prompts for confirmation before executing the destruction.

Terraform file to deploy Hugging Face models on Azure

Now, let’s analyze the terraform file that tells Terraform how to create the infrastructure required to run the translation service in the Cloud.

Terraform Block

This terraform block is used to define the specific versions of Terraform and its providers. This ensure the reproducibility of the service over time, just like all the set versions of the libraries used for the translation service in Python.

terraform {
  required_version = ">= 1.5.6" 

  required_providers {
    azurerm = {
      source  = "hashicorp/azurerm"
      version = ">= 3.71.0"
    }
    null = {
      source  = "hashicorp/null"
      version = ">= 3.2.1"
    }    
  }
}

AzureRM Provider Block

This block configures the AzureRM provider. The skip_provider_registration prevents the provider from attempting automatic registration. The features {} specifies that no additional features for the provider are required for this demo.

provider "azurerm" {
  skip_provider_registration = "true"
  features {}
}

Resource Group Block

This block creates an Azure Resource Group (ARG) named translationarg in the eastus region. The resource group is what is used to bundle all the other resources we will require for the translation service.

resource "azurerm_resource_group" "acr" {
  name     = "translationarg"
  location = "eastus"
}

Container Registry Block

This block creates an Azure Container Registry (ACR) named translationacr. It associates the ACR with the previously defined resource group, in the same region. The ACR is set to the “Standard” SKU. admin_enabled allows admin access to the registry.

resource "azurerm_container_registry" "acr" {
  name                     = "translationacr"
  resource_group_name      = azurerm_resource_group.acr.name
  location                 = azurerm_resource_group.acr.location
  sku                      = "Standard"
  admin_enabled            = true
}

Null Resource for Building and Pushing Docker Image

This block uses the Null Provider and defines a null_resource used for building and pushing the Docker image where the translation service is deployed. It has a dependence on the creation of the Azure Container Registry, which means that the ACR needs to be created before this resource. The triggers section is set to a timestamp, ensuring the Docker build is triggered on every Terraform apply. The local-exec provisioner runs the specified shell commands for building, tagging, and pushing the Docker image.

resource "null_resource" "build_and_push_image" {
  depends_on = [azurerm_container_registry.acr]

  triggers = {
    # Add a trigger to detect changes in your Docker build context
    # The timestamp forces Terraform to trigger the Docker build,
    # every time terraform is applied. The check to see if anything
    # needs to be updated in the Docker container is delegated
    # to Docker.
    build_trigger = timestamp()
  }

  provisioner "local-exec" {
    # Replace with the commands to build and push your Docker image to the ACR
    command = <<EOT
      # Build the Docker image
      docker build -t en-fr-translation-service:v1 ../../
      
      # Log in to the ACR
      az acr login --name translationacr
      
      # Tag the Docker image for ACR
      docker tag en-fr-translation-service:v1 translationacr.azurecr.io/en-fr-translation-service:v1
      
      # Push the Docker image to ACR
      docker push translationacr.azurecr.io/en-fr-translation-service:v1
    EOT
  }
}

Container Group Block

This block creates an Azure Container Group (ACG). This is the resource used to create a container instance from a Docker container. It depends on the null_resource above for creating the image of the container and to make it available to the ACG.

The lifecycle block ensures that this container group is replaced when the Docker image is updated. Various properties like name, location, resource group, IP address type, DNS label, and operating system are specified. The image_registry_credential section provides authentication details for the Azure Container Registry. A container is defined with its name, image, CPU, memory, and port settings. Those CPU and Memory are required for the service with the current model that is embedded in the Docker container. Lowering those values may result in the container instance to die silently with a out of memory error.

resource "azurerm_container_group" "acr" {
  depends_on = [null_resource.build_and_push_image]

  lifecycle {
    replace_triggered_by = [
      # Replace `azurerm_container_group` each time this instance of
      # the the Docker image is replaced.
      null_resource.build_and_push_image.id
    ]
  }

  name                = "translation-container-instance"
  location            = azurerm_resource_group.acr.location
  resource_group_name = azurerm_resource_group.acr.name
  ip_address_type     = "Public"
  dns_name_label      = "en-fr-translation-service"
  restart_policy      = "Never"
  os_type             = "Linux"

  image_registry_credential {
     username = azurerm_container_registry.acr.admin_username
     password = azurerm_container_registry.acr.admin_password
    server   = "translationacr.azurecr.io"
  }

  container {
    name   = "en-fr-translation-service-container"
    image  = "translationacr.azurecr.io/en-fr-translation-service:v1"
    cpu    = 4
    memory = 8

    ports {
      protocol = "TCP"
      port     = 6000
    }
  }

  tags = {
    environment = "development"
  }
}

Deploying the English/French Translation Service on Azure

Now that we have a Terraform file that does all the work for us, how can we deploy the service on Azure?

As simply as running this command line from the /terraform/deploy/ folder:

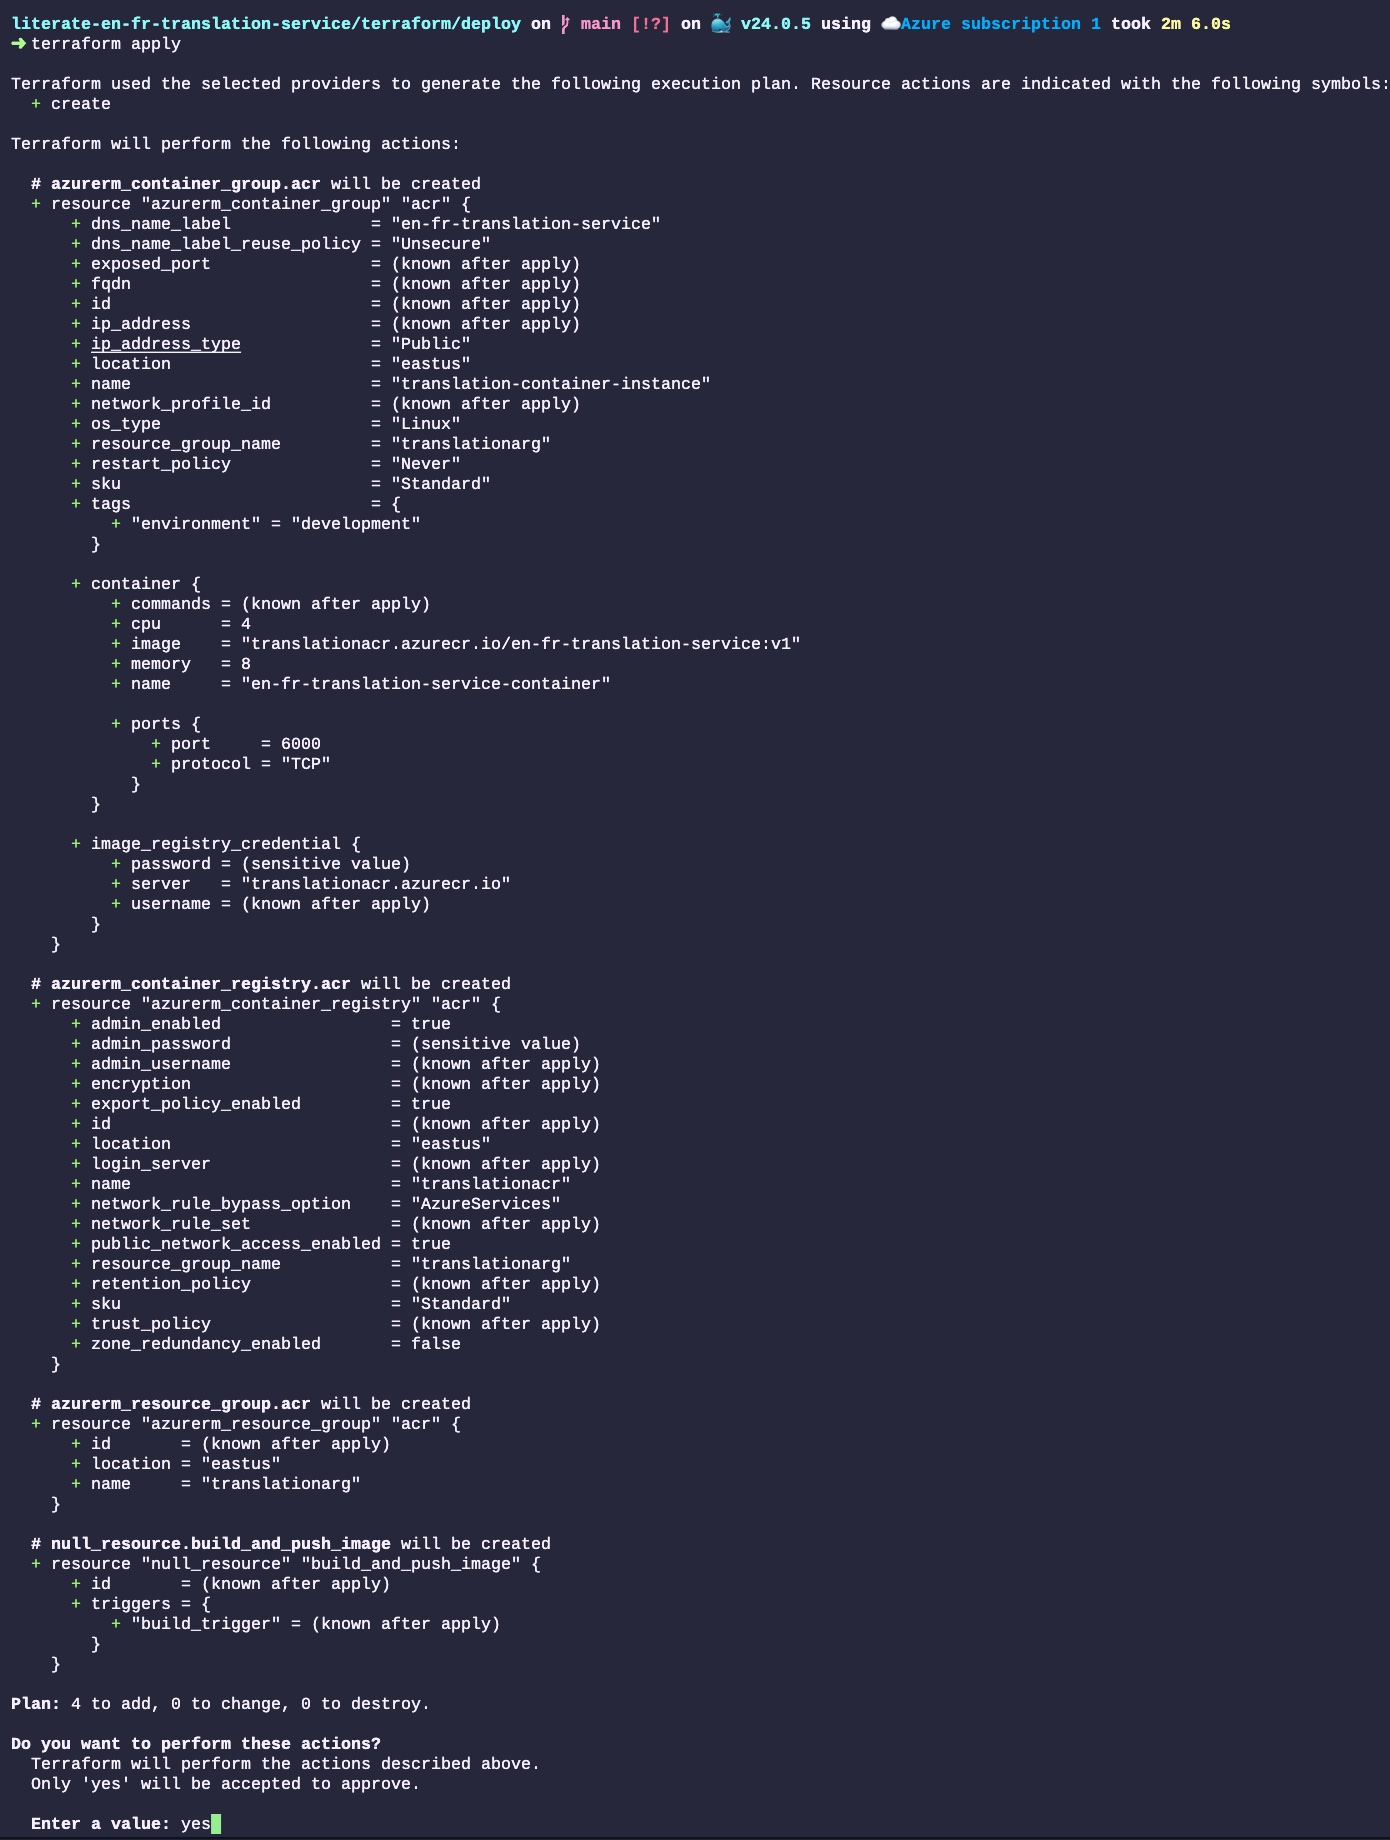
terraform apply

Once we run that command, Terraform will analyze the file, and show everything that will changes in the Cloud infrastructure. In this case, we start from scratch, so all those resources will be created (none will change nor be destroyed):

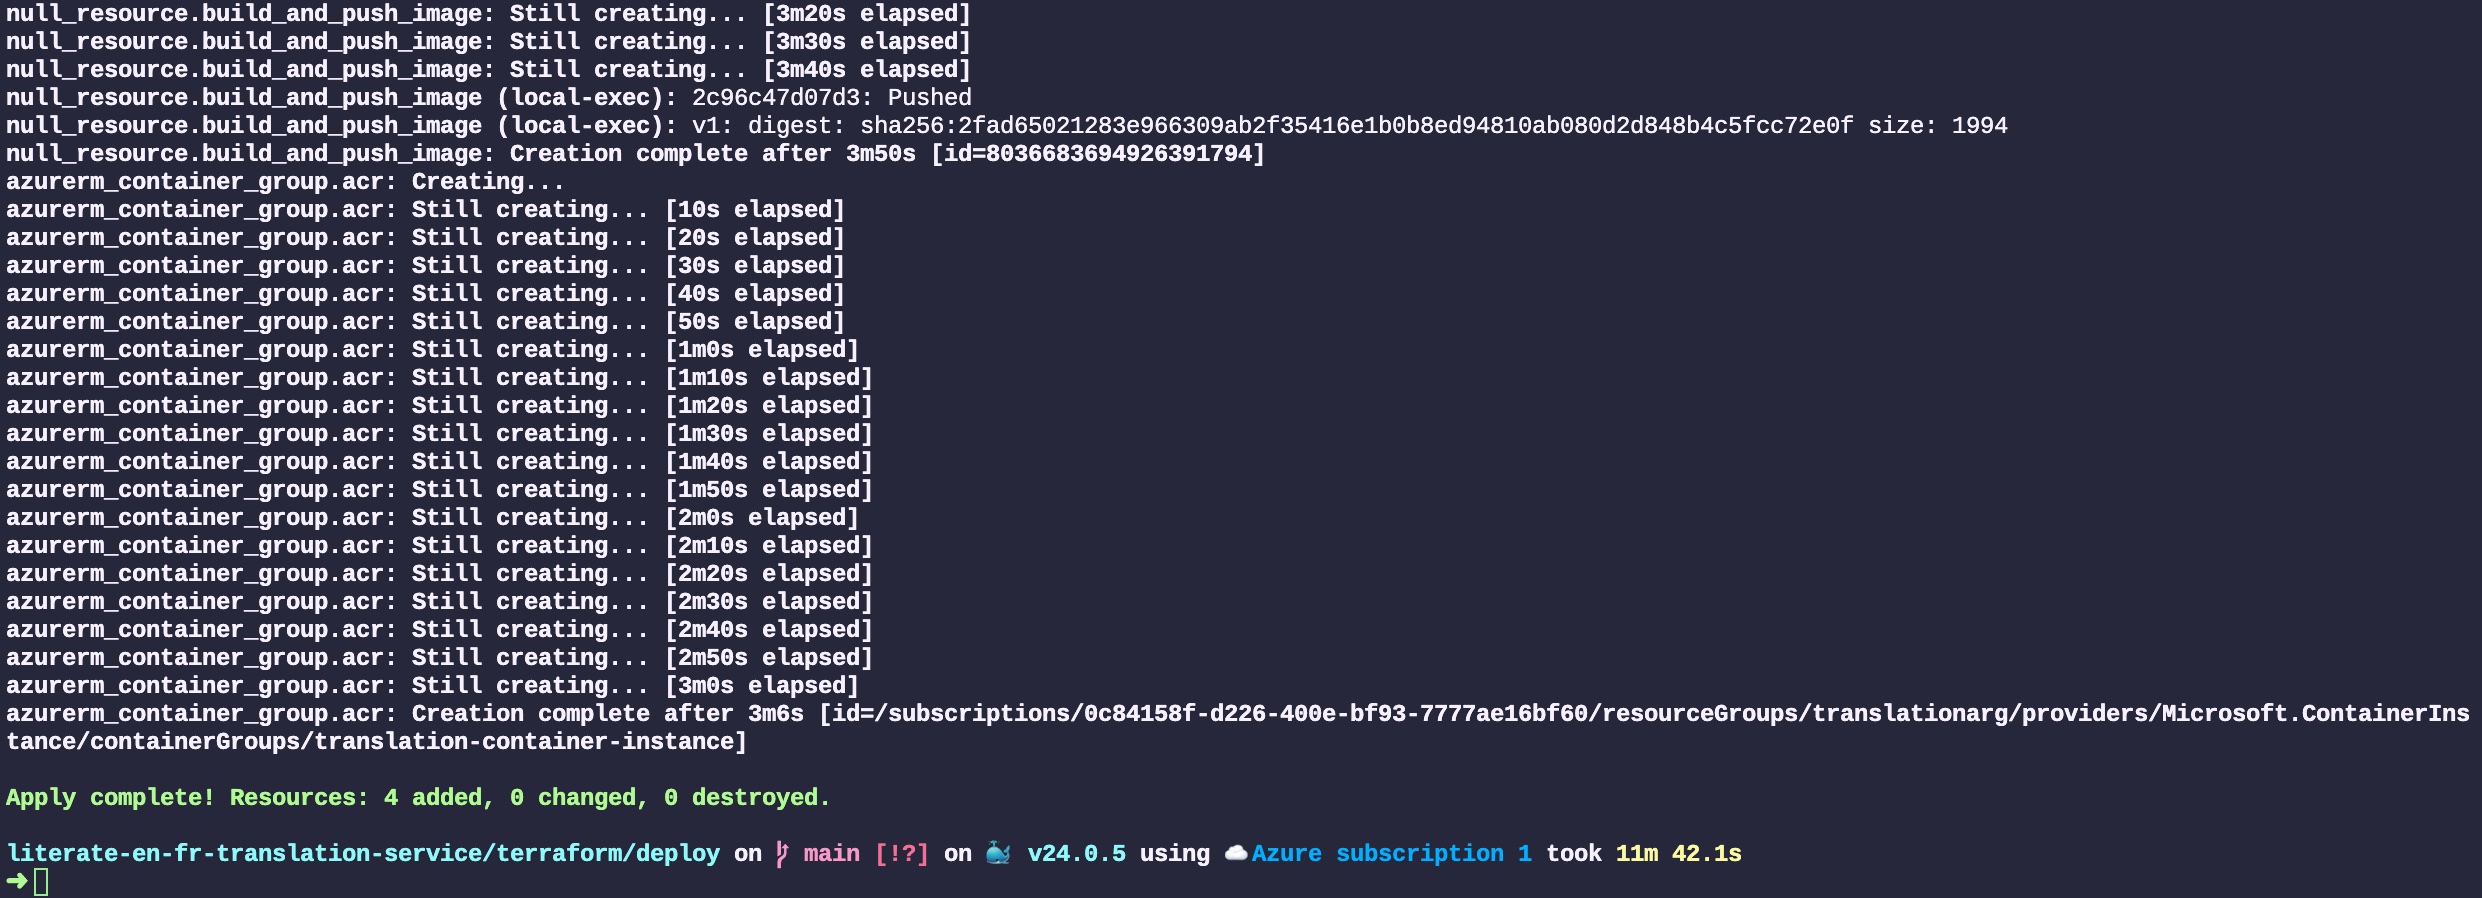
All the resources will then be created by Terraform. Those resources are created by communicating with Azure’s web service API. The output of each step is displayed in the terminal. The entire process to deploy four resources took about 12 minutes, 4 of which is to create the Docker image and 3 to create the Cloud resources and deploy the service. Most of the time is spent dealing with the somewhat big translation models that we baked in the Docker image:

Testing the Translation Service on Azure

The next step is to test the service we just created on Azure.

curl "http://en-fr-translation-service.eastus.azurecontainer.io:6000/translate/fr/en/" -H "Content-Type: application/json" -d '{"fr_text":"Bonjour le monde!"}'

The result we get from the service:

{
  "en_text": "Hello, world!"
}

It works! (well, why would I have spent the time to write this post if it didn’t?)

A single command in your terminal to:

  1. Package a translation service and powerful translation models into a container image
  2. Creating a complete cloud infrastructure to support the service
  3. Deploy the image on the infrastructure and start the service

If this is not like magic, I wonder what that is.

Destroying Cloud Infrastructure

The last step is to destroy the entire infrastructure such that we don’t incur costs for those tests. The only thing that is required is to run the following Terraform command:

terraform destroy

Just like with terraform apply, Terraform will check the current state of the cloud infrastructure (which is defined in the terraform.tfstate JSON file), will show all the resources that will be destroyed, and ask the user to confirm that they want to proceed by answering yes:

Linter

I would recommend that you always run your Terraform through a linter. There are several of them existing, none of them are mutually exclusive. Three popular ones are tflint, Checkov and Trivy. Checkov and Trivy are more focused on security risks. 

For this blog post, I will only focus on tflint. Once you installed it, you can run it easily from your terminal:

tflint

If I run that command from the /terraform/deploy/ folder, and if I remove the Terraform version from the Terraform block, tflint will return the following error:

You can then follow the link to the Github documentation to understand what the error means and how to fix it.

Run Linter every time you update your repository

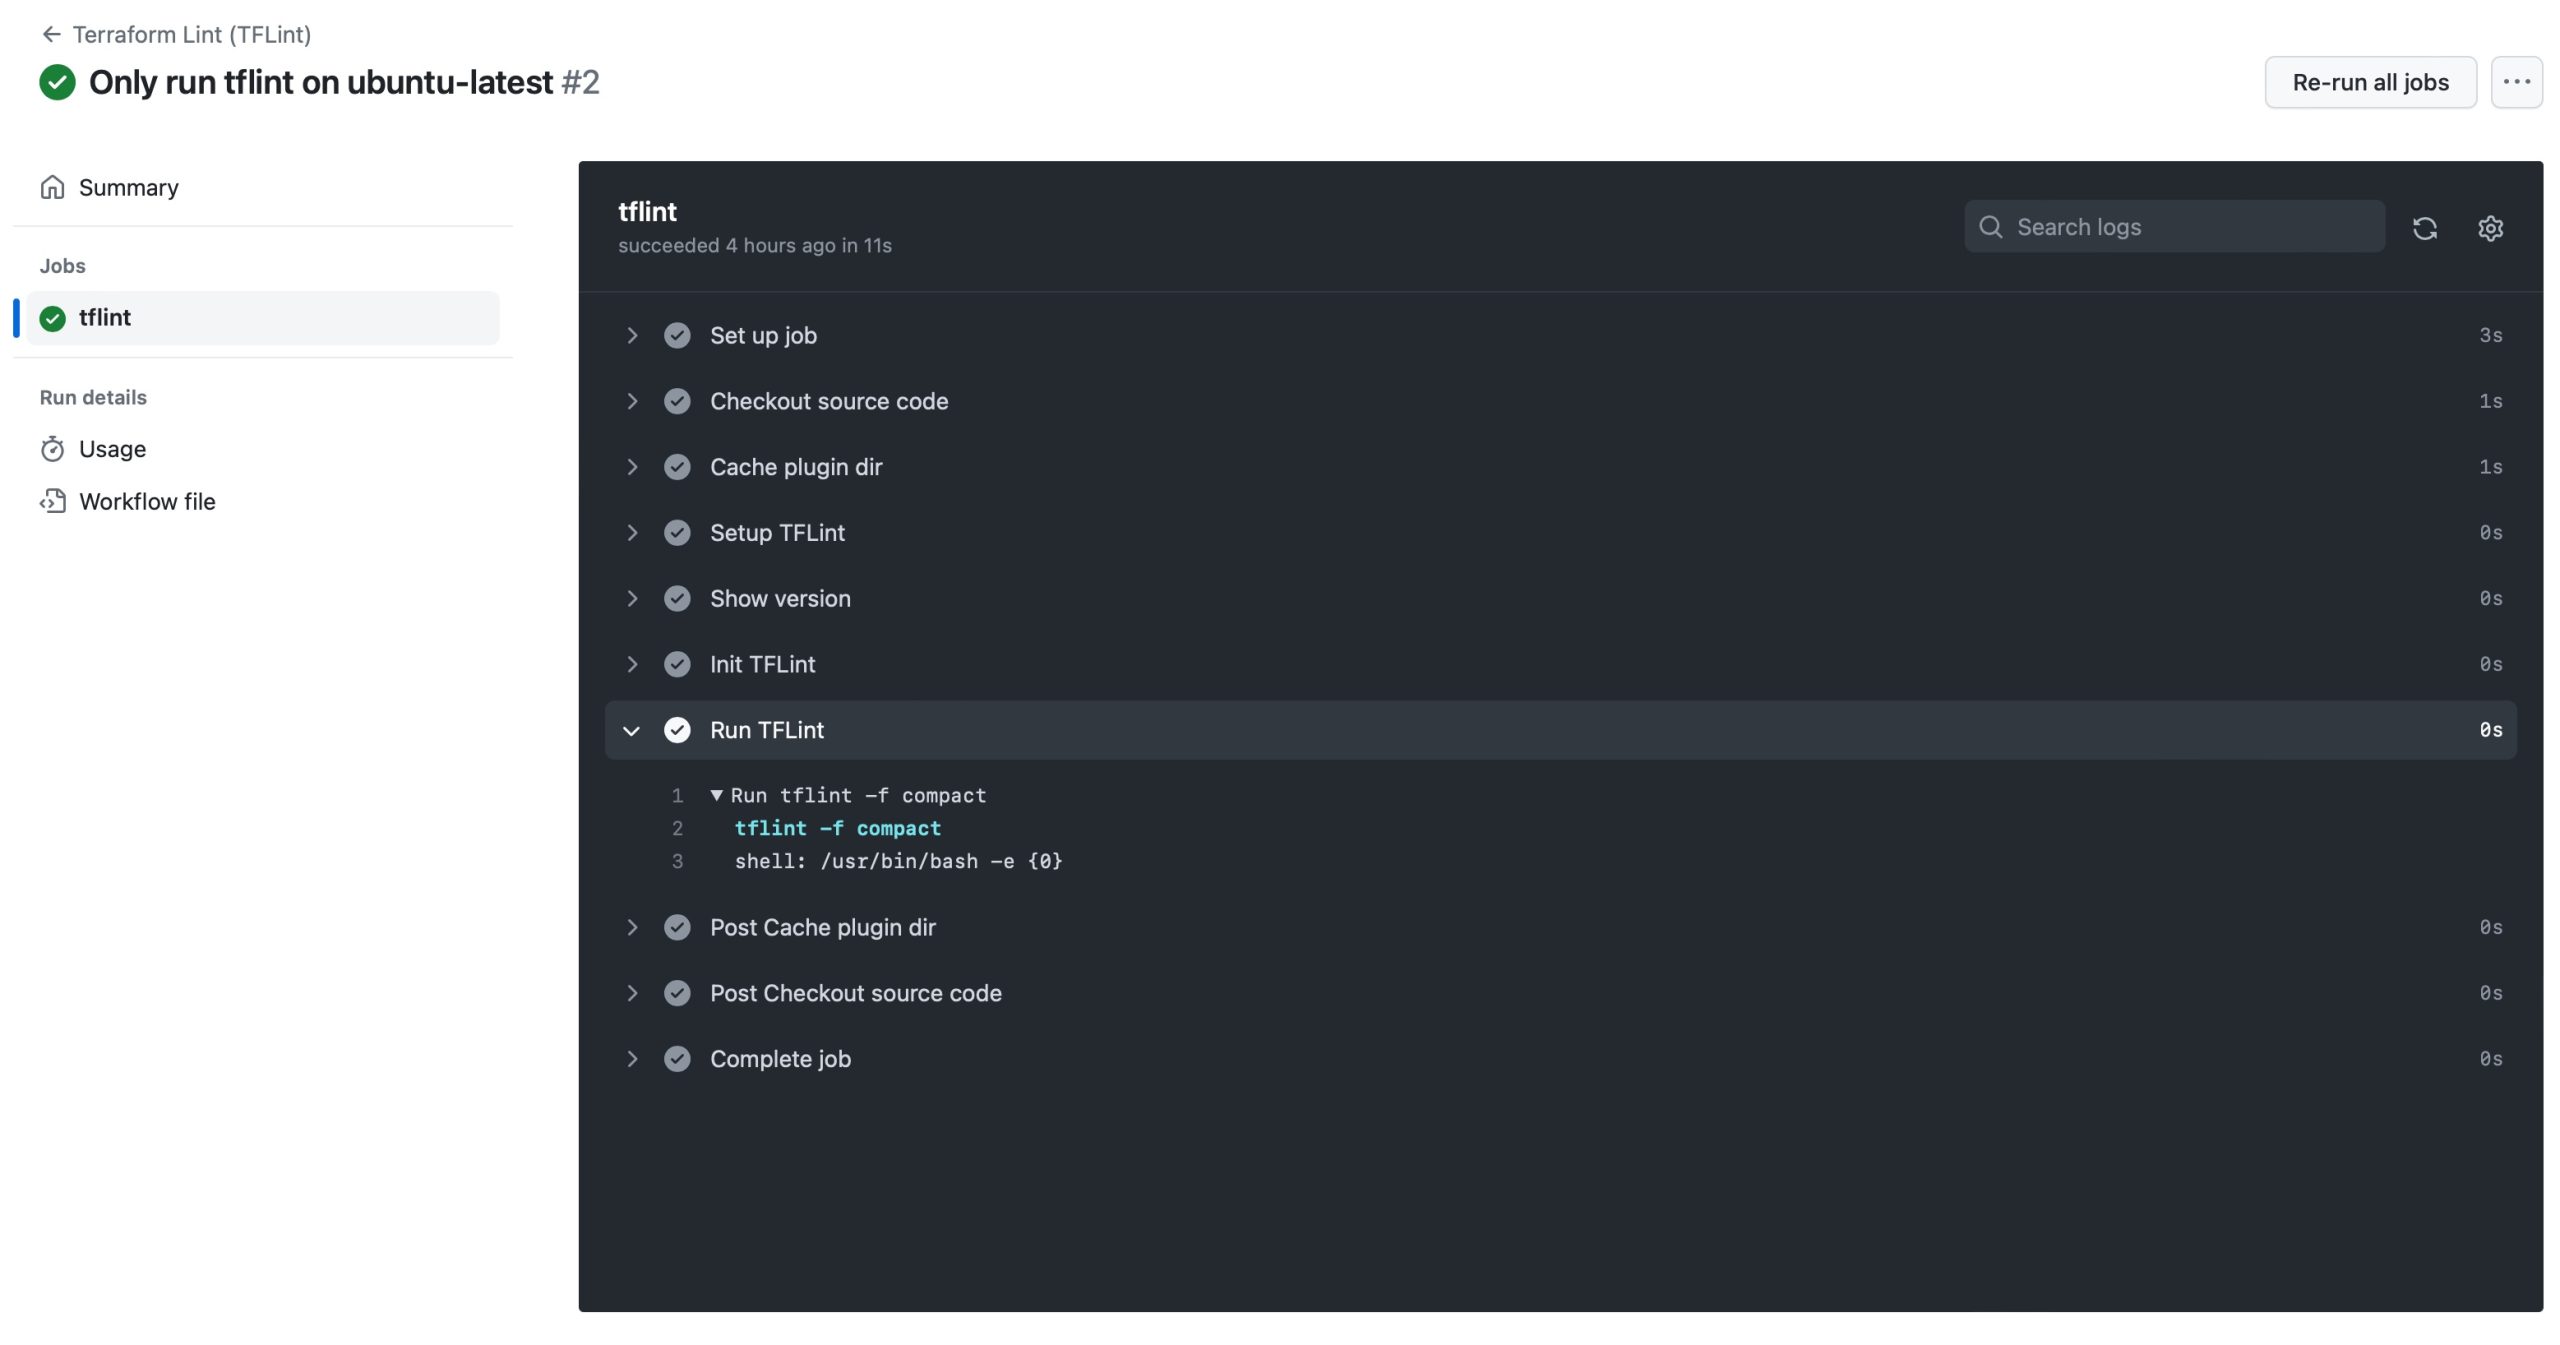
The final step is to create a new Github Action that will be triggered every time the main is modified. I simply had to use the setup-tflint action from the marketplace, add it to my repository, and to push it to  GitHub to run it every time the main branch is modified. 

Here is what it looks like when it runs:

Conclusion

This is what finalizes the series of blog posts related to the creation of an English/French translation web service endpoint using Hugging Face models.

As we can see, the current state state of the DevOps and machine learning echo system enables us to create powerful web services, in very little amount of time, with minimal efforts, while following engineering best practices.

None of this would have been as simple and fast just a few years ago. Just think about the amount of work necessary, by millions of people and thousands of business over the years to enable Fred to spawn a translation service in the Cloud, that anyone can access, with a single command in my laptop terminal.

Literate Programming in Python using NBDev

Donald Knuth considered that, of all his work on typography, the idea of literate programming had the greatest impact on him. This is a strong and profound statement that seems to be underestimated by history.

Literate programming has grown on me in such a way that I now have a hard time developing in a framework that is not literate. I need to be able to organize my ideas, my code, and its documentation the way I want, not in the way the programming language or library designers intend. I need that flexibility flexibility to be as effective as possible in my work; otherwise, I feel that something is missing.

Since 2016, I have been practicing literate programming using Org-Mode within Emacs. As of today, I have not yet found another tool as powerful as Org-Mode within Emacs for developing literate applications. It employs a simple plain text format with clean markup, making it easy to commit and suitable for peer review. However, when used in Emacs/Org-Mode and enhanced with Babel, developers end up with one of the most robust notebook systems imaginable, capable of facilitating effective literate programming.

However, the challenge lies in the tooling, particularly Emacs. I have been fortunate enough to build teams that worked with Emacs, allowing us to undertake projects in a literate manner. Yet, this was the exception rather than the norm.

Exploration

I recently invested time in exploring the latest developments in the Literate Programming tooling space. I aimed to find a solution that would bring me closer to the experience of Org-mode + Emacs, but without the friction associated with Emacs for general developers.

In 2016, all my development work was conducted in Clojure. Clojure developers naturally gravitated toward Emacs due to Cider. Nowadays, I work extensively with Python and configuration files. Consequently, I began researching the current state of the literate programming ecosystem. My search began with two keywords: Python and VS Code.

This research led me to discover a relatively new project (initiated a few years ago) called nbdev, developed by fast.ai (Jeremy Howard, Hamel Husain, and a few other contributors).

nbdev is an incredibly intriguing project. It leverages several existing open-source projects to build a new literate programming framework from the ground up: it employs Jupyter notebooks as the format for writing software (in contrast to a plain text format like Org-Mode). The Quarto tool is used to generate documentation from the codebase. Additionally, nbdev provides a range of tools for running tests, creating vanilla GitHub projects with built-in actions for automated deployment, and more. Due to its reliance on Jupyter, this literate workflow is Python-centric and can be developed using a simple browser or VS Code, complemented by the constantly improving Jupyter extension. There’s even an experimental nbdev extension available.

For this blog post, I will convert the en-fr-translation-service project I recently blogged about to use nbdev. Finally, based on my experience with Org-mode, I will propose some potential improvements to the project.

Creating a Vanilla nbdev (Notebook Dev) Project

The first step is to create a new vanilla literate-en-fr-translation-service GitHub repository and follow nbdev‘s End-to-End Walkthrough to create the literate version of the project. After installing jupyterlab, nbdev, and Quarto, I cloned the new repository locally and executed this command in my terminal to initialize the nbdev project:

nbdev_new

This command generated several new files in the repository:

  • .github/workflows: two GitHub actions
  • literate_en_fr_translation_service/: New module
  • nbs: where all literate notebook files reside
  • settings.ini: nbdev’s core settings file
  • …and various other auto-generated files

Once the nbdev vanilla project is complete, simply commit and push the changes to the GitHub repository:

git add .
git commit -m'Initial commit'
git push

After pushing the changes to the repository, the final step is to enable pages in your GitHub repository. Then you can verify the proper functioning of your workflows.

Development Process

The literate programming development process is straightforward yet requires a mindset shift. In the following sections, I will focus on nbdev’s specific process, which is not substantially different from other literate programming frameworks.

The entire application is developed directly within Jupyter notebooks. Each notebook defines both the application’s code and its documentation. When preparing the application, the documentation will be weaved from the Jupyter notebook and hosted as a set of GitHub Pages. Subsequently, the code will be tangled into source code files within the module’s folder:
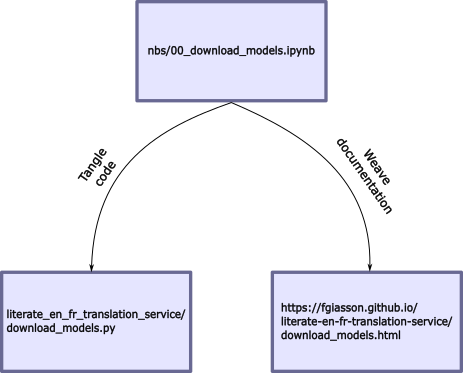
Documentation is intertwined among code boxes, and each code box has tangling instructions (indicating whether it should be part of the codebase or documentation, etc.). All the nbdev directives are accessible here.

The first step involves writing the nbs/index.ipynb file, which serves as the project’s readme. It introduces the project’s purpose, usage instructions, and more. This file becomes the initial page of your documentation.

Next, start organizing your application into different parts. In nbdev, a part is equivalent to a chapter, and a chapter is numbered. This numbering is a naming convention specific to nbdev. For our simple application, we’ll create two chapters: nbs/00_download_models.ipynb and nbs/01_main.ipynb. As you can see, the files are prefixed with numbers, acting as “chapter numbers.” These numbers help order the generated documentation’s index and provide clarity regarding the repository’s file flow.

The final step is to write each of these notebooks, focusing on both documentation (the why) and code (the how). This will be the focus of the upcoming sections.

Developing en-fr-translation-service as literate-en-fr-translation-service

The first step I took was to copy over the requirements.txt and Dockerfile to the root of the repository. Since nbdev currently only supports Python files, only that part of the application will be literate (more about this limitation later). The only change required is adjusting the paths of some files in the Dockerfile because nbdev creates a module for our application:

COPY literate_en_fr_translation_service/main.py .
COPY literate_en_fr_translation_service/download_models.py .

nbs/index.ipynb

The initial step is to create the index.ipynb file. This serves as the entry point for the generated documentation and also becomes the README.md file of the repository after running the nbdev_readme command.

This file is a simple Jupyter notebook containing a single Markdown cell where we provide an introduction to the project.

nbs/00_download_models.ipynb

The next step involves creating the 00_download_models.ipynb file. This file contains all the code and documentation related to downloading the ML models required for the translation service. Since the first task the Docker container performs upon running is downloading the translation model artifacts, I’ve prefixed the file with 00_ to signify it as the first chapter of the application.

At the top of the file, a Markdown cell should be created for the default_ext directive. This directive informs nbdev which module file the code from subsequent export and exports directives should be woven into:

#| default_exp download_models

In this case, all code from subsequent Python cells will be placed in the literate_en_fr_translation_service/download_models.py file.

Next, we add the import statements:

#| exports
from transformers import AutoTokenizer, AutoModelForSeq2SeqLM
import os

The difference between export and exports is that exports exports the code to both the code file and the documentation (the code will be displayed in a code box in the documentation). In contrast, export only adds the code to the code file and won’t appear in the documentation. For this case, we want the exports to be displayed in the documentation.

Following this, we define the download_models() function:

#| export
def download_model(model_path: str, model_name: str):
    """Download a Hugging Face model and tokenizer to the specified directory"""
    # Check if the directory already exists
    if not os.path.exists(model_path):
        os.makedirs(model_path)

    tokenizer = AutoTokenizer.from_pretrained(model_name)
    model = AutoModelForSeq2SeqLM.from_pretrained(model_name)

    # Save the model and tokenizer to the specified directory
    model.save_pretrained(model_path)
    tokenizer.save_pretrained(model_path)

In this case, we don’t intend for the code to appear in the documentation. Here, nbdev will document the function in textual form without directly including the code in the documentation.

Finally, we proceed to download the actual model artifacts:

#| exports
#| eval: false

download_model('models/en_fr/', 'Helsinki-NLP/opus-mt-en-fr')
download_model('models/fr_en/', 'Helsinki-NLP/opus-mt-fr-en')

This last code block is an interesting one that shows the flexibility of the code block directives, and their importance in the development flow. 

First, we do export the code to the codebase, and we show the two line of code in the documentation to help the user to understand how it works. But then we added an eval: false directive. Why? This is used to tell nbdev to not evaluate this code block when it tangles and weave the notebook file. Otherwise, this code would be executed, and the models artifacts would be downloaded which would add a lot of processing time and spend unnecessary bandwidth on the network. However, we want this code to appear in the codebase since the container will run that file to initialize the service with all the right models artifacts.

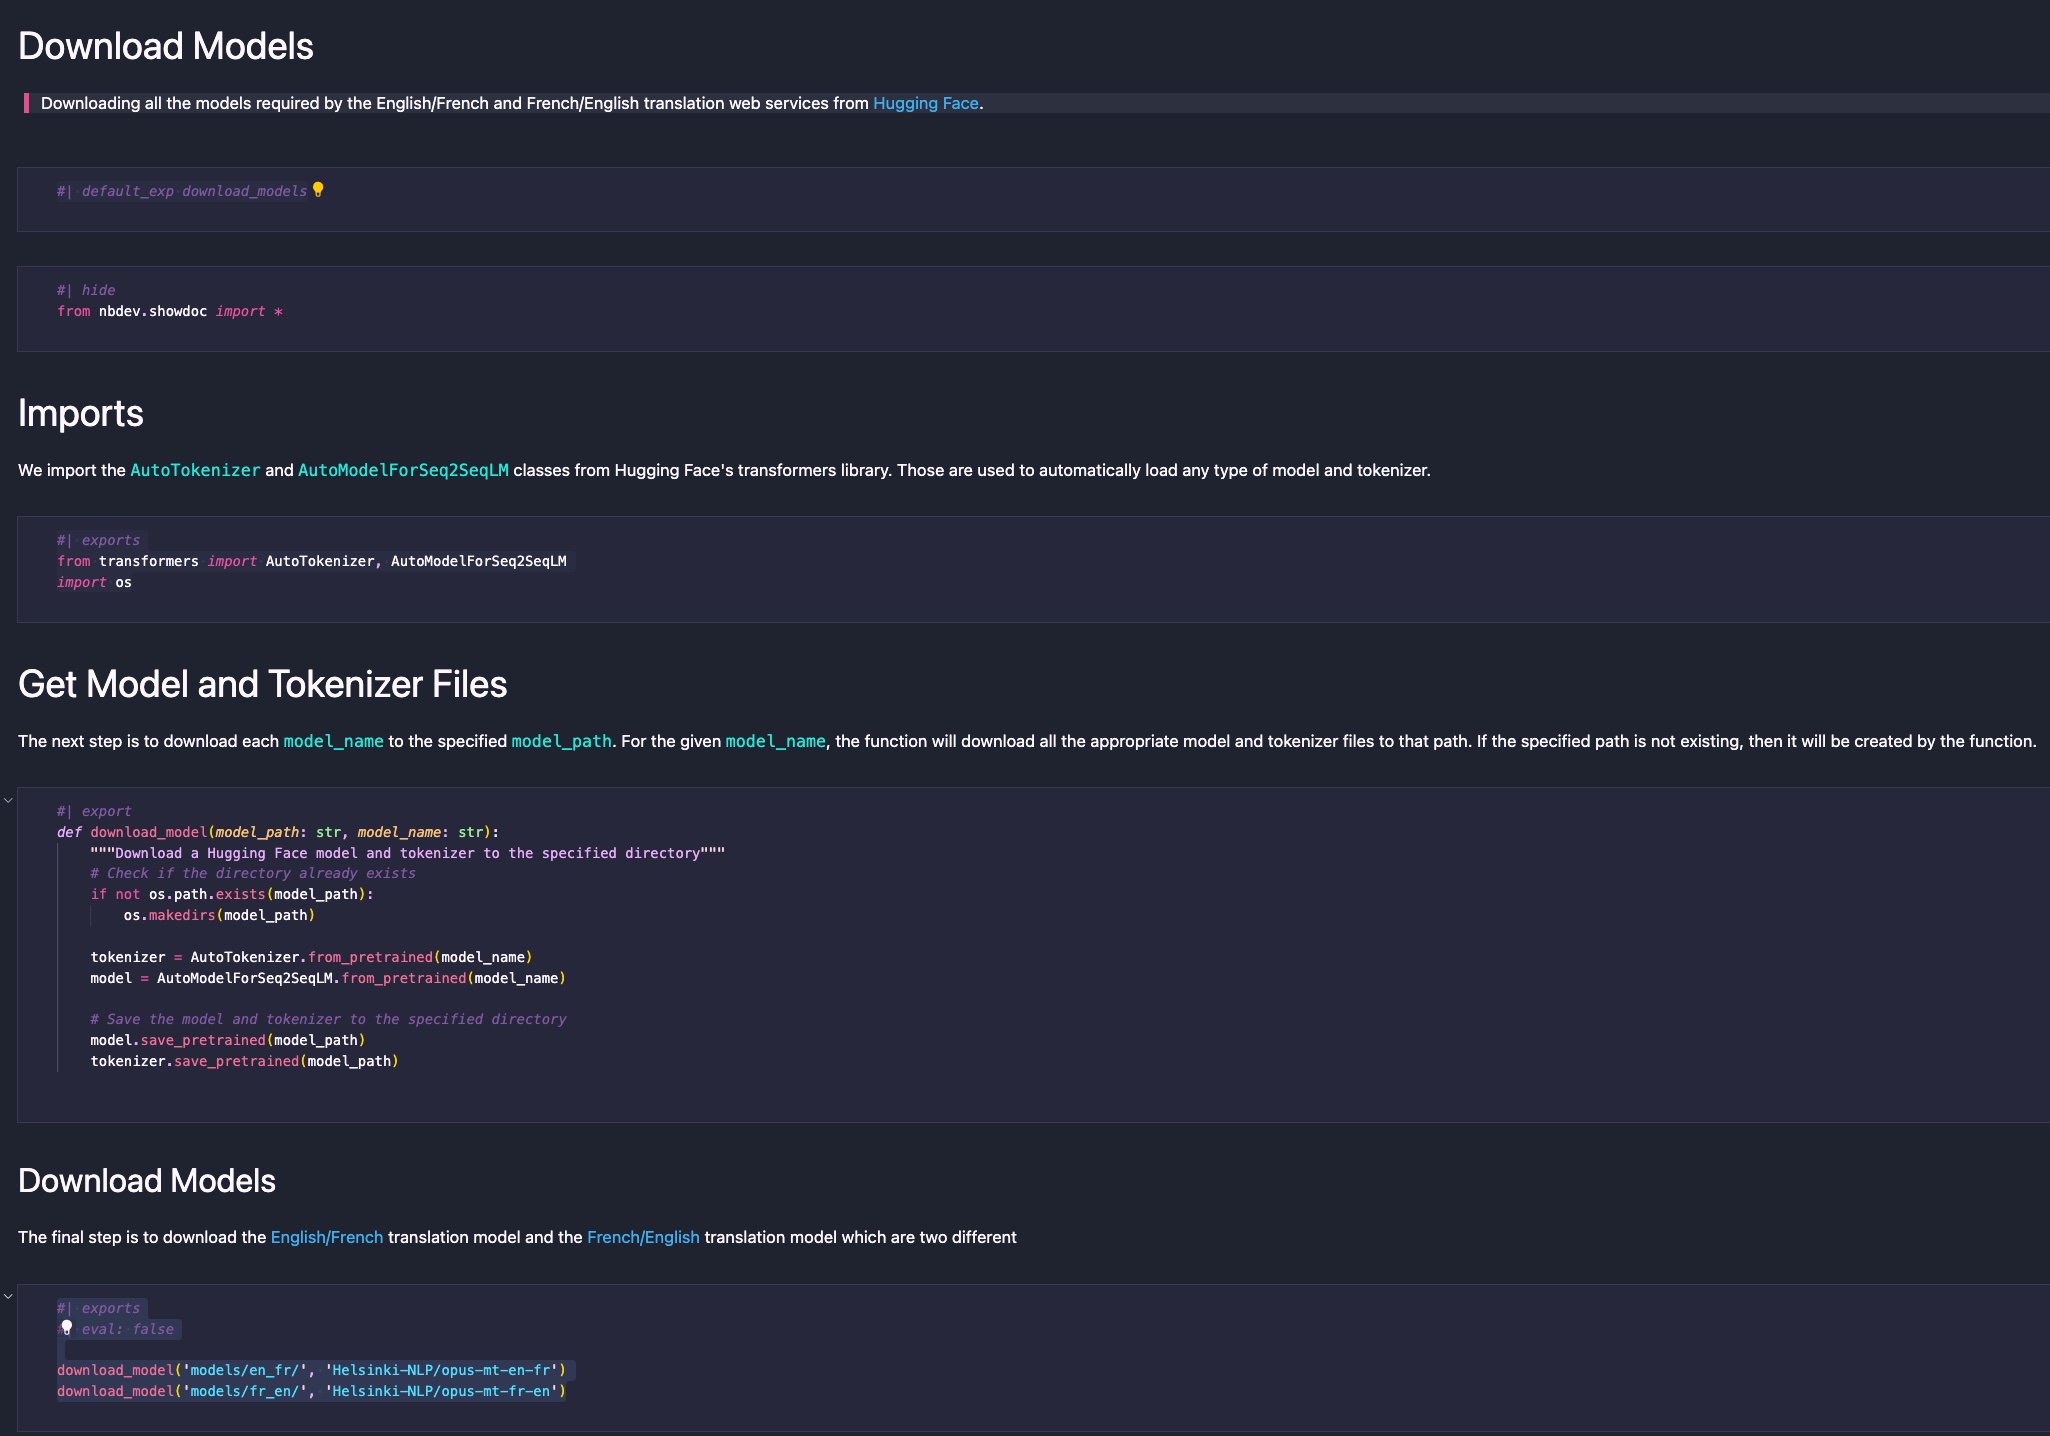
The result is a very simple and clean notebook that is easy to understand:
nbs/01_main.ipynb

The subsequent chapter is the core file of the translation service. It’s where the web service endpoints are defined, model file selection occurs, and the service’s entry point is specified. 

You can access the notebook here to see the result. I won’t elaborate on each section since the directives used are the same as in the previous chapter.

However, one difference lies in the addition of tests after the endpoint creation:

assert is_translation_supported('en', 'fr')
assert is_translation_supported('fr', 'en')
assert not is_translation_supported('en', 'es')
assert not is_translation_supported('es', 'en')

Those assertions are defined in their own code block. This demonstrates a crucial aspect of literate programming that I wrote about in 2016. This kind of workflow enables developers to:

  1. Create a series of unit tests directly where it matters (right below the function to test).
  2. Run the tests when it matters (continuously while developing or improving the tested function).

The developer can run that code cell within the Jupyter notebook to ensure that what they just wrote is functioning as expected. They can also execute the nbdev_test command-line application to run all the tests of an nbdev application. Finally, it will also be picked up by the tests GitHub workflow. This aspect of the development process is extremely important and powerful.

Everything is contextualized in the same place; there’s no need to look at 2 or 3 different places. This makes PR reviews much more effective for the reviewer: the documentation, the code, and its tests will all appear more or less on the same screen. If any of those elements are missing, the reviewer can easily address it in a comment.

Wrap-up

So, what does it look like in the end? Here are the references to each component of the literate application:

Possible nbdev Improvements

The fast.ai team has done excellent work with nbdev. I can clearly sense the same literate process that I experienced using Org-mode+Emacs, but with a completely different toolbox, which is refreshing to experience!

Here is a series of potential improvements I considered while testing nbdev. These could eventually become proposed PRs for the project when I find the time to work on them.

Save Jupyter notebook as Markdown or py:percent instead of JSON

Since I used Org-Mode, I believe that all notebook formats should be plain text with some markup. One issue I have with Jupyter is its default serialization format, a very complex and large JSON file.

While not a problem itself, it becomes one when reviewing notebook PRs. Therefore, whenever I had developers working with Jupyter notebooks, I always asked them to export their notebooks to Markdown or py:percent formats before committing to GitHub. This way, the notebook can be easily diffed on GitHub, and inline comments from PR reviewers can be added. Without this, you’d need to use a service like ReviewNB, which adds unnecessary complexity in my opinion.

I suggest that nbdev could leverage Jupyter’s internal Markdown export functionality to export each chapter into its own Markdown or py:percent file, which would then be part of the literate GitHub repository.

Another possibility without touching anything to the nbdev workflow could be using jupytext to manage the synchronization.

Add .ipynb Files to .gitignore

Assuming nbdev exports all notebooks as Markdown or py:percent files, I would consider adding .ipynb files to the repository’s .gitignore. This simplifies the repository’s content (containing only plain text files) and avoids duplicates. This is possible since Markdown files can be used to recreate the original JSON Jupyter files.

Ignore All Files Generated by a Notebook During Export

If all notebooks are in Markdown format, there’s no need to commit all the exported content to the repository either.

Since everything is in these notebook files, any developer can generate all the artifacts by:

  1. cloning the repository
  2. exporting the notebook files

This would generate all the necessary files for the application’s functionality. The advantage is a streamlined repository with a collection of literate notebooks.

Support Beyond Python

This is where Org-Mode+Emacs shines. In a single notebook, I could incorporate code from various languages and formats, such as Clojure, bash curl commands, JSON outputs, Dockerfile, etc. This flexibility was possible due to Babel.

It might be possible to achieve this in Jupyter (consider jp-babel), or even in VS Code’s Jupyter extension. Nevertheless, nbdev would need updates to enable this.

Currently, nbdev assumes everything is Python. This is why the directives like #| export foo create a file foo.py in the module’s folder.

My proposal is for the export and exports directives to accept a path/file as a value, rather than a string used to create the target path and file. This would make the directive more verbose, yet considerably more flexible.

If it worked this way, I could have all my Python code interwoven into one or multiple places in the repository. Additionally, in the same notebook file, I could have multiple code blocks for creating my Dockerfile, which would then export to /Dockerfile in the repository. I would treat the Dockerfile like any other code source in my project.

This aspect is crucial to me, particularly for Machine Learning projects, as they often involve diverse configuration files (Docker, Terraform, etc.) that should be managed in a literate framework, similar to traditional source code files.

This aspect is more important than having a Babel in Jupyter (and we are lucky since it is way simpler to implement!)

New export-test directive

Having tests in the notebooks, along side the code it tests is very valuable. However, I would think they should be tangled as well, just like any other piece of the code base. We could think about different design, two that come in mind are:

  1. If export and exports end-up supporting a path/file argument, then we would use that new behaviour to specify where the tests goes (i.e. /tests/test_foo.py)
  2. A new directive like export-test could be created where the test would be created in the /tests/ folder like: /tests/test_[default_ext].py

I think I prefer (1) since it is more flexible and could be used for other scenarios, like the ones mentioned above.

References

Lastly, I’ve compiled a list of excellent references about nbdev for anyone interested in trying it out:
How to Deploy Hugging Face Models in a Docker Container

In this short tutorial, we will explore how Hugging Face models can be deployed in a Docker Container and exposed as a web service endpoint.

The service it exposes is a translation service from English to French and French to English.

Why someone would like to do that? Other than to learn about those specific technologies, it is a very convenient way to try and test the thousands of models that exists on Hugging Face, in a clean and isolated environment that can easily be replicated, shared or deployed elsewhere than on your local computer.

In this tutorial, you will learn how to use Docker to create a container with all the necessary code and artifacts to load Hugging Face models and to expose them as web service endpoints using Flask.

All code and configurations used to write this blog post are available in this GitHub Repository. You simply have to clone it and to run the commands listed in this tutorial to replicate the service on your local machine.

Installing Docker

The first step is to install Docker. The easiest way is by simply installing Docker Desktop which is available on MacOS, Windows and Linux.

Creating the Dockerfile

The next step is to create a new Git repository where you will create a Dockerfile. The Dockerfile is where all instructions are written that tells Docker how to create the container.

I would also strongly encourage you to install and use hadolint, which is a really good Docker linter that helps people to follow Docker best practices. There is also a plugin for VS Code if this is what you use as you development IDE.

Base image and key installs

The first thing you define in a Dockerfile is the base image to use to initialize the container. For this tutorial, we will use Ubuntu’s latest LTS:

# Use Ubuntu's current LTS
FROM ubuntu:jammy-20230804

Since we are working to create a Python web service that expose the predictions of a ML model, the next step is to add they key pieces required for the Python service. Let’s make sure that you only include what is necessary to minimize the size, and complexity, of the container as much as possible:

# Make sure to not install recommends and to clean the 
# install to minimize the size of the container as much as possible.
RUN apt-get update && \
    apt-get install --no-install-recommends -y python3=3.10.6-1~22.04 && \
    apt-get install --no-install-recommends -y python3-pip=22.0.2+dfsg-1ubuntu0.3 && \
    apt-get install --no-install-recommends -y python3-venv=3.10.6-1~22.04 && \
    apt-get clean && \
    rm -rf /var/lib/apt/lists/*

This instruct Docker to install Python3, pip and venv. It also ensures that apt get cleaned of cached files, that nothing more is installed and that we define the exact version of the package we want to install. That is to ensure that we minimize the size of the container, while making sure that the container can easily be reproduced, with the exact same codebase, any time in the future.

Another thing to note: we run multiple commands with a single RUN instruction by piping them together with &&. This is to minimize the number of layers created by Docker for the container, and this is a best practice to follow when creating containers. If you don’t do this and run hadolint, then you will get warning suggesting you to refactor your Dockerfile accordingly.

Copy required files

Now that the base operating system is installed, the next step is to install all the requirements of the Python project we want to deploy in the container:

# Set the working directory within the container
WORKDIR /app

# Copy necessary files to the container
COPY requirements.txt .
COPY main.py .
COPY download_models.py .

First we define the working directory with the WORKDIR instruction. From now on, every other instruction will run from that directory in the container. We copy the local files: requirements.txt, main.py and download_models.py to the working directory.

Create virtual environment

Before doing anything with those files, we are better creating a virtual environment where to install all those dependencies. Some people may wonder why we create an environment within an environment? It is further isolation between the container and the Python application to make sure that there is no possibility of dependencies clashes. This is a good best practice to adopt.

# Create a virtual environment in the container
RUN python3 -m venv .venv

# Activate the virtual environment
ENV PATH="/app/.venv/bin:$PATH"

Install application requirements

Once the virtual environment is created and activated in the container, the next step is to install all the required dependencies in that new environment:

    # Install Python dependencies from the requirements file
RUN pip install --no-cache-dir -r requirements.txt && \
    # Get the models from Hugging Face to bake into the container
    python3 download_models.py

It runs pip install to install all the dependencies listed in requirements.txt. The dependencies are:

transformers==4.30.2
flask==2.3.3
torch==2.0.1
sacremoses==0.0.53
sentencepiece==0.1.99

Just like the Ubuntu package version, we should (have to!) pin (specify) the exact version of each dependency. This is the best way to ensure that we can reproduce this environment any time in the future and to prevent unexpected crashes because code changed in some downstream dependencies that causes issues with the code.

Downloading all models in the container

As you can see in the previous RUN command, the next step is to download all models and tokenizers in the working directory such that we bake the model’s artifacts directly in the container. That will ensures that we minimize the time it takes to initialize a container. We spend the time to download all those artifacts at build time instead of run time. The downside is that the containers will be much bigger depending on the models that are required.

The download_models.py file is a utility file used to download the Hugging Face models used by the service directly into the container. The code simply download the models and tokenizer files from Hugging Face and save them locally (in the working directory of the container):

from transformers import AutoTokenizer, AutoModelForSeq2SeqLM
import os

def download_model(model_path, model_name):
    """Download a Hugging Face model and tokenizer to the specified directory"""
    # Check if the directory already exists
    if not os.path.exists(model_path):
        # Create the directory
        os.makedirs(model_path)

    tokenizer = AutoTokenizer.from_pretrained(model_name)
    model = AutoModelForSeq2SeqLM.from_pretrained(model_name)

    # Save the model and tokenizer to the specified directory
    model.save_pretrained(model_path)
    tokenizer.save_pretrained(model_path)

# For this demo, download the English-French and French-English models
download_model('models/en_fr/', 'Helsinki-NLP/opus-mt-en-fr')
download_model('models/fr_en/', 'Helsinki-NLP/opus-mt-fr-en')

Creating the Flask translation web service endpoint

The last thing we have to do with the Dockerfile is to expose the port where the web service will be available and to tell the container what to run when it starts:

# Make port 6000 available to the world outside this container
EXPOSE 6000

ENTRYPOINT [ "python3" ]

# Run main.py when the container launches
CMD [ "main.py" ]

We expose the port 6000 to the outside world, and we tell Docker to run the python3 command with main.py. The main.py file is a very simple file that register the web service’s path using Flask, and that makes the predictions (translations in this case):

from flask import Flask, request, jsonify
from transformers import AutoTokenizer, AutoModelForSeq2SeqLM

def get_model(model_path):
    """Load a Hugging Face model and tokenizer from the specified directory"""
    tokenizer = AutoTokenizer.from_pretrained(model_path)
    model = AutoModelForSeq2SeqLM.from_pretrained(model_path)
    return model, tokenizer

# Load the models and tokenizers for each supported language
en_fr_model, en_fr_tokenizer = get_model('models/en_fr/')
fr_en_model, fr_en_tokenizer = get_model('models/fr_en/')

app = Flask(__name__)

def is_translation_supported(from_lang, to_lang):
    """Check if the specified translation is supported"""
    supported_translations = ['en_fr', 'fr_en']
    return f'{from_lang}_{to_lang}' in supported_translations

@app.route('/translate/<from_lang>/<to_lang>/', methods=['POST'])
def translate_endpoint(from_lang, to_lang):
    """Translate text from one language to another. This function is 
    called when a POST request is sent to /translate/<from_lang>/<to_lang>/"""
    if not is_translation_supported(from_lang, to_lang):
        return jsonify({'error': 'Translation not supported'}), 400

    data = request.get_json()
    from_text = data.get(f'{from_lang}_text', '')

    if from_text:
        model = None
        tokenizer = None

        match from_lang:
            case 'en':        
                model = en_fr_model
                tokenizer = en_fr_tokenizer
            case 'fr':
                model = fr_en_model
                tokenizer = fr_en_tokenizer

        to_text = tokenizer.decode(model.generate(tokenizer.encode(from_text, return_tensors='pt')).squeeze(), skip_special_tokens=True)

        return jsonify({f'{to_lang}_text': to_text})
    else:
        return jsonify({'error': 'Text to translate not provided'}), 400
    
if __name__ == '__main__':
    app.run(host='0.0.0.0', port=6000, debug=True)

Building the container

Now that the Dockerfile is completed, the next step is to use it to have Docker to build the actual image of the container. This is done using this command in the terminal:

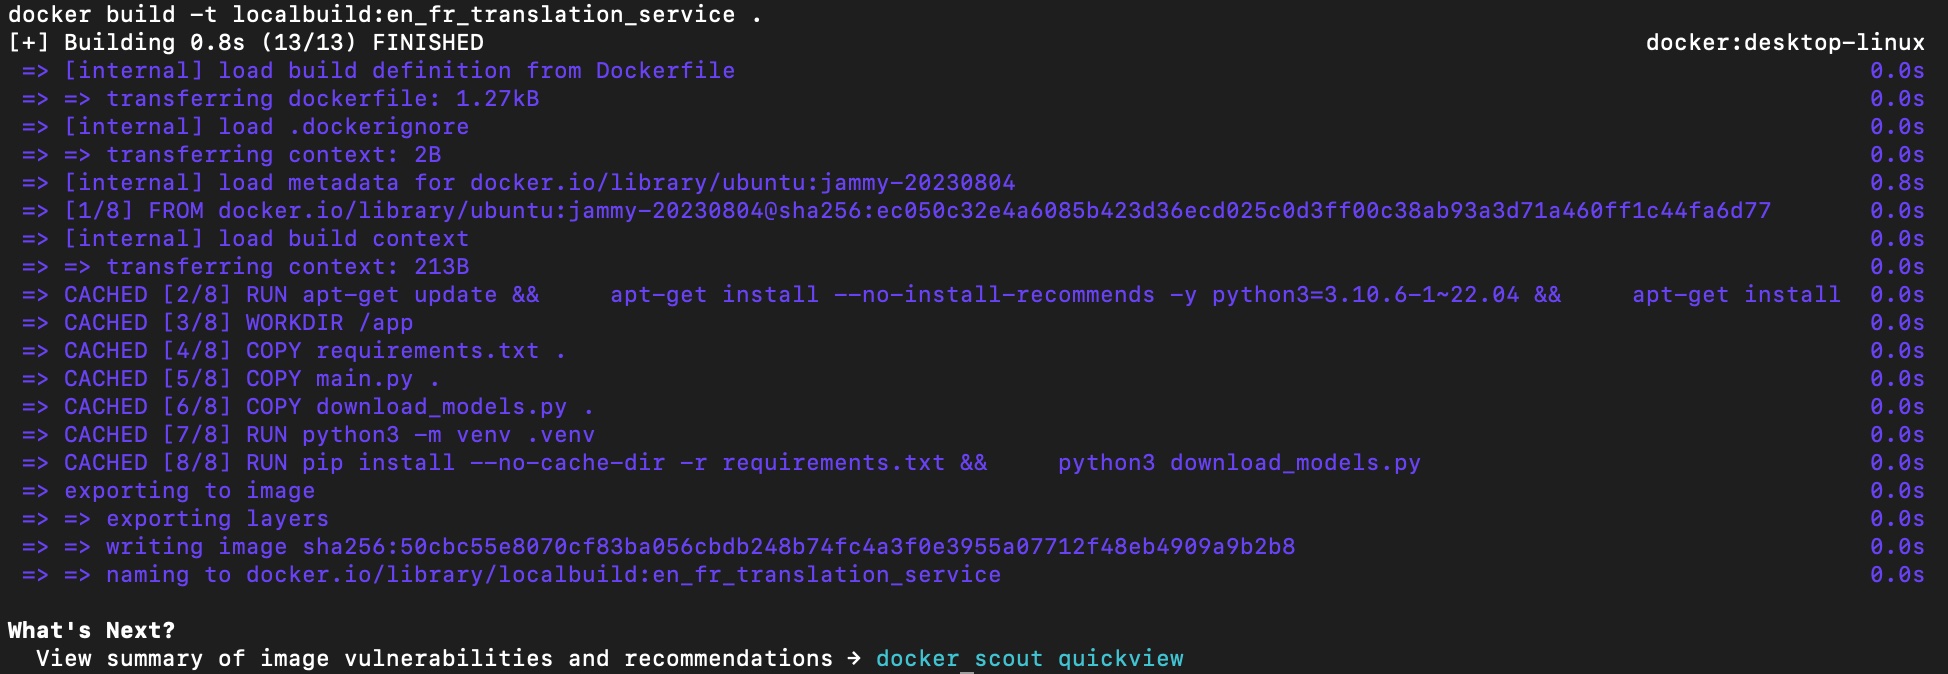
docker build -t localbuild:en_fr_translation_service .

Note that we specified a tag to make it easier to manage it in between all the other images that may exists in the environment. The output of the terminal will show every step defined in the Dockerfile, and the processing for each of those step. The final output looks like:

Running and Querying the service

Now that we have a brand new image, the next step is to test it. In this section, I will use Docker Desktop’s user interface to show how we can easily do this, but all those step can easily be done (and automated) using the docker command line application.

After you built the image, it will automatically appear in the images section of Docker Desktop:

You can see the tag of the image, its size, when it was created, etc. To start the container from that image, we simply have to click the play arrow in the Actions column. That will start running a new container using that image.

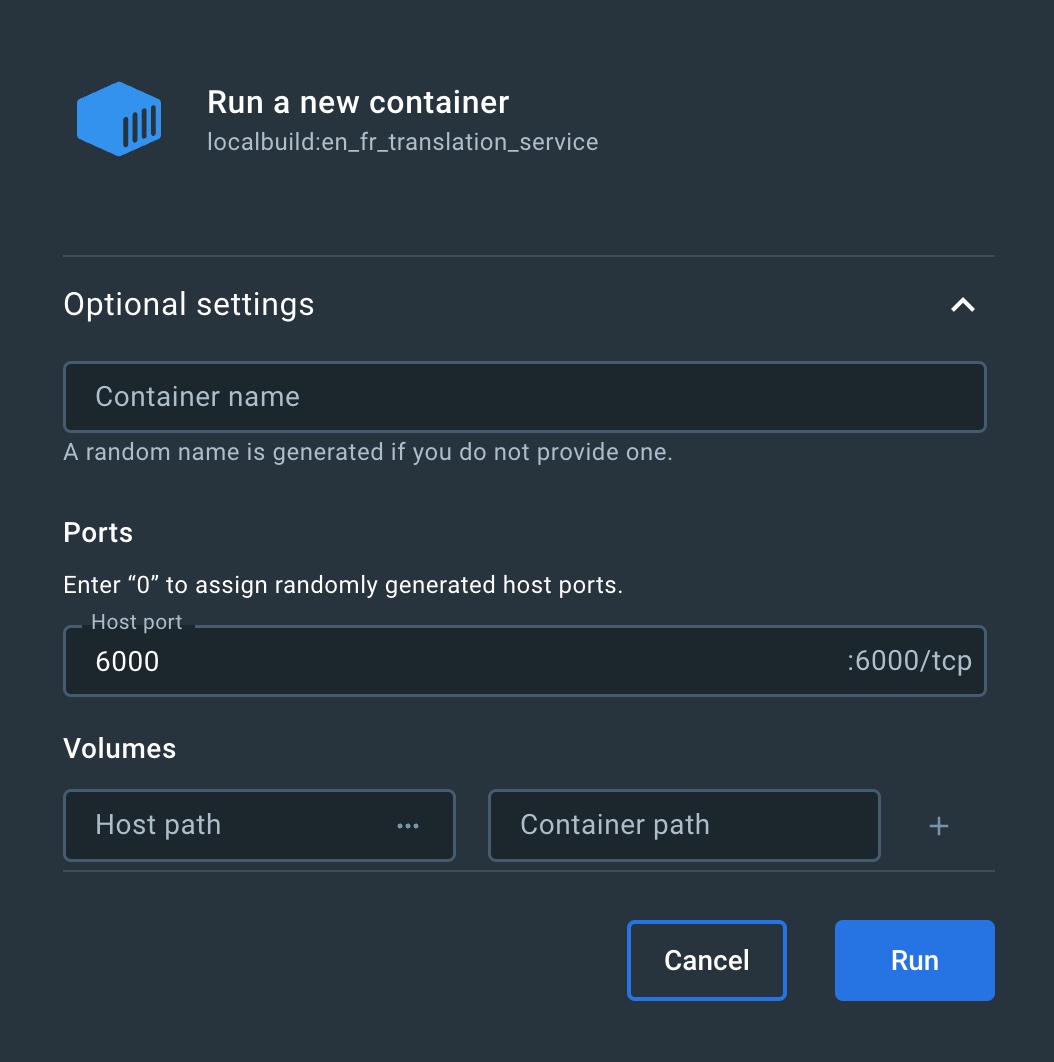
Docker Desktop will enable you to add some more parameter to start the container with the following window:

The most important thing to define here is to Host port. If you leave it empty, then the port 6000 we exposed in the Docker file will become unbound and we won’t be able to reach the service running in the container.

Once you click the Run button, the container will appear in the Containers section:

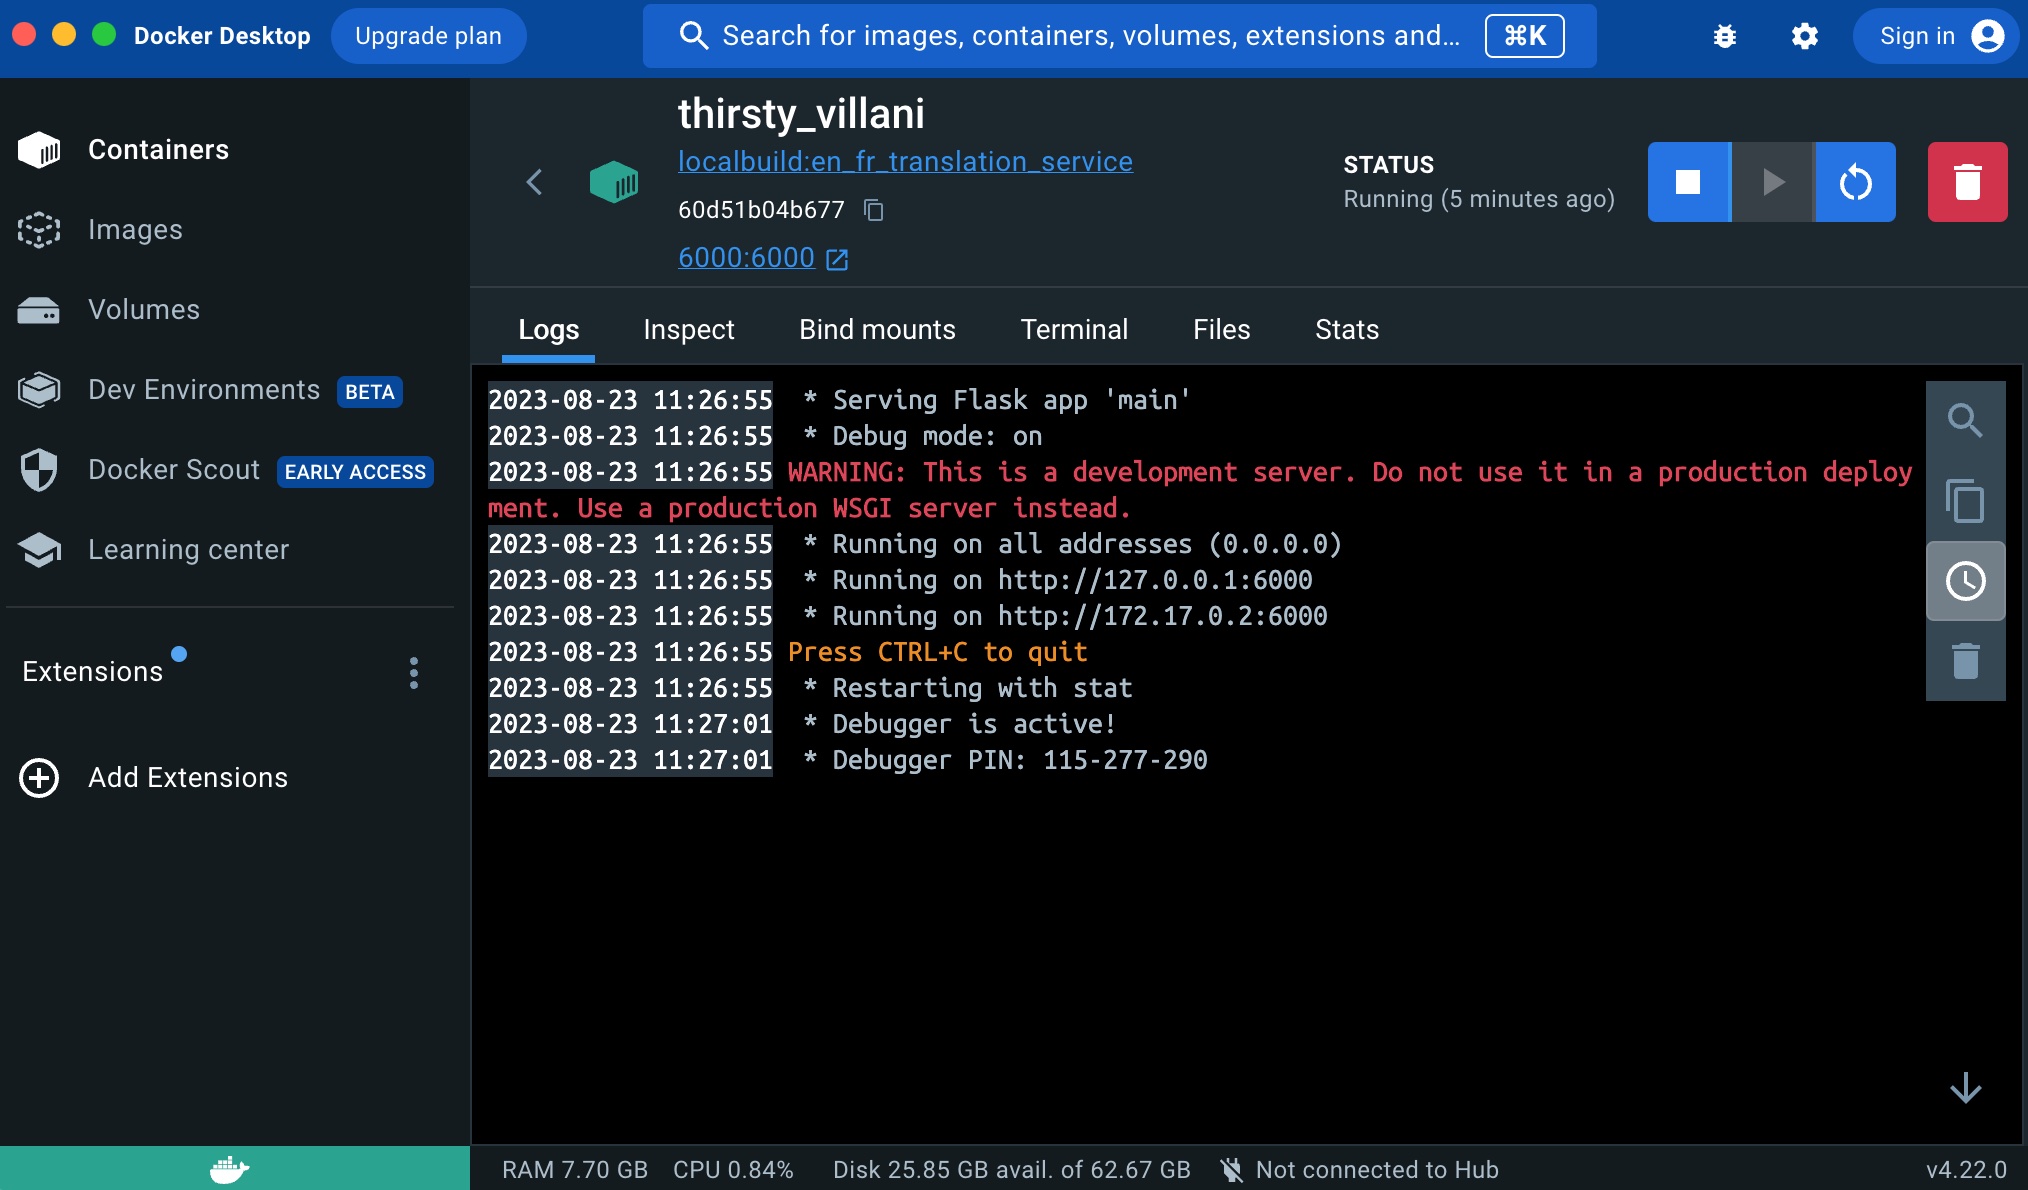
And if you click on it’s name’s link, you will have access to the internal of the container (the files it contains, the execution logs, etc.:

Now that the container is running, we can query the endpoint like this:

curl http://localhost:6000/translate/en/fr/ POST -H "Content-Type: application/json" -v -d '{"en_text": "Towards Certification of Machine Learning-Based Distributed Systems Behavior"}'

It returns:

{
  "fr_text": "Vers la certification des syst\u00e8mes distribu\u00e9s fond\u00e9s sur l'apprentissage automatique"
}

And then for the French to English translation:

curl http://localhost:6000/translate/fr/en/ POST -H "Content-Type: application/json" -v -d '{"fr_text": "Ce qu'\''il y a d'\''admirable dans le bonheur des autres, c'\''est qu'\''on y croit."}'

It returns:

{
  "en_text": "What is admirable in the happiness of others is that one believes in it."
}

Conclusion

As we can see, it is pretty straightforward to create simple Docker containers that turns pretty much any Hugging Face pre-trained models into a web service endpoint.