Donald Knuth considered that, of all his work on typography, the idea of literate programming had the greatest impact on him. This is a strong and profound statement that seems to be underestimated by history.
Literate programming has grown on me in such a way that I now have a hard time developing in a framework that is not literate. I need to be able to organize my ideas, my code, and its documentation the way I want, not in the way the programming language or library designers intend. I need that flexibility flexibility to be as effective as possible in my work; otherwise, I feel that something is missing.
Since 2016, I have been practicing literate programming using Org-Mode within Emacs. As of today, I have not yet found another tool as powerful as Org-Mode within Emacs for developing literate applications. It employs a simple plain text format with clean markup, making it easy to commit and suitable for peer review. However, when used in Emacs/Org-Mode and enhanced with Babel, developers end up with one of the most robust notebook systems imaginable, capable of facilitating effective literate programming.
However, the challenge lies in the tooling, particularly Emacs. I have been fortunate enough to build teams that worked with Emacs, allowing us to undertake projects in a literate manner. Yet, this was the exception rather than the norm.
Exploration
I recently invested time in exploring the latest developments in the Literate Programming tooling space. I aimed to find a solution that would bring me closer to the experience of Org-mode + Emacs, but without the friction associated with Emacs for general developers.
In 2016, all my development work was conducted in Clojure. Clojure developers naturally gravitated toward Emacs due to Cider. Nowadays, I work extensively with Python and configuration files. Consequently, I began researching the current state of the literate programming ecosystem. My search began with two keywords: Python and VS Code.
This research led me to discover a relatively new project (initiated a few years ago) called nbdev, developed by fast.ai (Jeremy Howard, Hamel Husain, and a few other contributors).
nbdev is an incredibly intriguing project. It leverages several existing open-source projects to build a new literate programming framework from the ground up: it employs Jupyter notebooks as the format for writing software (in contrast to a plain text format like Org-Mode). The Quarto tool is used to generate documentation from the codebase. Additionally, nbdev provides a range of tools for running tests, creating vanilla GitHub projects with built-in actions for automated deployment, and more. Due to its reliance on Jupyter, this literate workflow is Python-centric and can be developed using a simple browser or VS Code, complemented by the constantly improving Jupyter extension. There’s even an experimental nbdev extension available.
For this blog post, I will convert the en-fr-translation-service project I recently blogged about to use nbdev. Finally, based on my experience with Org-mode, I will propose some potential improvements to the project.
Creating a Vanilla nbdev (Notebook Dev) Project
The first step is to create a new vanilla literate-en-fr-translation-service GitHub repository and follow nbdev‘s End-to-End Walkthrough to create the literate version of the project. After installing jupyterlab, nbdev, and Quarto, I cloned the new repository locally and executed this command in my terminal to initialize the nbdev project:
nbdev_newThis command generated several new files in the repository:
.github/workflows: two GitHub actionsliterate_en_fr_translation_service/: New modulenbs: where all literate notebook files residesettings.ini: nbdev’s core settings file- …and various other auto-generated files
Once the nbdev vanilla project is complete, simply commit and push the changes to the GitHub repository:
git add .
git commit -m'Initial commit'
git push
After pushing the changes to the repository, the final step is to enable pages in your GitHub repository. Then you can verify the proper functioning of your workflows.
Development Process
The literate programming development process is straightforward yet requires a mindset shift. In the following sections, I will focus on nbdev’s specific process, which is not substantially different from other literate programming frameworks.
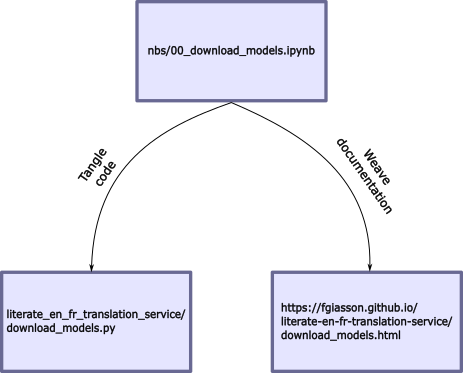
The entire application is developed directly within Jupyter notebooks. Each notebook defines both the application’s code and its documentation. When preparing the application, the documentation will be weaved from the Jupyter notebook and hosted as a set of GitHub Pages. Subsequently, the code will be tangled into source code files within the module’s folder:
Documentation is intertwined among code boxes, and each code box has tangling instructions (indicating whether it should be part of the codebase or documentation, etc.). All the nbdev directives are accessible here.
The first step involves writing the nbs/index.ipynb file, which serves as the project’s readme. It introduces the project’s purpose, usage instructions, and more. This file becomes the initial page of your documentation.
Next, start organizing your application into different parts. In nbdev, a part is equivalent to a chapter, and a chapter is numbered. This numbering is a naming convention specific to nbdev. For our simple application, we’ll create two chapters: nbs/00_download_models.ipynb and nbs/01_main.ipynb. As you can see, the files are prefixed with numbers, acting as “chapter numbers.” These numbers help order the generated documentation’s index and provide clarity regarding the repository’s file flow.
The final step is to write each of these notebooks, focusing on both documentation (the why) and code (the how). This will be the focus of the upcoming sections.
Developing en-fr-translation-service as literate-en-fr-translation-service
The first step I took was to copy over the requirements.txt and Dockerfile to the root of the repository. Since nbdev currently only supports Python files, only that part of the application will be literate (more about this limitation later). The only change required is adjusting the paths of some files in the Dockerfile because nbdev creates a module for our application:
COPY literate_en_fr_translation_service/main.py .
COPY literate_en_fr_translation_service/download_models.py .
nbs/index.ipynb
The initial step is to create the index.ipynb file. This serves as the entry point for the generated documentation and also becomes the README.md file of the repository after running the nbdev_readme command.
This file is a simple Jupyter notebook containing a single Markdown cell where we provide an introduction to the project.
nbs/00_download_models.ipynb
The next step involves creating the 00_download_models.ipynb file. This file contains all the code and documentation related to downloading the ML models required for the translation service. Since the first task the Docker container performs upon running is downloading the translation model artifacts, I’ve prefixed the file with 00_ to signify it as the first chapter of the application.
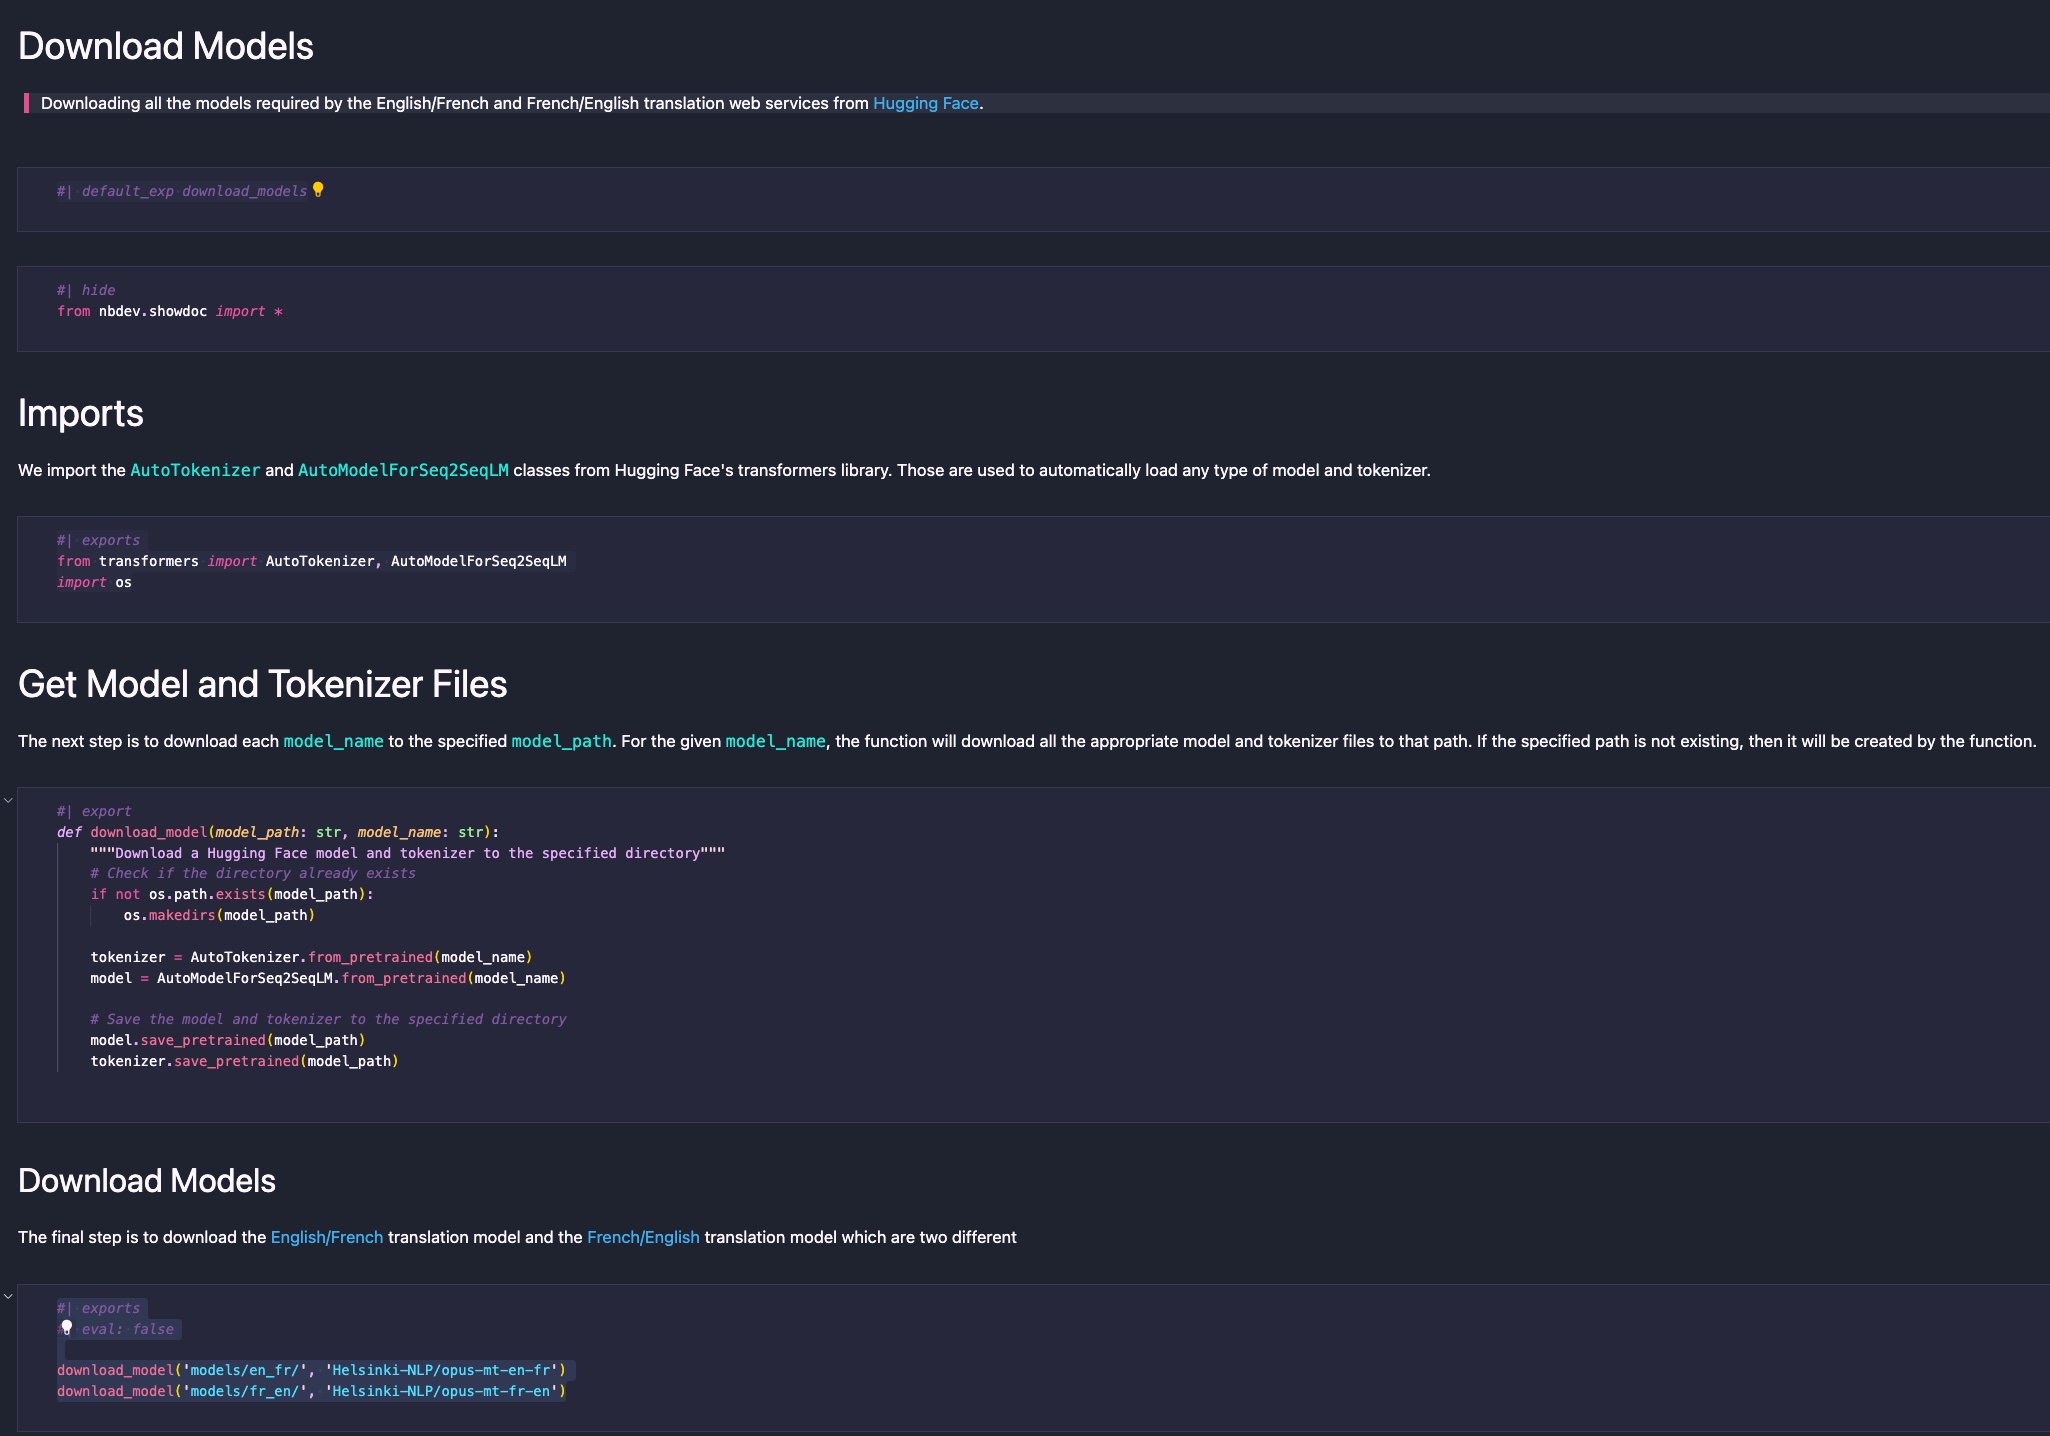
At the top of the file, a Markdown cell should be created for the default_ext directive. This directive informs nbdev which module file the code from subsequent export and exports directives should be woven into:
#| default_exp download_modelsIn this case, all code from subsequent Python cells will be placed in the literate_en_fr_translation_service/download_models.py file.
Next, we add the import statements:
#| exports
from transformers import AutoTokenizer, AutoModelForSeq2SeqLM
import os
The difference between export and exports is that exports exports the code to both the code file and the documentation (the code will be displayed in a code box in the documentation). In contrast, export only adds the code to the code file and won’t appear in the documentation. For this case, we want the exports to be displayed in the documentation.
Following this, we define the download_models() function:
#| export
def download_model(model_path: str, model_name: str):
    """Download a Hugging Face model and tokenizer to the specified directory"""
    # Check if the directory already exists
    if not os.path.exists(model_path):
        os.makedirs(model_path)

    tokenizer = AutoTokenizer.from_pretrained(model_name)
    model = AutoModelForSeq2SeqLM.from_pretrained(model_name)

    # Save the model and tokenizer to the specified directory
    model.save_pretrained(model_path)
    tokenizer.save_pretrained(model_path)
In this case, we don’t intend for the code to appear in the documentation. Here, nbdev will document the function in textual form without directly including the code in the documentation.
Finally, we proceed to download the actual model artifacts:
#| exports
#| eval: false

download_model('models/en_fr/', 'Helsinki-NLP/opus-mt-en-fr')
download_model('models/fr_en/', 'Helsinki-NLP/opus-mt-fr-en')
This last code block is an interesting one that shows the flexibility of the code block directives, and their importance in the development flow.
First, we do export the code to the codebase, and we show the two line of code in the documentation to help the user to understand how it works. But then we added an eval: false directive. Why? This is used to tell nbdev to not evaluate this code block when it tangles and weave the notebook file. Otherwise, this code would be executed, and the models artifacts would be downloaded which would add a lot of processing time and spend unnecessary bandwidth on the network. However, we want this code to appear in the codebase since the container will run that file to initialize the service with all the right models artifacts.
The result is a very simple and clean notebook that is easy to understand:
nbs/01_main.ipynb
The subsequent chapter is the core file of the translation service. It’s where the web service endpoints are defined, model file selection occurs, and the service’s entry point is specified.
You can access the notebook here to see the result. I won’t elaborate on each section since the directives used are the same as in the previous chapter.
However, one difference lies in the addition of tests after the endpoint creation:
assert is_translation_supported('en', 'fr')
assert is_translation_supported('fr', 'en')
assert not is_translation_supported('en', 'es')
assert not is_translation_supported('es', 'en')
Those assertions are defined in their own code block. This demonstrates a crucial aspect of literate programming that I wrote about in 2016. This kind of workflow enables developers to:
- Create a series of unit tests directly where it matters (right below the function to test).
- Run the tests when it matters (continuously while developing or improving the tested function).
The developer can run that code cell within the Jupyter notebook to ensure that what they just wrote is functioning as expected. They can also execute the nbdev_test command-line application to run all the tests of an nbdev application. Finally, it will also be picked up by the tests GitHub workflow. This aspect of the development process is extremely important and powerful.
Everything is contextualized in the same place; there’s no need to look at 2 or 3 different places. This makes PR reviews much more effective for the reviewer: the documentation, the code, and its tests will all appear more or less on the same screen. If any of those elements are missing, the reviewer can easily address it in a comment.
Wrap-up
So, what does it look like in the end? Here are the references to each component of the literate application:
- GitHub repository of the literate application
- Literate notebooks where all the application code, documentation and tests are defined
- Tangled source code from the notebooks
- Weaved documentation as GitHub pages
- Created CI/CD workflows
Possible nbdev Improvements
The fast.ai team has done excellent work with nbdev. I can clearly sense the same literate process that I experienced using Org-mode+Emacs, but with a completely different toolbox, which is refreshing to experience!
Here is a series of potential improvements I considered while testing nbdev. These could eventually become proposed PRs for the project when I find the time to work on them.
Save Jupyter notebook as Markdown or py:percent instead of JSON
Since I used Org-Mode, I believe that all notebook formats should be plain text with some markup. One issue I have with Jupyter is its default serialization format, a very complex and large JSON file.
While not a problem itself, it becomes one when reviewing notebook PRs. Therefore, whenever I had developers working with Jupyter notebooks, I always asked them to export their notebooks to Markdown or py:percent formats before committing to GitHub. This way, the notebook can be easily diffed on GitHub, and inline comments from PR reviewers can be added. Without this, you’d need to use a service like ReviewNB, which adds unnecessary complexity in my opinion.
I suggest that nbdev could leverage Jupyter’s internal Markdown export functionality to export each chapter into its own Markdown or py:percent file, which would then be part of the literate GitHub repository.
Another possibility without touching anything to the nbdev workflow could be using jupytext to manage the synchronization.
Add .ipynb Files to .gitignore
Assuming nbdev exports all notebooks as Markdown or py:percent files, I would consider adding .ipynb files to the repository’s .gitignore. This simplifies the repository’s content (containing only plain text files) and avoids duplicates. This is possible since Markdown files can be used to recreate the original JSON Jupyter files.
Ignore All Files Generated by a Notebook During Export
If all notebooks are in Markdown format, there’s no need to commit all the exported content to the repository either.
Since everything is in these notebook files, any developer can generate all the artifacts by:
- cloning the repository
- exporting the notebook files
This would generate all the necessary files for the application’s functionality. The advantage is a streamlined repository with a collection of literate notebooks.
Support Beyond Python
This is where Org-Mode+Emacs shines. In a single notebook, I could incorporate code from various languages and formats, such as Clojure, bash curl commands, JSON outputs, Dockerfile, etc. This flexibility was possible due to Babel.
It might be possible to achieve this in Jupyter (consider jp-babel), or even in VS Code’s Jupyter extension. Nevertheless, nbdev would need updates to enable this.
Currently, nbdev assumes everything is Python. This is why the directives like #| export foo create a file foo.py in the module’s folder.
My proposal is for the export and exports directives to accept a path/file as a value, rather than a string used to create the target path and file. This would make the directive more verbose, yet considerably more flexible.
If it worked this way, I could have all my Python code interwoven into one or multiple places in the repository. Additionally, in the same notebook file, I could have multiple code blocks for creating my Dockerfile, which would then export to /Dockerfile in the repository. I would treat the Dockerfile like any other code source in my project.
This aspect is crucial to me, particularly for Machine Learning projects, as they often involve diverse configuration files (Docker, Terraform, etc.) that should be managed in a literate framework, similar to traditional source code files.
This aspect is more important than having a Babel in Jupyter (and we are lucky since it is way simpler to implement!)
New export-test directive
Having tests in the notebooks, along side the code it tests is very valuable. However, I would think they should be tangled as well, just like any other piece of the code base. We could think about different design, two that come in mind are:
- If
exportandexportsend-up supporting a path/file argument, then we would use that new behaviour to specify where the tests goes (i.e./tests/test_foo.py) - A new directive like
export-testcould be created where the test would be created in the/tests/folder like:/tests/test_[default_ext].py
I think I prefer (1) since it is more flexible and could be used for other scenarios, like the ones mentioned above.
References
Lastly, I’ve compiled a list of excellent references about nbdev for anyone interested in trying it out: