Loading DBpedia into the Open Semantic Framework

dbpedia_osf

This first article or a series of two will show you how to load DBpedia into a Open Semantic Framework instance. A second article will be published that will show you how the 3.5 million entities present in DBpedia can be accessible from a Drupal 7 installation. All the entities will be searchable, templatable, viewable, mappable, editabled and revisionable directly within Drupal.
Loading DBPedia into a OSF instance is not overly complex. Someone can easily manage to do it using this tutorial, and ending up with a OSF instance loaded with the full DBpedia dataset.

Creating a Open Semantic Framework Instance

The first step is to create a OSF instance. This tutorial uses the AWS EC2 OSF image. However, you can easily perform the same steps except that you should use the OSF Installer to install OSF on your own Ubuntu 12.10 server.
To create the OSF instance we will use to load DBpedia, we use one of the following OSF 3.0 AMI:
Region arch root store AMI
us-east-1 64-bit EBS ami-afe4d1c6
us-west-1 64-bit EBS ami-d01b2895
us-west-2 64-bit EBS ami-c6f691f6
eu-west-1 64-bit EBS ami-883fd4ff
sa-east-1 64-bit EBS ami-6515b478
ap-southeast-2 64-bit EBS ami-4734ab7d
ap-southeast-1 64-bit EBS ami-364d1a64
ap-northeast-1 64-bit EBS ami-476a0646

Then to make things faster, we used a EC2 c3.4xlarge server with 75G of disk space.

In this tutorial, we are not re-configuring any passwords or settings for this vanilla instance. However, if you are to create an instance of your own, you should read the Creating and Configuring an Amazon EC2 AMI OSF Instance manual to configure it for you own purpose and to make it secure.

Note that most of the steps to load DBpedia into Virtuoso come from Jorn Hees’ article about this subject.

Also note that you should make sure to path the files in the following 3 commits. These issues have been found while writing this blog post, and haven’t (yet) made it into the AMI we use here: 88d6f1a782744a62bf83d52eceff695e0fee773b, 1389744b7dbf8f755a1bb9be468b3c51df75d6d8 and 719b4a776d43345e73847e6c785a4e9964b83a1c

Downloading DBpedia

The second step is to download all the DBpedia files that you want to use in your OSF instance. For this tutorial, we focus on the files where we can get the titles, abstracts, descriptions, all the mapped properties, the geolocalization of the entities, etc. You can download all these files by running the following commands:

[cc lang=’bash’ line_numbers=’false’]
[raw]

mkdir -p /usr/local/data/dbpedia/3.9/en

cd /usr/local/data/dbpedia/3.9/en

wget http://downloads.dbpedia.org/3.9/en/instance_types_en.nt.bz2
wget http://downloads.dbpedia.org/3.9/en/mappingbased_properties_en.nt.bz2
wget http://downloads.dbpedia.org/3.9/en/labels_en.nt.bz2
wget http://downloads.dbpedia.org/3.9/en/short_abstracts_en.nt.bz2
wget http://downloads.dbpedia.org/3.9/en/long_abstracts_en.nt.bz2
wget http://downloads.dbpedia.org/3.9/en/images_en.nt.bz2
wget http://downloads.dbpedia.org/3.9/en/geo_coordinates_en.nt.bz2

bzip2 -d *
[/raw]
[/cc]

Loading DBpedia into Virtuoso

The next step is to use the Virtuoso’s RDF Bulk Loader to load all the DBpedia triples into Virtuoso. To do so, the first step we have to do is to create a new OSF dataset where the DBpedia entities will be indexed. To create the new dataset, we use the DMT (Datasets Management Tool) to create it. Note that the DMT is already installed on that OSF AMI 3.0.

[cc lang=’bash’ line_numbers=’false’]
[raw]
dmt -n –osf-web-services=”http://localhost/ws/” –uri=”http://dbpedia.org” –creator=”http://localhost/wsf/users/admin” –title=”DBpedia 3.9″ –group=”http://localhost/wsf/groups/administrators”
[/raw]
[/cc]

Then we have to create and configure the RDF Bulk Loader. The first step is to create the procedure file that will be used to import the tables and procedures into Virtuoso:

[cc lang=’bash’ line_numbers=’false’]
[raw]
cd /tmp/
[/raw]
[/cc]

Then create a file called VirtBulkRDFLoaderScript.vsql and add the following code in that new file:

[cc lang=’sql’ line_numbers=’false’]
[raw]
CREATE TABLE load_list (
ll_file VARCHAR,
ll_graph VARCHAR,
ll_state INT DEFAULT 0, — 0 not started, 1 going, 2 done
ll_started DATETIME,
ll_done DATETIME,
ll_host INT,
ll_work_time INTEGER,
ll_error VARCHAR,
PRIMARY KEY (ll_file))
ALTER INDEX load_list ON load_list PARTITION (ll_file VARCHAR)
;

CREATE INDEX ll_state ON load_list (ll_state, ll_file, ll_graph) PARTITION (ll_state INT)
;

CREATE TABLE ldlock (id INT PRIMARY KEY)
ALTER INDEX ldlock ON ldlock PARTITION (id INT)
;

INSERT INTO ldlock VALUES (0);

CREATE PROCEDURE
ld_dir (IN path VARCHAR, IN mask VARCHAR, IN graph VARCHAR)
{
DECLARE ls ANY;
DECLARE inx INT;
ls := sys_dirlist (path, 1);
FOR (inx := 0; inx < LENGTH (ls); inx := inx + 1) { IF (ls[inx] LIKE mask) { SET ISOLATION = 'serializable'; IF (NOT (EXISTS (SELECT 1 FROM DB.DBA.LOAD_LIST WHERE LL_FILE = path || '/' || ls[inx] FOR UPDATE))) { DECLARE gfile, cgfile, ngraph VARCHAR; gfile := path || '/' || REPLACE (ls[inx], '.gz', '') || '.graph'; cgfile := path || '/' || regexp_replace (REPLACE (ls[inx], '.gz', ''), '\\-[0-9]+\\.n', '.n') || '.graph'; IF (file_stat (gfile) <> 0)
ngraph := TRIM (file_to_string (gfile), ‘ \r\n’);
ELSE IF (file_stat (cgfile) <> 0)
ngraph := TRIM (file_to_string (cgfile), ‘ \r\n’);
ELSE IF (file_stat (path || ‘/’ || ‘global.graph’) <> 0)
ngraph := TRIM (file_to_string (path || ‘/’ || ‘global.graph’), ‘ \r\n’);
ELSE
ngraph := graph;
IF (ngraph IS NOT NULL)
{
INSERT INTO DB.DBA.LOAD_LIST (ll_file, ll_graph) VALUES (path || ‘/’ || ls[inx], ngraph);
}
}

COMMIT WORK;
}
}
}
;

CREATE PROCEDURE
rdf_read_dir (IN path VARCHAR, IN mask VARCHAR, IN graph VARCHAR)
{
ld_dirr (path, mask, graph);
}
;

CREATE PROCEDURE
ld_dir_all (IN path VARCHAR, IN mask VARCHAR, IN graph VARCHAR)
{
DECLARE ls ANY;
DECLARE inx INT;
ls := sys_dirlist (path, 0);
ld_dir (path, mask, graph);
FOR (inx := 0; inx < LENGTH (ls); inx := inx + 1) { IF (ls[inx] <> ‘.’ AND ls[inx] <> ‘..’)
{
ld_dir_all (path||’/’||ls[inx], mask, graph);
}
}
}
;

CREATE PROCEDURE
ld_add (IN _fname VARCHAR, IN _graph VARCHAR)
{
–log_message (sprintf (‘ld_add: %s, %s’, _fname, _graph));

SET ISOLATION = ‘serializable’;

IF (NOT (EXISTS (SELECT 1 FROM DB.DBA.LOAD_LIST WHERE LL_FILE = _fname FOR UPDATE)))
{
INSERT INTO DB.DBA.LOAD_LIST (LL_FILE, LL_GRAPH) VALUES (_fname, _graph);
}
COMMIT WORK;
}
;

CREATE PROCEDURE
ld_ttlp_flags (IN fname VARCHAR)
{
IF (fname LIKE ‘%/btc-2009%’ OR fname LIKE ‘%.nq%’ OR fname LIKE ‘%.n4’)
RETURN 255 + 512;
RETURN 255;
}
;

CREATE PROCEDURE
ld_file (IN f VARCHAR, IN graph VARCHAR)
{
DECLARE gzip_name VARCHAR;
DECLARE exit handler FOR sqlstate ‘*’ {
ROLLBACK WORK;
UPDATE DB.DBA.LOAD_LIST
SET LL_STATE = 2,
LL_DONE = CURDATETIME (),
LL_ERROR = __sql_state || ‘ ‘ || __sql_message
WHERE LL_FILE = f;
COMMIT WORK;

log_message (sprintf (‘ File %s error %s %s’, f, __sql_state, __sql_message));
RETURN;
};

IF (f LIKE ‘%.grdf’ OR f LIKE ‘%.grdf.gz’)
{
load_grdf (f);
}
ELSE IF (f LIKE ‘%.gz’)
{
gzip_name := regexp_replace (f, ‘\.gz\x24’, ”);
IF (gzip_name LIKE ‘%.xml’ OR gzip_name LIKE ‘%.owl’ OR gzip_name LIKE ‘%.rdf’)
DB.DBA.RDF_LOAD_RDFXML (gz_file_open (f), graph, graph);
ELSE
TTLP (gz_file_open (f), graph, graph, ld_ttlp_flags (gzip_name));
}
ELSE
{
IF (f LIKE ‘%.xml’ OR f LIKE ‘%.owl’ OR f LIKE ‘%.rdf’)
DB.DBA.RDF_LOAD_RDFXML (file_open (f), graph, graph);
ELSE
TTLP (file_open (f), graph, graph, ld_ttlp_flags (f));
}

–log_message (sprintf (‘loaded %s’, f));
}
;

CREATE PROCEDURE
rdf_load_dir (IN path VARCHAR,
IN mask VARCHAR := ‘%.nt’,
IN graph VARCHAR := ‘http://dbpedia.org’)
{

DELETE FROM DB.DBA.LOAD_LIST WHERE LL_FILE = ‘##stop’;
COMMIT WORK;

ld_dir (path, mask, graph);

rdf_loader_run ();
}
;

CREATE PROCEDURE
ld_array ()
{
DECLARE first, last, arr, len, local ANY;
DECLARE cr CURSOR FOR
SELECT TOP 100 LL_FILE, LL_GRAPH
FROM DB.DBA.LOAD_LIST TABLE OPTION (INDEX ll_state)
WHERE LL_STATE = 0
FOR UPDATE;
DECLARE fill INT;
DECLARE f, g VARCHAR;
DECLARE r ANY;
WHENEVER NOT FOUND GOTO done;
first := 0;
last := 0;
arr := make_array (100, ‘any’);
fill := 0;
OPEN cr;
len := 0;
FOR (;;)
{
FETCH cr INTO f, g;
IF (0 = first) first := f;
last := f;
arr[fill] := VECTOR (f, g);
len := len + CAST (file_stat (f, 1) AS INT);
fill := fill + 1;
IF (len > 2000000)
GOTO done;
}
done:
IF (0 = first)
RETURN 0;
IF (1 <> sys_stat (‘cl_run_local_only’))
local := sys_stat (‘cl_this_host’);
UPDATE load_list SET ll_state = 1, ll_started = CURDATETIME (), LL_HOST = local
WHERE ll_file >= first AND ll_file <= last; RETURN arr; } ; CREATE PROCEDURE rdf_loader_run (IN max_files INTEGER := NULL, IN log_enable INT := 2) { DECLARE sec_delay float; DECLARE _f, _graph VARCHAR; DECLARE arr ANY; DECLARE xx, inx, tx_mode, ld_mode INT; ld_mode := log_enable; IF (0 = sys_stat ('cl_run_local_only')) { IF (log_enable = 2 AND cl_this_host () = 1) { cl_exec ('checkpoint_interval (0)'); cl_exec ('__dbf_set (''cl_non_logged_write_mode'', 1)'); } IF (cl_this_host () = 1) cl_exec('__dbf_set(''cl_max_keep_alives_missed'',3000)'); } tx_mode := bit_and (1, log_enable); log_message ('Loader started'); DELETE FROM DB.DBA.LOAD_LIST WHERE LL_FILE = '##stop'; COMMIT WORK; WHILE (1) { SET ISOLATION = 'repeatable'; DECLARE exit handler FOR sqlstate '40001' { ROLLBACK WORK; sec_delay := RND(1000)*0.001; log_message(sprintf('deadlock in loader, waiting %d milliseconds', CAST (sec_delay * 1000 AS INTEGER))); delay(sec_delay); GOTO again; }; again:; IF (EXISTS (SELECT 1 FROM DB.DBA.LOAD_LIST WHERE LL_FILE = '##stop')) { log_message ('File load stopped by rdf_load_stop.'); RETURN; } log_enable (tx_mode, 1); IF (max_files IS NOT NULL AND max_files <= 0) { COMMIT WORK; log_message ('Max_files reached. Finishing.'); RETURN; } WHENEVER NOT FOUND GOTO looks_empty; -- log_message ('Getting next file.'); SET ISOLATION = 'serializable'; SELECT id INTO xx FROM ldlock WHERE id = 0 FOR UPDATE; arr := ld_array (); COMMIT WORK; IF (0 = arr) GOTO looks_empty; log_enable (ld_mode, 1); FOR (inx := 0; inx < 100; inx := inx + 1) { IF (0 = arr[inx]) GOTO arr_done; ld_file (arr[inx][0], arr[inx][1]); UPDATE DB.DBA.LOAD_LIST SET LL_STATE = 2, LL_DONE = CURDATETIME () WHERE LL_FILE = arr[inx][0]; } arr_done: log_enable (tx_mode, 1); IF (max_files IS NOT NULL) max_files := max_files - 100; COMMIT WORK; } looks_empty: COMMIT WORK; log_message ('No more files to load. Loader has finished,'); RETURN; } ; CREATE PROCEDURE rdf_load_stop (IN force INT := 0) { INSERT INTO DB.DBA.LOAD_LIST (LL_FILE) VALUES ('##stop'); COMMIT WORK; IF (force) cl_exec ('txn_killall (1)'); } ; CREATE PROCEDURE RDF_LOADER_RUN_1 (IN x INT, IN y INT) { rdf_loader_run (x, y); } ; CREATE PROCEDURE rdf_ld_srv (IN log_enable INT) { DECLARE aq ANY; aq := async_queue (1); aq_request (aq, 'DB.DBA.RDF_LOADER_RUN_1', VECTOR (NULL, log_enable)); aq_wait_all (aq); } ; CREATE PROCEDURE load_grdf (IN f VARCHAR) { DECLARE line ANY; DECLARE inx INT; DECLARE ses ANY; DECLARE gr VARCHAR; IF (f LIKE '%.gz') ses := gz_file_open (f); ELSE ses := file_open (f); inx := 0; line := ''; WHILE (line <> 0)
{
gr := ses_read_line (ses, 0, 0, 1);
IF (gr = 0) RETURN;
line := ses_read_line (ses, 0, 0, 1);
IF (line = 0) RETURN;
DB.DBA.RDF_LOAD_RDFXML (line, gr, gr);
inx := inx + 1;
}
}
;

— cl_exec (‘set lock_escalation_pct = 110’);
— cl_exec (‘DB.DBA.RDF_LD_SRV (1)’) &
— cl_exec (‘DB.DBA.RDF_LD_SRV (2)’) &
[/raw]
[/cc]

Then we have to load it into Virtuoso using the following command:

[cc lang=’bash’ line_numbers=’false’]
[raw]
/usr/bin/isql-vt localhost dba dba VirtBulkRDFLoaderScript.vsql
[/raw]
[/cc]

Then we have to configure the RDF Bulk Loader. First enter in the isql interface:

[cc lang=’bash’ line_numbers=’false’]
[raw]
/usr/bin/isql-vt
[/raw]
[/cc]

Then copy/paste the following SQL code into the isql interface:

[cc lang=’sql’ line_numbers=’false’]
[raw]
— load the files to bulk-load
ld_dir_all(‘/usr/local/data/dbpedia/3.9’, ‘*.*’, ‘http://dbpedia.org’);

— list all the files that will be loaded
SELECT * FROM DB.DBA.LOAD_LIST;

— if unsatisfied use:
— delete from DB.DBA.LOAD_LIST and redo;
EXIT;
[/raw]
[/cc]

Then enter the isql interface again:

[cc lang=’bash’ line_numbers=’false’]
[raw]
/usr/bin/isql-vt
[/raw]
[/cc]

And copy/paste the following SQL lines:

[cc lang=’sql’ line_numbers=’false’]
[raw]
rdf_loader_run();

— will take approx. 2 hours with that EC2 server

checkpoint;
commit WORK;
checkpoint;
EXIT;
[/raw]
[/cc]

Configure the Datasets Management Tool

The next step is to properly configure the DMT to bulk load all the DBpedia entities into OSF.

Let’s step back, and explain what we are doing here. What we did with the steps above, is to use a fast method to import all the 3.5 million DBpedia records into Virtuoso. What we are doing now is to take these records, and to index them in the other underlying OSF systems (namely, the Solr full text search & faceting server). What the following steps will be doing is to load all these entities into the Solr index using the CRUD: Create web service endpoint. Once this step is finished, it means that all the DBpedia entities will be searchable and facetable using the OSF Search endpoint.

The first step is to edit the dmt.ini file to add information about the dataset to update:

[cc lang=’bash’ line_numbers=’false’]
[raw]
vim /usr/share/datasets-management-tool/dmt.ini
[/raw]
[/cc]

Then add the following section at the end of the file:

[cc lang=’ini’ line_numbers=’false’]
[raw]
[DBpedia]
datasetURI = “http://dbpedia.org”
baseURI = “http://dbpedia.org/”
datasetLocalPath = “/usr/local/data/dbpedia/3.9/en/”
converterPath = “/usr/share/datasets-management-tool/converters/default/”
converterScript = “defaultConverter.php”
converterFunctionName = “defaultConverter”
baseOntologyURI = “http://dbpedia.org/ontology/”
sliceSize = “500”
targetOSFWebServices = “http://localhost/ws/”
filteredFiles = “instance_types_en.nt”
forceReloadSolrIndex = “true”
[/raw]
[/cc]

Other Configurations to Speed-Up the Process

Now we will cover a few more configurations that can be performed in order to improve the speed of the indexation into OSF. You can skip these additional configuration steps, but if you do so, do not index more than 200 records per slice.

First search and edit the virtuoso.ini file. Then find the ResultSetMaxRows setting and configure it for 1000000 rows.

Then we have to increase the maximum memory allocated for the CRUD: Create web service endpoint. You have to edit the index.php file:

[cc lang=’bash’ line_numbers=’false’]
[raw]
vim /usr/share/osf/StructuredDynamics/osf/ws/crud/create/index.php
[/raw]
[/cc]

Then check around line #17 and increase the memory (memory_limit) to 1000M.

Then we have to change the maximum number of URIs that the CRUD: Read web service endpoint can get as input. By default it is 64, we will ramp it up to 500.

[cc lang=’bash’ line_numbers=’false’]
[raw]
vim /usr/share/osf/StructuredDynamics/osf/ws/crud/read/interfaces /DefaultSourceInterface.php
[/raw]
[/cc]

Then change 64 to 500 at line #25

Importing the DBpedia Ontology

before we start the process of importing the DBpedia dataset into OSF, we have to import the DBpedia Ontology into OSF such that it uses what is defined in the ontology to optimally index the content into the Solr index. To import the ontology, we use the OMT (Ontologies Management Tool).

[cc lang=’bash’ line_numbers=’false’]
[raw]
cd /data/ontologies/files/

wget http://downloads.dbpedia.org/3.9/dbpedia_3.9.owl.bz2

bzip2 -d dbpedia_3.9.owl.bz2

# Load the DBpedia Ontology
omt –load=”file://localhost/data/ontologies/files/dbpedia_3.9.owl” –osf-web-services=”http://localhost/ws/”

# Create the permissions access record for the administrator group to access this ontology
pmt –create-access –access-dataset=”file://localhost/data/ontologies/files/dbpedia_3.9.owl” –access-group=”http://localhost/wsf/groups/administrators” –access-perm-create=”true” –access-perm-read=”true” –access-perm-delete=”true” –access-perm-update=”true” –access-all-ws

# Regenerate the underlying ontological structures
omt –generate-structures=”/data/ontologies/structure/” –osf-web-services=”http://localhost/ws/”
[/raw]
[/cc]

Import DBpedia Into OSF

This is the final step: importing the DBpedia dataset into the OSF full text search index (Solr). To do so, we will use the DMT (Datasets Management Tool) that we previously configured to fully index the DBpedia entities into OSF:

[cc lang=’bash’ line_numbers=’false’]
[raw]
dmt -s -c dmt.ini –config-id=”DBpedia”
[/raw]
[/cc]

This process should take up to 24h with that kind of server.

Conclusion

At that point, the DBpedia dataset, composed of 3.5 million entities, is fully indexed into OSF. What that means is that all the 27 OSF web service endpoints can be used to query, manipulate and use these millions of entities.

However, there is even much more that come out-of-the-box by having DBpedia loaded into OSF. In fact, as we will see in the next article, this means that DBpedia becomes readily available to Drupal 7 if the OSF for Drupal module is installed on that Drupal 7 instance.

What that means is that the 3.5 million DBpedia entities can be searched via the Search API, can be manipulated via the Entity API, can be templated using the Drupal templating engine, etc. Then they can be searched and faceted directly on a map using the sWebMap OSF Widget. Then will be queriable via the OSF QueryBuilder that can be used to create all kind of complex search queries. Etc.

All this out-of-the-box.

Open Semantic Framework version 3.0 Released!

I am really proud to announce the release of the Open Semantic Framework version 3.0. This is a major milestone for the OSF platform and it includes important new features and improvements. triple_902

The updated platform has just emerged from more than a year and a half of full-time development sponsored by one of Structured Dynamics‘ clients: Healthdirect Australia. OSF’s development as been highly influenced by the big enterprise requirements of the HDA sponsor, resulting in two portals to be fully operated by OSF: healthinsite and Pregnancy, Birth and Baby. OSF 3.0 is already in production with these two portals, but it will continue to constantly evolve in the coming months and years.

The OSF release is major in a number of ways. The first thing you will notice is that we re-branded the entire project, which includes all of its moving parts, around the OSF name. The OSF for Drupal (previously known as conStruct) was migrated to Drupal 7 and about 80% of its code was re-written. Seven new OSF Web Services (previously known as structWSF) were created. The old IP based security layer was completely replaced by a new key based security layer. A new revisioning system has been put in place to revision every record has it changes. A new caching layer has been added to the OSF Web Services to improve its performance and decrease the load on the other pieces of the OSF stack (about 80% of the non-search queries will hit the cache). A set of command line tools has been developed to help system administrators to manage and automate tasks on OSF instances. A set of system integration tests, which is composed of 746 tests and 4139 assertions, tests all of the functionalities of the system to make sure it is properly deployed on a server. The OSF Wiki has been completely rewritten and re-organized to help users and developers to find answers to their questions.

You can check the list of all the OSF 3.0 features, and the list of all the new features to OSF 3.0. Now let’s see what this new release is really all about.

[extoc]

The OSF (Open Semantic Framework) Brand

The first thing you will notice with this new OSF 3.0 release is that the whole project got re-branded around the OSF terminology. The Open Semantic Framework (OSF) stack is now composed of:

OSF Web Services

The OSF Web Services changed drastically since version 1.1. Most of its code got re-written, a new structure has been put in place, new features and new web service endpoints got created, etc. In this section, we will cover what changed in the OSF Web Services and what are these new features.

New Security Layer

Initially, we created a simple and effective security layer for the OSF Web Services. It was based on the IP of the requester, nothing more, nothing less. That was five years ago. This simple security layer was quite effective, but it was a nightmare to manage.

What we did for OSF 3.0 is to ditch this old security layer, and to replace it by something secure and much easier to manage.

The new security layer does two things:

  1. Validates the web service call
  2. Validates the data access of the user

To validate the web service call, the new security system uses a secret keys authentication system. Every HTTP query that is sent to any web service endpoint needs to comply with the security protocol. If it doesn’t, then the requests will be refused.

Then if the call is authenticated, the web service endpoint will make sure that the requesting user has proper access to the datasets that are being queried. This second authentication step makes sure that the user can only access the data to which he has access rights.

The real improvement of the new security layer is how the users are managed. In the past, we were managing individual IP addresses. Now, we are managing groups of users. All dataset access permissions to records are related to a group. Each group is composed of one or multiple users. Then, when a web service endpoint checks if a requesting user does have access to the content of a certain dataset, it checks if the requesting users belong to a group that has access to the content of that dataset.

It is now much easier to manage groups of users at the level of the dataset than individual IP addresses.

New Revisioning System

A new records revisioning system is now available in OSF. If required, every change to a record can be revisioned. This means that if someone makes an error when editing a record, all changes can be roll-backed at anytime using the new revisioning system.

A new set of web service endpoints has been created to manage the revisions. You can list, read, update, delete, and compare revisions with these new endpoints.

New Web Service Endpoints

A series of new web service endpoints have been created:

Multi-Language Support

All of the web services that create, update or read data from OSF now have multi-lingual capabilities. If you are creating data, the only thing you have to do is to specify the language for each literal you are defining in the RDF documents you are indexing in OSF. If you are reading or searching data, you only have to specify the language you want to use for each web service query you are creating.

New Caching Layer

OSF is a stack that includes a multitude of underlying systems such as Virtuoso, Solr, OWLAPI, GATE, etc. Depending on the web service endpoints that are used, and depending on how they are used, the same query can be requested again and again, and each of these background services may be queried again and again too.

To improve the performances of each of the OSF Web Services, and to minimize the usage of these underlying systems as much as possible, we added a caching layer at the level of the web service endpoints. The result is that every OSF Web Services query is being cached into the caching layer. This means that every time that the same query is being requested twice, the second time the results will come from the caching layer.

The caching system that is used by OSF is Memcached. More information about the OSF Cache can be read on the OSF Wiki.

Improved Search

The Search web service endpoint, which is by far the most used OSF web service endpoint, also improved quite a lot in developing this new version.

First, the Search endpoint is now using the eDisMax query parser. In itself, this changes everything in the endpoint and leads to the creation of multiple new search functionalities.

It is now possible to change the ranking of the search results by boosting the scoring of the results based on different things such as their dataset provenance, their types or any of their attribute/values. This enables the possibility to improve the quality of the results returned on a OSF web portal depending on the context of a search and the semantics of the records being searched.

It is also now possible to add restrictions to the search queries. This means that search keywords will be restricted to a set of attributes. Then it is also possible to boost the scoring of the returned results depending on where the search keywords appeared.

There is a new spell-checker function for the search queries. This means that if no results are returned for a specific search query, then the system will return a series of possible keywords that the user may want to use to re-initiate the search query.

Finally, an extended search query syntax is now supported by the Search endpoint. This enables more complex search queries to be sent to the Search endpoint, opening the door to the creation of more complex contextual search profiles queries.

New Interfacing Mechanism

A new interface mechanism as been put in place for the OSF Web Services. An interface is a the code that is run by the web service endpoint for a given query.

An interface cocorresponds to a specific version of a web service endpoint. Two different interfaces, for the same endpoint, may comply to different versions of its API. However, these two interfaces can work side-by-side using the same data.

If two interfaces comply to the same endpoint API, it means that their processing of the query will be different (like querying Solr 4.0 instead of 3.6). If two interfaces don’t comply to the same endpoint API version, then it means that each interface supports different versions of the endpoint.

This new interfacing mechanism becomes handy to support more than one triple store, or when the same OSF instance needs to use different Solr query parsers, or when some of the endpoints have to be backward compatible for some portals/users that still need to be supported by the OSF instance, etc.

The new interfacing mechanism gives the flexibility to be able to run different code or support different web service API version on the same OSF instance.

OSF for Drupal

OSF for Drupal now runs on Drupal 7. About 80% of the Drupal-related code got rewritten and we can now state that OSF is fully integrated into Drupal.

Drupal Connectors

A series of OSF connectors have been developed in the last year and a half that basically let Drupal’s core features use OSF instead of MySQL: Entity & Entity API, FieldAPI & FieldStorage and the SearchAPI. These connectors mean that if OSF for Drupal is installed and configured on a Drupal 7 instance, developers will be able to use these core APIs to query registered decentralized OSF instances instead of local MySQL/Solr instances.

OSF Entities

The OSF Entities connector module implements the Drupal Entity API. This means that if OSF for Drupal is properly installed and configured on a Drupal instance, that the Entity API can be used to read, create, update and delete content from registered external OSF Web Services networks. Under this scenario, no information about these Drupal entities will be local to the Drupal instance. All of the content will be hosted externally on a dedicated OSF instance. All of the data manipulated by the Entity API is RDF data. What that means is that the Entity API now may interface with an RDF data management system, with communications with it via web service endpoint queries.

In short, this connector makes OSF records visible to Drupal via the Entity API.

OSF FieldStorage

The OSF FieldStorage connector module creates a new FieldStorage type that enables Drupal users to save Drupal content into an OSF instance instead of saving the content in the default storage system (namely MySQL). This means that if someone starts using OSF instead as the backend of a Drupal portal, then all the Drupal content that will be created will be available via the OSF web service endpoints. This means that other external applications that know how to talk to OSF web service endpoints are now able to leverage the content that has been created from the Drupal instance. Also, all of the content will be available as RDF.

What this connector does at the end is to save Drupal entities into OSF instead of in the default storage system (MySQL).

OSF SearchAPI

The OSF SearchAPI connector module creates a new service for the SearchAPI module. It enables the SearchAPI to send search queries to an OSF Search web service endpoint instead of the default search service. This means that the Drupal search engine is now fully powered by the OSF Search endpoint, and gives access to all the datasets hosted on one, or multiple, remote OSF instances.

Better Configuration & Management

Registering, configuring and managing OSF instances and datasets into Drupal has never been easier. The new OSF Configure module is a new module that centralizes all of the features and options that are required to register, configure and maintain OSF instances and datasets.

QueryBuilder & Search Profiles

A new kind of tool has been developed in OSF for Drupal 3.x: OSF Search Profiles. A search profile is a predefined search query where its search results are displayed in a block positioned on some Drupal pages. These search profiles are normally used to display lists of information that match a search query. Search profiles are also to some extent aware of their context. For example, if the main topic of a page is about cancer and if we have a search profile that displays a list of events, then when the search profile is used in the context of that page about cancer, then cancer related events should be displayed. That is one of the core purposes of the search profiles.

The search profiles’ underlying search queries are being created using the new OSF Query Builder module. This powerful user interface enables site administrators to create complex search queries that will be used within a search profile.

OSF Web Services PHP API

In prior versions, knowing how to query the OSF web services was not an easy task. It is the reason why the OSF Web Services PHP API was developed: to help developers to easily query OSF web service endpoints. This PHP API is a set of classes where each of them has a series of methods that can be used to query a particular web service endpoint. Let’s take this example of some OSF WS PHP API code that does send a query to the OSF Search web service endpoint:

[cc lang=’php’ line_numbers=’false’]
[raw]
//
// Step #1: Instantiate the class of the web service then want to query
//

// Create the SearchQuery object
$search = new SearchQuery(‘http://localhost/ws/’, ‘some-app-id’, ‘some-api-key’, ‘http://localhost/users/foo’);

//
// Step #2: Define all the parameters/features/behaviors of the web service by invoking different methods of the class
//

$resultset = $search->enableInference
->excludeAggregates()
->items(20)
->page(40)
->query(“forest”)
->send()
->getResultset();

// Print the PHP array serialization for that resultset
print_r($resultset->getResultset());
[/raw]
[/cc]

OSF Management Tools

A new set of command line tools have been developed for OSF version 3.0. These tools’ focus has been to help OSF instance administrators by giving them command line tools that they could use in their scripts, Cron jobs, or any other middleware toolings that may perform different tasks on a OSF instance.

Datasets Management Tool

The Datasets Management Tool (DMT) is a command line tool used to manage datasets of a OSF instance. With this tool, you may create, delete, update, import and export datasets directly from the command line.

Ontologies Management Tool

The Ontologies Management Tool (OMT) is a command line tool used to manage ontologies of a OSF Web Services network instance. It can be used to list the ontologies of a OSF Web Services instance, to manage those ontologies, to create/import new ones, to delete existing ones, and to generate underlying ontological structures.

Permissions Management Tool

The Permissions Management Tool (PMT) is a command line tool used to manage access permissions on a OSF Web Services network instance. This tool is used to list, create and delete access permissions, groups and users.

Data Validator Tool

The Data Validator Tool (DVT) is a command line tool used to perform a series of post-indexation data validation tests. What this tool does is to run a series of pre-configured tests, and return validation errors if any are found.

OSF Widgets

All the OSF Widgets (formerly the Semantic Components) have been updated to work with OSF 3.0. The big difference with this update is that all of the OSF Widgets now have access to an OSF for Drupal proxy. This proxy enables them to communicate with a OSF Web Services instance without having to authenticate themselves to the endpoints.

OSF Wiki

The OSF Wiki has been completely rewritten and re-organized. It is the go-to place to find more information about the Open Semantic Framework project, and all pieces of the stack.

Installing and Configuring OSF

OSF Installer

Installing and configuring OSF has never been easier to do. The OSF Installer utility has been improved to ease the deployment of OSF on a new Ubuntu 12.10 server. The installation tool will install and configure all the pieces required by the OSF stack. Once everything is installed and configured, it will run the OSF Tests Suites to make sure that all the OSF functionalities are fully operational on the new server.

Then, once the OSF stack is installed, the user is then able to use the OSF Installer tool to install, deploy and configure Drupal 7 with OSF for Drupal.

OSF EC2

Additionally, we created a new public Amazon AWS EC2 image that includes the full OSF stack version 3.0. This new public image is available in all the zones:

Region arch root store AMI
us-east-1 64-bit EBS ami-afe4d1c6
us-west-1 64-bit EBS ami-d01b2895
us-west-2 64-bit EBS ami-c6f691f6
eu-west-1 64-bit EBS ami-883fd4ff
sa-east-1 64-bit EBS ami-6515b478
ap-southeast-2 64-bit EBS ami-4734ab7d
ap-southeast-1 64-bit EBS ami-364d1a64
ap-northeast-1 64-bit EBS ami-476a0646

Once you create a new instance from that image, you will have to properly configure it to make it secure and fully operational. The only thing you have to do is to follow the steps outlined in the Creating and Configuring an Amazon EC2 AMI OSF Instance manual.

System Integration Tests

A complete suite of integration tests has been created for OSF 3.0. The tests suites are composed of 746 tests and 4139 assertions. These integration tests make sure that all of the functionality of an OSF instance is working. These tests are run every time an OSF instance is deployed using the OSF Installer script. Then, they can be re-run anytime thereafter. Normally, every time an update is made on an OSF instance, the tests should be run as well to make sure that the update didn’t break anything.

These tests are testing:

  • All of the input parameters of each endpoint
  • All of the combinations of all the input parameters of each endpoint
  • All of the mime types supported by each endpoint
  • All of the expected error returned by each endpoint.

Conclusion

We have been working on this new Open Semantic Framework version 3.0 for almost two full years now. We have been quiet during that time since we had no more time other than coding, documenting, testing and deploying the code that we are releasing today.

This new version is a major leap forward for the Open Semantic Framework open source project. Five years ago, Mike and I set as a goal to have a complete OSF stack in place that could be leveraged by anybody to fulfill the requirement of any kind of projects. I think that with this OSF version 3.0, we reached the middle term goal that we fixed for ourselves 5 years ago.

New Mapping Semantic Component In JavaScript


I am please to announce the release of the new sWebMap Semantic Component in JavaScript. This new mapping component is a standalone JavaScript application that can be integrated on any new or existing web sites and that interact with an Open Semantic Framework (OSF) instance to search, browse, filter and display with geographically-located information on an interactive map.

Features

The sWebMap is a rich mapping tool that can easily be integrated on any webpage, and that can be extensively customized. The sWebMap does support these features:

  • Full text search for searching and displaying results on a map
  • Extensive filtering capabilities
    • Filtering by dataset source
    • Filtering by type
    • Filtering by attribute/value
    • Filtering of records that belongs to a specific geographic region
  • Display of record on the map using:
    • Different markers depending on the type of record to display (determined by the ontologies)
    • Polygon shapes for records that refers to a geographic region
    • Polyline shapes for records that refers to a geographically-located path
  • Templating of records in a resultset depending on their type
  • Templating of records’ preview, displayed in an overlay window, depending on their type
  • Persist records on the map accros searches and filtering operations
  • Supports map sessions
    • Save map sessions
    • Load saved map sessions
    • Delete saved map sessions
    • Share saved map sessions
  • Supports a multiple-maps mode
    • Three focus maps are available under the main map
    • Each map focus on a particular region of the main map
    • User can switch between focus map to see different records in different region


Normal Mode

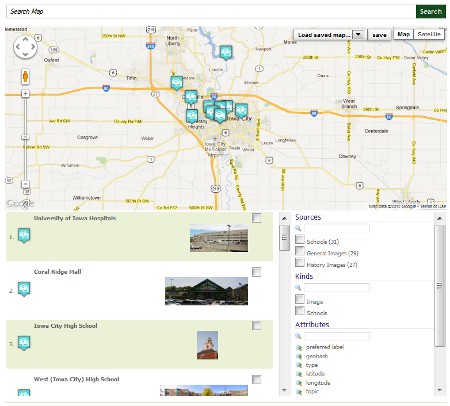
Here is what the default sWebMap, in normal mode, using a few datasets related to the city of Iowa looks like. You can also interact with this sWebMap instance directly on the Citizen DAN demo website here.

Multiple Windows Mode

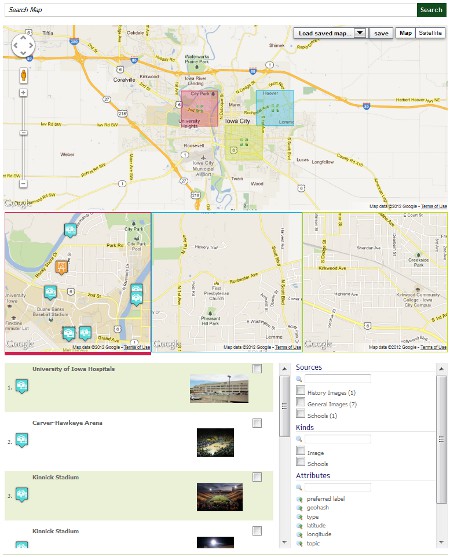
Here is what the default sWebMap, in multiple windows mode, using a few datasets related to the city of Iowa looks like. You can also interact with this sWebMap instance directly on the Citizen DAN demo website here.


Under the Hood: The Open Semantic Framework

Each sWebMap component communicates with an OSF (Open Semantic Framework) instance. More specifically, a sWebMap component will send Search/Filtering queries to a geo-enabled structWSF Search web service endpoint.

Depending on the options you had specified when you created the sWebMap control, each time you move (option), zoom (option) or change the filtering criterias, this will send a query to the Search endpoint. The sWebMap control then requests JSON formatted resultset and display the results to the user.

This means that to implement the sWebMap component on your website, you will need to have:

Download

You can immediately download the entire code source from this GitHub reposiroty:

Installation

Installing the sWebMap component is really easy. In fact, you only have to load a few JavaScript and CSS files, to defined a <div></div> container for the map, and to create a sWebMap component object, which is a single line of code.

Additionally, you can initialize the sWebMap component with one of the multiple options available.

Refer you to the Usage section of the sWebMap component to know exactly how to install and setup a sWebMap component instance.

Resources

Here are some additional resources related to the sWebMap component:


Benchmark of PHP’s main String Search Functions

I am currently upgrading the structWSF ontologies related web service endpoints along with the structOntology conStruct module to make them more performing so that we can load ontologies that have thousands of classes and properties (at least up to 30 000 of them).

While testing these new upgrades with them UMBEL ontology, I noticed that much of the time was spent by a few number of stripos() calls located in the loadXML() function of the ProcessorXML.php internal structXML parser. They were used to extract the prefixes in the header of the structXML files, and then to resolve them into the XML file. I was using stripos() instead of strpos() to make the parsing of these structXML files case-insensitive even if XML is case-sensitive itself. However, due to their processing cost, I did change this behaviors by using the strpos() function instead. Here are the main reasons to this change:

  • XML is itself case-sensitive, so don’t try to be too clever
  • These structXML files that are exchanged are mostly internal to structXML
  • Their parsing performances is critical

The Tests

This is a non-scientific post about some experimentation I made related to the various PHP 5.3 string search functions. These tests have been performed on a small Amazon EC2 instance using DBG and PHPeD.

[cc lang=’php’ line_numbers=’true’]
[raw]

[/raw]
[/cc]

The first test uses a text of 138 words. That text get exploded into an array where each value is a word of that text. Then, before each iteration, we randomly select a word that we will search, within the text, using each of the 4 search functions.

Note that in the result images below, each of the line in the left-most column are the ones of the PHP code above.

That first test starts with 10 000 iterations. Here are the results of the first run:


The second test uses the same 138 words, but the test is performed 100 000 times:

As we can see, strpos() and strstr() are clearly faster than their case-insensitive counterparts.

Now, let’s see what is the impact of the size of the text to search. We will now perform the two tests with 10 000 and 100 000 iterations but with a text that has 497 words.

[cc lang=’php’ line_numbers=’true’]
[raw]

[/raw]
[/cc]

That third test starts with 10 000 iterations. Here are the results of the third run:

The fourth test uses the same 497 words, but the test is performed 100 000 times:

As we can see, even if we add more words, the same kind of performances are experienced.

Conclusion

After many runs (I only demonstrated a few here). I think I can affirm that strpos() and strstr() are way faster than their case-insensitive counterparts. However, strpos() seems a little bit faster than strstr(), but it seems to depends of the context, and which random words are being searched for. In any cases, according to PHP’s documentation, we should always use strpos() instead of strstr() because it supposedly use less memory.

There may also be some unknown memory considerations that may affect the code I used to test these functions. In any case, I can affirm that in a real context, where queries are sent to the Ontology: Read web service endpoint that hosts the UMBEL ontology, that strpos() is a way faster than stripos().