structFieldStorage: A New Field Storage System for Drupal 7

Structured Dynamics has been working with Drupal for quite some time. This week marks our third anniversary of posting code to the contributed conStruct modules in Drupal. But, what I’m able to share today is our most exciting interaction with Drupal to date. In essence, we now can run Drupal directly from an RDF triplestore and take full advantage of our broader Open Semantic Framework (OSF) stack. Massively cool!

On a vanilla Drupal 7 instance, everything ends up being saved into Drupal’s default storage system. This blog post introduces a new way to save (local) Content Type entities: the structfieldstorage field storage system. This new field storage system gives the possibility to Drupal administrators to choose to save specific (or all) fields and their values into a remote structWSF instance. This option replaces Drupal’s default storage system (often MySQL) for the content types and their fields chosen.

By using this new field storage system, all of the local Drupal 7 content can be queried via any of structWSF’s web service endpoints (which includes a SPARQL endpoint). This means that all Drupal 7 content (using this new storage system) gets converted and indexed as RDF data. This means that all of the Drupal local content gets indexed in a semantic web service framework.

Fields and Bundles

There are multiple core concepts in Drupal, two of which are Bundles and Fields. A Field is basically an attribute/value tuple that describes an entity. A Bundle is a set (an aggregation) of fields. The main topic of this blog post is a special feature of the field: their storage system.

In Drupal, each field instance does have its own field storage system associated to it. A field storage system is a system that manages the field/value tuples of each entity that has been defined as a Drupal instance. The default storage system of any field is the field_sql_storage, which is normally a MySQL server or database.

The field storage system allows a bundle to have multiple field instances, each of which may have a different field storage target. This means that the data that describes an entity can be saved in multiple different data stores. Though it may appear odd at first as to why such flexibility has merit, but we will see that this design is quite clever, and probably essential.

There are currently a few other field storage systems that have been developed for Drupal 7 so far. The most cited one is probably the MongoDB module, and there is also Riak. What I am discussing in this blog post is a new field storage system for Drupal 7 which uses structWSF as the data store. This new module is called the structFieldStorage module and it is part of conStruct.

Flexibility of the Field Storage API design

The design of having one field storage system per field is really flexible and probably essential. By default, all of the field widgets and all the modules have been created using the field_sql_storage system. This means that a few things here and there have been coded with the specificities of that field storage system. The result is that even if the Field Storage API has been designed and developed such that we can create new field storage systems, the reality is that once you do it, multiple existing field widgets and modules can break from the new field storage systems.

What the field storage system developer has to do is to test all the existing (core) field widgets and modules and make sure to handle all the specifics of these widgets and modules within the field storage system. If it cannot handle a specific widget or module, it should restrict their usage and warn the user.

However, there are situations where someone may require the use of a specific field widget that won’t work with that new field storage system. Because of the flexibility of the design, we can always substitute the field_sql_storage system for the given field dependent on that special widget. Under this circumstance, the values of that field widget would be saved in the field_sql_storage system (MySQL) while the other fields would save their value in a structWSF instance. Other circumstances may also warrant this flexibility.

structFieldStorage Architecture

Here is the general architecture for the structFieldStorage module. The following schema shows how the Drupal Field Storage API Works, and shows the flexibility that resides into the fields, and how multiple fields, all part of the same bundle, can use different storage systems:

bundles_fields_field_storage_api_outline

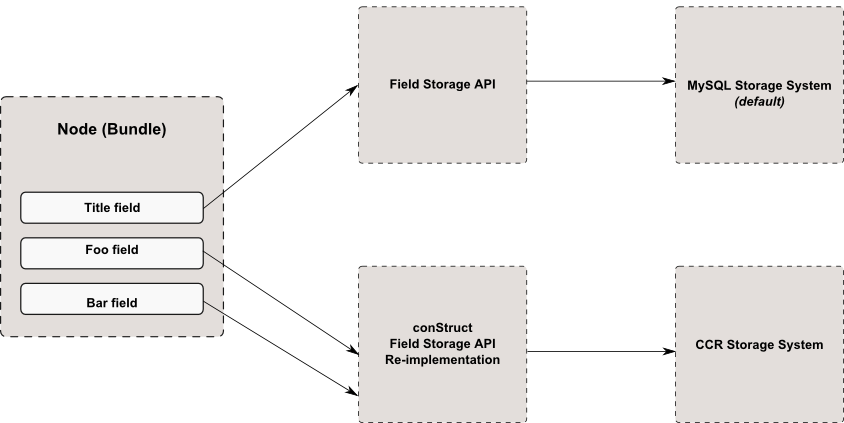
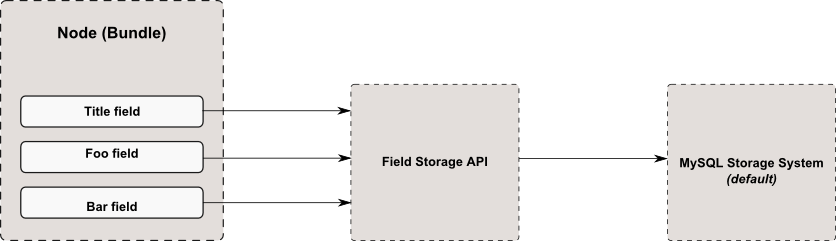
By default, on a vanilla Drupal instance, all the fields use the field_sql_storage field storage system:

default_field_storage_system_interaction

Here is what that same bundle looks like when all fields use the structfieldstorage field storage system:

ccr_field_storage_system_interaction

Finally here is another schema that shows the interaction between Drupal’s core API, structFieldStorage and the structWSF web service endpoints:

structFieldStorage

Synchronization

Similar to the default MySQL field_sql_storage system, we have to take into account a few synchronization use cases when dealing with the structfieldstorage storage system for the Drupal content types.

Synchronization with structFieldStorage occurs when fields and field instances that use the structfieldstorage storage system get deleted from a bundle or when an RDF mapping changes. These situations don’t appear often once a portal is developed and properly configured. However, since things evolve all the time, the synchronization mechanism is always available to handle deleted content or changed schema.

The synchronization workflow answers the following questions:

  • What happens when a field get deleted in a content type?
  • What happens when a field’s RDF mapping changes for a new property?
  • What happens when a bundle’s type RDF mapping changes for a new one?

Additionally, if new field instances are being created in a bundle, no synchronization of any kind is required. Since this is a new field, there is necessarily no data for this field in the OSF, so we just wait until people start using this new field to commit new data in the OSF.

The current synchronization heuristics follow the following steps:

  1. Read the structfieldstorage_pending_opts_fields table and get all the un-executed synchronization change operations
    1. For each un-executed change:
      1. Get 20 records within the local content dataset from the Search endpoint. Filter the results to get all the entities that would be affected by the current change
        1. Do until the Search query returns 0 results
          1. For each record within that list
            1. Apply the current change to the entities
            2. Save that modified entities into the OSF using the CRUD: Update web service endpoint
      2. When the Search query returns 0 results, it means that this change got fully applied to the OSF. The state of this change record then get marked as executed.
  2. Read the structfieldstorage_pending_opts_bundles table and get all the un-executed synchronization change operations
    1. For each un-executed change:
      1. Get 20 records within the local content dataset from the Search endpoint. Filter the results to get only the ones that would be affected by the current change
        1. Do until the Search query returns 0 results
          1. For each record within that list
            1. Apply the current change to the entities
            2. Save that changed record into the OSF using the CRUD: Update web service endpoint
      2. When the Search query returns 0 results, it means that this change got fully applied to the OSF. The state of this change record then get marked as executed.

The synchronization process is triggered by a Drupal cron job. Eventually this may be changed to have a setting option that would let you use cron synchronization or to trigger it by hand using some kind of button.

Compatibility

The structFieldStorage module is already compatible with multiple field widgets and external contributed Drupal 7 modules. However, because of Drupal’s nature, other field widgets and contributed modules that are not listed in this section may be working with this new field storage system, but tests will be required by the Drupal system administrator.

Field Widgets

Here is a list of all the core Field Widgets that are normally used by Drupal users. This list tells you which field widget is fully operational or disabled with the structfieldstorage field storage system.

Note that if a field is marked as disabled, it only means that it is not currently implemented for working with this new field storage system. It may be re-enabled in the future if it become required.

Field Type Field Widget Operational?
Text Text Field Fully operational
Autocomplete for predefined suggestions Fully operational
Struct Lookup Fully operational
Struct Lookup with suggestion Fully operational
Autocomplete for existing field data Disabled
Autocomplete for existing field data and some node titles Disabled
Term Reference Autocomplete term widget (tagging) Disabled
Select list Disabled
Check boxes/radio buttons Disabled
Long text and summary Text area with a summary Fully operational
Long text Text area (multiple rows) Fully operational
List (text) Select list Fully operational
Check boxes/radio buttons Fully operational
Autocomplete for allowed values list Disabled
List (integer) Select list Fully operational
Check boxes/radio buttons Fully operational
Autocomplete for allowed values list Disabled
List (float) Select list Fully operational
Check boxes/radio buttons Fully operational
Autocomplete for allowed values list Disabled
Link Link Fully operational
Integer Text field Fully operational
Float Text field Fully operational
Image Image Fully operational
File File Fully operational
Entity Reference Select list Fully operational
Check boxes/radio buttons Fully operational
Autocomplete Fully operational
Autocomplete (Tags style) Fully operational
Decimal Text field Fully operational
Date (Unix timestamp) Text field Fully operational
Select list Fully operational
Pop-up calendar Fully operational
Date (ISO format) Text field Fully operational
Select list Fully operational
Pop-up calendar Fully operational
Date Text field Fully operational
Select list Fully operational
Pop-up calendar Fully operational
Boolean Check boxes/radio buttons Fully operational
Single on/off checkbox Fully operational

Core & Popular Modules

Revisioning

The Revisioning module is fully operational with the structfieldstorage field storage system. All the operations exposed in the UI have been handled and implemented in the hook_revisionapi() hook.

Diff

The Diff module is fully operational. Since it compares entity class instances, there is no additional Diff API implementation to do. Each time revisions get compared, then structfieldstorage_field_storage_load() gets called to load the specific entity instances. Then the comparison is done on these entity descriptions.

Taxonomy

The Taxonomy module is not currently supported by the structfieldstorage field storage system. The reason is that the Taxonomy module is relying on the design of the field_sql_storage field storage system, which means that it has been tailored to use that specific field storage system. In some places it can be used, such as with the entity reference field widget, but its core functionality, the term reference field widget, is currently disabled.

Views

structViews is a Views query plugin for querying an OSF backend. It interfaces the Views 3 UI and generates OSF Search queries for searching and filtering all the content it contains. However, Views 3 is intimately tied with the field_sql_storage field storage system, which means that Views 3 itself cannot use the structfieldstorage storage system off the shelf. However, Views 3 design has been created such that a new Views querying engine could be implemented, and used, with the Views 3 user interface. This is no different than how the Field Storage API works for example. This is exactly what structViews is, and this is exactly how we can use Views on all the fields that uses the structfieldstorage field storage system.

This is not different than what is required for the mongodb Drupal module. The mongodb Field Storage API implementation is not working with the default Views 3 functionality either, as shown by this old, and very minimal, mongodb Views 3 integration module.

structViews is already working because all of the information defined in fields that use the structfieldstorage storage system is indexed into the OSF. What structViews does is just to expose this OSF information via the Views 3 user interface. All the fields that define the local content can be added to a structViews view, all the fields can participate into filter criteria, etc.

What our design means is that the structFieldStorage module doesn’t break the Views 3 module. It does not because structViews takes care to expose that entity storage system to Views 3, via the re-implmented API.

efq_views

efq_views is another contributed module that exposes the EntityFieldQuery API to Views 3. What that means is that all of the Field Storage Systems that implement the EntityFieldQuery API should be able to interface with Views 3 via this efq_views Views 3 querying engine.

Right now, the structFieldStorage module does not implement the EntityFieldQueryAPI. However, it could implement it by implementing the hook_field_storage_query() hook. (This was not required by our current client.)

A Better Revisioning System

There is a problem with the core functionality of Drupal’s current revisioning system. The problem is that if a field or a field instance gets deleted from a bundle, then all of the values of those fields, within all of the revisions of the entities that use this bundle, get deleted at the same time.

This means that there is no way to delete a field without deleting the values of that field in existing entities revisions. This is a big issue since there is no way to keep that information, at least for archiving purposes. This is probably working that way because core Drupal developers didn’t want break the feature that enables people to revert an entity to one of its past revisions. This would have meant that data for fields that no longer existed would have to be re-created (creating its own set of issues).

However, for all the fields that uses the structfieldstorage field storage system, this issue is non-existing. Even if fields or fields instances are being deleted, all the past information about these fields remains in the revisions of the entities.

Conclusion

This blog post exposes the internal mechanism of this new structfieldstorage backend to Drupal. The next blog post will focus on the user interface of this new module. It will explain how it can be configured and used. And it will explain the different Drupal backend user interface changes that are needed to expose the new functionality related to this new module.

jQuery Cookie Pluging Extended With HTML5 localStorage And Chunked Cookies

Is there a web developer that never used cookies to save some information in a user’s browser? There may be, but they should be legion. As you probably know, the problem with cookies is that their implementation in browsers is random: some will limit the size of the cookie to 4096 bytes, others will limit the number of cookies from a specific domain to 50, others will have no perceivable limits, etc.


In any case, if one of these limits is reached, the cookie is simply not created the browser. This is fine, because web developer expects cookies to fail from time to time, and the system they develop has to cope with this unreliableness. However, this situation can sometimes become frustrating, and it is why I wanted to extend the default behavior of the jQuery Cookie plugin with a few more capabilities.

This extension to the jQuery Cookie plugin adds the capability to save content that is bigger than 4096 bytes long using two different mechanism: the usage of HTML5’s localStorage, or the usage of a series of cookies where the content is chunked and saved. This extension is backward compatible with the jQuery Cookie plugin and its usage should be transparent to the users. Even if existing cookies have been created with the normal Cookie plugin, they will still be usable by this new extension. The usage syntax is the same, but 3 new options have been created.

Now, let’s see how this plugin works, how developers should use it, what are its limitations, etc.

You can immediately download the jQuery Extended Cookie plugin from here:

Limitations Of Cookies

First, let’s see what the RFC 2109 says about the limitations of cookies in web browsers. Browsers should normally have these implementation limits (see section 6.3):

   Practical user agent implementations have limits on the number and
   size of cookies that they can store.  In general, user agents' cookie
   support should have no fixed limits.  They should strive to store as
   many frequently-used cookies as possible.  Furthermore, general-use
   user agents should provide each of the following minimum capabilities
   individually, although not necessarily simultaneously:

      * at least 300 cookies
      * at least 4096 bytes per cookie (as measured by the size of the
        characters that comprise the cookie non-terminal in the syntax
        description of the Set-Cookie header)
      * at least 20 cookies per unique host or domain name

   User agents created for specific purposes or for limited-capacity
   devices should provide at least 20 cookies of 4096 bytes, to ensure
   that the user can interact with a session-based origin server.

   The information in a Set-Cookie response header must be retained in
   its entirety.  If for some reason there is inadequate space to store
   the cookie, it must be discarded, not truncated.

   Applications should use as few and as small cookies as possible, and
   they should cope gracefully with the loss of a cookie.

New Options

Before I explains how this extension works, let me introduce three new options that have been added to the Cookie plugin. These new options will be put into context, and properly defined later in this blog post.

  • maxChunkSize – This defines the maximum number of bytes that can be saved in a single cookie. (default: 3000)
  • maxNumberOfCookies - This is the maximum number of cookies that can be created for a single domain name. (default: 20)
  • useLocalStorage – This tells the extended Cookie plugin to use the HTML5’s localStorage capabilities of the browser instead of a cookie to save that value. (default: true)

How Does This Extension Works?

As I said in the introduction of this blog post, this extension to the jQuery Cookie plugin does two things:

  1. It uses the HTML5 localStorage capabilities of the browser if this feature is available instead of relying on the cookies. However, if cookies are needed by the developer, this feature can be turned off with the useLocalStorage = false option
  2. If the localStorage option is disable, or simply not available on a browser, and if the content is bigger than the limit of the size of a cookie, then this extension will chunk the input content, and save it in multiple cookies

If the useLocalStorage is true, then the plugin will try to see if the HTML5 localStorage mechanism is available on the browser. If it is, then it will use that local storage to save and retrieve content to the browser. If it is not, then the plugin will act like if useLocalStorage is false and the process will continue by using cookies to save and read that content from the browser.

If useLocalStorage is false, or if the HTML5 localStorage mechanism is not available on the browser, then the plugin will check if the content is bigger than the maxChunkSize option, than all the chunks will be saved in different cookies until it reaches the limit imposed by the maxNumberOfCookies option.

If cookies are used, then two use-cases can happen:

  1. The content is smaller than or equal to maxChunkSize
  2. The content is bigger than maxChunkSize

If the content is smaller than or equal to maxChunkSize than only one cookie will be created by the browser. The name of the cookie will be the value provided to the key parameter.

If the content is bigger than maxChunkSize than multiple cookies will be created, one per chunk. The convention is that the name of the first cookie is the value provided to the key parameter. The name of the other chunks is the value provided to the key parameter with the chunk indicator ---ChunkNum append to it. For example, if we have a cookie with a content of 10000 bytes that has maxChunkSize defined to 4000 bytes, then these three cookies would be created:

  • cookie-name
  • cookie-name---1
  • cookie-name---2

Usage

Now, let’s see how this extended jQuery Cookie plugin should be used in your code. The usage of the extension is no different from the usage of the normal jQuery Cookie plugin. However, I am showing how to use the new options along with how to use the plugin in general.

Create a Cookie

Let’s create a cookie that expires in 365 days and where the path is the root:

[cc lang=’javascript’ ]

$.cookie(‘my-cookie’, “the-content-of-my-cookie”, { expires: 365, path: “/” });

[/cc]

By default, this value will be persisted in the localStorage if the browser supports it, and not in a cookie. So, let’s see how to force the plugin to save the content in a cookie by using the useLocalStorage option:

[cc lang=’javascript’ ]

$.cookie(‘my-cookie’, “the-content-of-my-cookie”, {useLocalStorage: false, expires: 365, path: “/” });

[/cc]

Delete a Cookie

Let’s see how a cookie can be deleted. The method is simply to put null as the value of the cookie. This will instruct the plugin to remove the cookie.

[cc lang=’javascript’ ]

$.cookie(‘my-cookie’, null);

[/cc]

With that call, the plugin will try to remove my-cookie both in the localStorage and in the cookies.

Read a Cookie

Let’s see how we can read the content of a cookie:

[cc lang=’javascript’ ]

var value = $.cookie(‘my-cookie’);

[/cc]

With this call, value will get the content that has been saved in the localStorage, or the cookies. This will depend if the localStorage was available in the browser.

Now, let’s see how to force reading the cookies by bypassing the localStorage mechanism:

[cc lang=’javascript’ ]

var value = $.cookie(‘my-cookie’, {useLocalStorage: false});

[/cc]

Note that if the cookie is not existing for a key, then the $.cookie() function will return null.

Using Limitations

Let’s see how to use the maxNumberOfCookies and maxChunkSize options to limit the size and the number of cookies to be created.

With this example, the content will be saved in multiple cookies of 1000 bytes each up to 30 cookies:

[cc lang=’javascript’ ]

var value = $.cookie(‘my-cookie’, “the-content-of-my-cookie-is-10000-bytes-long…”, {useLocalStorage: false, maxChunkSize  = 1000, maxNumberOfCookies = 30, expires: 365, path: “/” });

[/cc]

Limitations

Users have to be aware of the limitations of this enhanced plugin. Depending on the browser, the values of the maxChunkSize and the maxNumberOfCookies options should be different. In the worse case, some cookies (or cookies chunks) may simply not be created by the browser. As stated in the RFC 2109, the web applications have to take that fact into account, and be able to gracefully cope with this.

Future Enhancements

In the future, this extension should detect the browser where it runs, and setup the maxChunkSize and the maxNumberOfCookies parameters automatically depending on the cookies limitation of each browser.

Conclusion

I had to create this extension to the jQuery Cookie plugin to be able to store the resultsets returned by some web service endpoints. It is only used to limit the number of queries sent to these endpoints. Since the values returned by the endpoints are nearly static, that they are loaded at each page view and that they are a few kilobytes big, I had to find a way to save that information in the browser, and to overcome the size limitation of the cookies if possible. I also needed to be able to cope with older versions of browsers that only supports cookies. In the worse case scenario, the browser will simply send the request to the endpoints at each page load for the special use-cases where nothing works: not the cookies and not the localStorage. But at least, my application will benefit of this enhancement from the 95% of the users were one of these solutions works.

The Open Semantic Framework Installer

We are excited to introduce the first Open Semantic Framework installation script. This new installer application will install and configure the entire Open Semantic Framework stack for you. It will take about 10 minutes of your time, and will process in the background for a few hours while everything necessary to build the OSF stack is downloaded and compiled. Open Semantic Framework Installer

The only thing you have to do to run the OSF Installer is to issue the few commands outlined below, and then to answer a few questions in the process (which, since most of them use the standard default values, is pretty easy).

The OSF Installer is a major addition to the Open Semantic Framework since it now enables a greater number of people (mere mortals) to install and use the stack, and it enables much faster deployment of the system.

The full installation manual, where each of the steps performed by the installer is explained in detail, is available as a reference here.

Requirements

The current version of the Open Semantic Framework Installer is fully operational on:

  1. Ubuntu 10.04 (Lucid)
  2. 32 Bits Operating System
  3. Access to internet from the server
  4. 5GIG of disk space on the partition where you are installing OSF

Eventually this installer will be upgraded for 64-bits operating systems, and for other Linux distributions. Also, the current installer should work on newer versions of Ubuntu, but it has only been tested to date on the latest LTS version.

Installing the Open Semantic Framework

The only manual steps need to do to install the Open Semantic Framework are to:

  1. Create a folder where to install OSF on your server
  2. Download the osf-install.zip installation package
  3. Make the osf-install.sh installation script executable
  4. Run the osf-install.sh installation script
  5. Answer the questions asked by the installer

Here are the commands you have to run:

[cc lang=’bash’ line_numbers=’true’ ]

cd /mnt/
sudo wget https://github.com/downloads/structureddynamics/Open-Semantic-Framework-Installer/osf-installer-v1.0a4.zip
sudo unzip osf-installer-v1.0a4.zip
cd `ls -d structureddynamics*/`
sudo chmod 755 osf-install.sh
./osf-install.sh

[/cc]

conStruct and structWSF Upgrades

In the process, both conStruct and structWSF have been enhanced to enable automatic upgrading in the future. Starting with structWSF version 1.0a92 and conStruct version 6.x-1.0-beta9, future upgrades should be done automatically using automatic upgrading procedures.

However, to enable this, existing users will have to upgrade their current versions manually to establish the new automatic upgrades baseline.

Next Steps

Once you have installed the OSF stack, you next query the structWSF Web service endpoints, and import datasets using conStruct. Here are a few things you can do to start exploring the Open Semantic Framework:

  1. Start exploring structWSF
  2. Start exploring conStruct
  3. Start exploring Ontologies usage in OSF
  4. Start importing and manipulating datasets
  5. Start exploring the Open Semantic Framework architecture
  6. Start playing with the structWSF web service endpoints

Since everything is installed on your server, so you only have to play with the stack now. If you break something, just ping us on the mailing list or re-install it without worrying about each installation steps!

Help

It may be possible that you experience some issues with this new OSF Installer. If that is the case, I would suggest your to make an outreach to the Open Semantic Web Mailing List so that we fix it on the Git repository.

Just write an email that includes the specifications of the server where you are trying to install OSF on. Then tell us where the issue happens in the installation process. Also add any logs that could be helpful in debugging the issue.

Conclusion

This is the first version of the OSF installer, but this is a real balm for installing OSF. As noted, this installer will eventually be upgraded to support 64-bit servers and other Linux distributions. Also, any help improving this installer from Bash wizards would naturally be greatly welcomed.

Moving Projects from Google Code to GitHub

Last week we slowly migrated Structured Dynamics‘ Google Code Projects to GitHub.We have been thinking about moving to GitHub for some time now, but we only wanted to move projects to it if no prior history and commits were dropped in the process. One motivation for the possible change has been the seeming lack of support by Google for certain long-standing services: we are seeing disturbing trends across a number of existing services. We also needed a migration process that would work with all of our various projects, without losing a trunk, branch, tag or commits (and their related comments).

It was not until recently that I found a workable process. Other people have successfully migrated Google Code SVN projects to GitHub, but I had yet to find a consolidated guide to do it. It is for this last reason that I write this blog post: to help people, if they desire, to move projects from Google Code to GitHub.

Moving from Google Code to GitHub

The protocol outlined below may appear complex, but it looks more intimidating than it really is. Moving a project takes about two to five minutes once your GitHub account and your migration computer is properly configured.

You need four things to move a Google Code SVN project to GitHub:

  1. A Google Code project to move
  2. A GitHub user account
  3. SSH keys, and
  4. A migration computer that is configured to migrate the project from Google Code to GitHub. (in this tutorial, we will use a Ubuntu server; but any other Linux/Windows/Mac computer, properly configured, should do the job)

Create GitHub Account

If you don’t already own a GitHub account, the first step is to create one here.

Create & Configure SSH Keys

Once your account has been created, you have to create and setup the SSH keys that you will use to commit the code into the Git Repository on GitHub:

  1. Go to the SSH Keys Registration page of your account
  2. If you already have a key, then add it to this page, otherwise read this manual to learn how to generate one

Configure Migration Server

The next step is to configure the computer that will be used to migrate the project. For this tutorial, I use a Ubuntu server to do the migration, but any Windows, Linux or Mac computer should do the job if properly configured.

The first step is to install Git and Ruby on that computer:

[cc lang=’bash’ line_numbers=’true’] sudo apt-get install git-core git-svn ruby rubygems[/cc]

To perform the migration of a Google Code SVN project to GitHub, we are using a Ruby application called svn2git that is now developed by Kevin Menard. The next step is to install svn2git on that computer:

[cc lang=’bash’ line_numbers=’true’] sudo gem install svn2git –source http://gemcutter.org [/cc]

Migrate Project

Before migrating your project, you have to link the Google Code committers to GitHub accounts. This is done by populating a simple text file that will be given as input to svn2git.

Open the authors.txt file into a temporary folder:

[cc lang=’bash’ line_numbers=’true’] sudo vim /tmp/authors.txt[/cc]

Then, for each author, you have to add the mapping between their Google Code and GitHub accounts. If a Google Code committer does not exist on GitHub, then you should map it to your own GitHub account.

[cc lang=’text’ line_numbers=’true’]
[raw]
(no author) = Frederick Giasson
fred@f…com = Frederick Giasson
[/raw]
[/cc]

The format of this authors.txt file is:

[cc lang=’text’ line_numbers=’true’ ][raw] Google-Account-Username = Name-Of-Author-On-GitHub (no author) mapping. This link is required for every authors.txt file. This placeholder is used to map the initial commit performed by the Google Code system. (When Google Code initializes a new project, it uses that username for creating the first commit of any project.)

When you are done, save the file.

Now that set up is complete, you are ready to migrate your project. First, let’s create the folder that will be used to checkout the SVN project on the server, and then to push it on GitHub.

[cc lang=’bash’ line_numbers=’true’]
cd /tmp/
mkdir myproject
cd myproject
[/cc]

In this tutorial, we have a normal migration scenario. However, your migration scenario may differ from this one. It is why I would suggest you check out the different scenarios that are supported by svn2git document. Change the following command accordingly. Let’s migrate the Google Code SVN Project into the local Git repository:

[cc lang=’bash’ line_numbers=’true’] /var/lib/gems/1.8/bin/svn2git http://myproject.googlecode.com/svn –authors /tmp/authors.txt –verbose [/cc]

Make sure that no errors have been reported during the process. If it is the case, then refer to the Possible Errors and Fixes section below to troubleshoot your issue.

The next step is to create a new GitHub repository where to migrate the SVN project. Go to this GitHub page to create your new repository. Then you have to configure Git to add a remote link, from the local Git repository you created on your migration computer, to this remote GitHub repository:

[cc lang=’bash’ line_numbers=’true’] git remote add origin [email protected]:you-github-username/myproject.git[/cc]

Finally, let’s push the local Git repository master, branches and tags to GitHub. The first thing to push onto GitHub is the SVN’s trunk. It is done by running that command:

[cc lang=’bash’ line_numbers=’true’] git push -u origin master[/cc]

Then, if your project has multiple branches and tags, you can push them, one by one, using the same command. However, you will have to replace master by the name of that branch or tag. If you don’t know what is the exact name of these branches or tags, you can easily list all of them using this Git command:

[cc lang=’bash’ line_numbers=’true’] git show-ref[/cc]

Once you have progressed through all branches and tags, you are done. If you take a look at your GitHub project’s page, you should see that the trunk, branches, tags and commits are now properly imported into that project.

Possible Errors And Fixes

Fatal Error: Not a valid object name

There are a few things that can go wrong while trying to migrate your project(s).

One of the errors I experienced is a "fatal" error message "Not a valid object name". To fix this, we have to fix a line of code in svn2git. Open the migration.rb file. Check around the line 227 for the method fix_branches(). Remove the first line of that method, and replace the second one by:

[cc lang=’ruby’ line_numbers=’true’][raw] svn_branches = @remote.find_all { |b| [email protected]?(b) && b.strip =~ %r{^svn\/} }[/raw][/cc]

Error: author not existing

While running the svn2git application, the process may finish prematurely. If you check the output, you may see that it can’t find the match for an author. What you will have to do is to add that author to your authors file and re-run svn2git. Otherwise you won’t be able to fully migrate the project.

I’m not quite sure why these minor glitches occurred during my initial migrate, but with the simple fixes above you should be good to go.

Open Sources Projects As A Pool Of Resources

In a previous blog post, I wrote about how Open Source may be unnatural, and even counter intuitive, to many people. However, that really begs some questions evident with my current company’s strategy.

Why have Mike Bergman and I chosen to develop no less than three major open source projects (structWSF, conStruct and the Semantic Components), encompassing more than 100 000 lines of new code and leveraging between 30 to 50 other open source software and libraries? Why have we open sourced all our software? Why has open source formed the core business strategy of Structured Dynamics in the last three years? How have we been able to profitably sustain the company, even in the midst of the global economic crisis that began in 2008?

I will try to answer these questions in this blog post, perhaps even providing some guidance for newer startups that may follow behind us.

Why Open Sourcing?

Why did Structured Dynamics chose to open source all of its software? There are multiple reasons why people and businesses choose to go open source. For some, it is because they think that it is where the market place is moving. For others it is because they think that a community will emerge around their effort, and then get free resources that improve the piece of software. Some think that their software will promptly be reviewed by professional programmer. Others may think that their system will become more secure. Etc.

For Structured Dynamics the reason why we choose to go open source is somewhat different:

We perceived that by open sourcing our complete software stack we could bootstrap the company without any external investment.

Making a Living out of Open Source Projects

There are multiple ways to do a living from an open source project:

  • Doing consultancy work related to the project
  • Implementing the software(s) into clients’ computer environment(s)
  • Selling training classes
  • Selling support contracts
  • Selling maintenance contracts
  • Selling hosted instances of the software (the SaaS model for one)
  • Selling development time to improve some part(s) of the software
  • Creating conferences around their open source projects
  • Selling proprietary extensions
  • I am probably missing a few, so please add them in a comment section below, and I will make sure to add them to this list.

Depending on the software you are developing, and depending on the business plan of your company, you may be doing one — or multiple — of these things to generate some money from your open source projects.

At Structured Dynamics we are doing some of them: we do get consultancy contracts related to the Open Semantic Framework and we do implement OSF in our clients’ computer environments.

But, more importantly, we are also doing development contracts related to the framework. In fact, each project we are working on is quite different. Our major projects involve companies that reside in totally different domains, have different needs and need to accommodate different kinds of users. However, most of the projects share the same core needs, and all of them advance the core technology in ways meaningful to our vision. We choose our customers — and , of course, vice versa — based on a true sense of partnership wherein both parties have their objectives furthered.

Let’s see how we use these relationships to drive the development of the Open Semantic Framework.

Open Source Project as a Pool of Resources

In the last three years, Structured Dynamics has attracted multiple companies and organizations that share our vision, and which are willing to invest in the Open Semantic Framework open source project. (See Mike’s recent post on business development for a bit more on that aspect of things.) Each of these clients did want to use the OSF framework for their own needs. However, each of them did want to do something special that was not currently implemented in the framework.

What we created in these three years is a pool of resources that we used to develop the framework such that it accommodates the needs of each of our clients. Each of our clients then becomes a participant to the shared pool of innovation. Our clients have been willing to invest in the open source framework because they need their own features and because they know that they will benefit from what other participants of the pool will invest themselves down the road.

In that scenario, we are the managers of a pool of resources. We have the vision of where we want the framework to go, we know the roadmap of the project and we know the needs of each participant (our clients). What we do is to try to optimize the resources we get from each of our clients by developing the framework such that it can accommodate as broad of a spectrum of participants as possible. Then, we seek to find new participants that have some needs that will help us continue to develop the next steps of the roadmap. In this manner, we Jacob’s Ladder our existing work to increase the capabilities for later clients, but earlier clients still benefit because they can upgrade to the later improvements. This is a self-sustaining model to continue to move the development of the framework forward.

By finding new clients, what we do is to give a return on investment to the other pool participants. Most of the new features that we develop for these new clients will benefit the other participants to the pool and will create new possibilities for them without any additional investment. All of our first clients have implemented what other participants later invest into the pool, thus crystallizing and augmenting their return on investment by using these new features.

Open Source is Not Just About Software

Open Source is not just about pieces of code, and this is quite important to understand. What we have open sourced with the Open Semantic Framework is much more than a series of code sources. We open sourced the entire framework:

  1. The source codes
  2. The documentation
  3. The processes
  4. The methodologies

We term this comprehensive approach our total open solution.

This distinction with other open source projects is an essential differentiator with our approach. We choose to open source all of the pieces related to the framework. What drove this decision is a simple sentence that shows our philosophy behind it:

“We’re Successful When We’re Not Needed”

If the APIs, processes and methodologies are not properly documented, it means that we would certainly be needed by our clients, which would mean that we failed to open source our solution. But since we are working to open source our code, our processes and our methodologies, we are on the way to successfully open source the Open Semantic Framework since we won’t be needed by our clients.

This business approach is not as crazy as it sounds. We are free to work on new and important innovations, and are not basing our company culture on dependency and a constant drain by our customers. I know, it does not sound like Larry Ellison, but sounds good to us and our clients. It is certainly not a maximum revenue objective built on the backs of individual clients.

Our life is more fun and our clients trust us with new stuff. Further, each step of the way, we are able to leverage our own framework for unbelievable productivity in what we deliver for the money. But that is a topic for another day.

We think Structured Dynamics’ business approach is a contemporary winning strategy. Our customers get good and advanced capabilities at low cost and risk, while we get to work on innovative extensions that are raising the semantic baseline for the marketplace. Who knows if we will always continue this path, but for now it is leading to sustained development and market growth for open semantic frameworks, including our own OSF.