Open Semantic Framework 3.2 Released

Structured Dynamics is happy to announce the immediate availability of the Open Semantic Framework version 3.2. This is the second important OSF release in a month and a half. triple_120

This new major release of OSF changes the way the web services communicate with the triple store. Originally, OSF web services were using a ODBC channel to communicate with the triple store (Virtuoso). This new release uses the SPARQL HTTP endpoints of the triple store to send queries to it. This is the only changes that occurs in this new version, but as you will see bellow, this is a major one.

Why switching to HTTP?

The problem with using ODBC as the primary communication channel between the OSF web services and the triple store is that it was adding a lot of complexity into OSF. Because the UnixODBC drivers that are shipped with Ubuntu had issues with Virtuoso, we had to use the iODBC drivers to make sure that everything was working properly. This situation forced us to recompile PHP5 such that it uses iODBC instead of UnixODBC as the ODBC drivers for PHP5.

This was greatly complexifying the deployment of OSF since we couldn’t use the default PHP5 packages that shipped with Ubuntu, but had to maintain our own ones that were working with iODBC.

The side effect of this is that system administrators couldn’t upgrade their Ubuntu instances normally since PHP5 needed to be upgraded using particular packages created for that purpose.

Now that OSF doesn’t use ODBC to communicate with the triple store, all this complexity goes away since no special handling is now required. All of the default Ubuntu packages can be used like system administrators normally do.

With this new version, the installation and deployment of a OSF instance has been greatly simplified.

Supports New Triple Stores

Another problem with using ODBC is that it was limiting the number of different triple stores that could be used for operating OSF. In fact, people could only use Virtuoso with their OSF instance.

This new release opens new opportunities. OSF still ships with Virtuoso Open Source as its default triple store, however any triple store that has the following characteristics could replace Virtuoso in OSF:

  1. It has a SPARQL HTTP endpoint
  2. It supports SPARQL 1.1 and SPARQL Update 1.1
  3. It supports SPARQL Update queries that can be sent to the SPARQL HTTP endpoint
  4. It supports the SPARQL 1.1 Query Results JSON Format
  5. It supports the SPARQL 1.1 Graph Store HTTP Protocol via a HTTP endpoint (optional, only required by the Datasets Management Tool)

Deploying a new OSF 3.2 Server

Using the OSF Installer

OSF 3.2 can easily be deployed on a Ubuntu 14.04 LTS server using the osf-installer application. It can easily be done by executing the following commands in your terminal:

[cc lang=”bash”]
[raw]
mkdir -p /usr/share/osf-installer/

cd /usr/share/osf-installer/

wget https://raw.github.com/structureddynamics/Open-Semantic-Framework-Installer/3.2/install.sh

chmod 755 install.sh

./install.sh

./osf-installer –install-osf -v
[/raw]
[/cc]

Using a Amazon AMI

If you are an Amazon AWS user, you also have access to a free AMI that you can use to create your own OSF instance. The full documentation for using the OSF AMI is available here.

Upgrading Existing Installations

It is not possible to automatically upgrade previous versions of OSF to OSF 3.2. It is possible to upgrade a older instance of OSF to OSF version 3.2, but only manually. If you have this requirement, just let me know and I will write about the upgrade steps that are required to upgrade these instances to OSF version 3.2.

Security

Now that the triple store’s SPARQL HTTP endpoint requires it to be enabled with SPARQL Update rights, it is more important than ever to make sure that the SPARQL HTTP endpoint of the triple store is only available to the OSF web services.

This can be done by properly configuring your firewall or proxy such that only local traffic, or traffic coming from the OSF web service processes, can reach the endpoint.

The SPARQL endpoint that should be exposed to the outside World is OSF’s SPARQL endpoint, which adds an authentication layer above the triple store’s endpoint, and restricts potentially armful SPARQL queries.

Conclusion

This new version of the Open Semantic Framework greatly simplifies its deployment and its maintenance. It also enables other triple stores that exist on the market to be used for OSF instead of Virtuoso Open Source.

New UMBEL Concept Noun Tagger Web Service & Other Improvements

Last week, we released the UMBEL Concept Plain Tagger web service endpoint. Today we are releasing the UMBEL Concept Noun Tagger. umbel_ws

This noun tagger uses UMBEL reference concepts to tag an input text, and is based on the plain tagger, except as noted below.

The noun tagger uses the plain labels of the reference concepts as matches against the nouns of the input text. With this tagger, no manipulations are performed on the reference concept labels nor on the input text except if you specify the usage of the stemmer. Also, there is NO disambiguation performed by the tagger if multiple concepts are tagged for a given keyword.

Intended Users

This tool is intended for those who want to focus on UMBEL and do not care about more complicated matches. The output of the tagger can be used as-is, but it is intended to be the input to more sophisticated reference concept matching and disambiguation methods. Expect additional tagging methods to follow.

Stemming Option

This web service endpoint does have a stemming option. If the option is specified, then the input text will be stemmed and the matches will be made against an index where all the preferred and alternative labels have been stemmed as well. Then once the matches occurs, the tagger will recompose the text such that unstemmed versions of the input text and the tagged reference concepts are presented to the user.

Depending on the use case. users may prefer turning on or off the stemming option on this web service endpoint.

The Web Service Endpoint

The web service endpoint is freely available. It can return its resultset in JSON, Clojure code or EDN (Extensible Data Notation).

This endpoint will return a list of matches on the preferred and alternative labels of the UMBEL reference concepts that match the noun tokens of an input text. It will also return the number of matches and the position of the tokens that match the concepts.

The Online Tool

We also provide an online tagging tool that people can use to experience interacting with the web service.

The results are presented in two sections depending on whether the preferred or alternative label(s) were matched. Multiple matches, either by concept or label type, are coded by color. Source words with matches and multiple source occurrences are ranked first; thereafter, all source words are presented alphabetically.

The tagged concepts can be clicked to have access to their full description.

umbel_tagger_noun

Other UMBEL Website Improvements

We also did some more improvements to the UMBEL website.

Search Autocompletion Mode

First, we created a new autocomplete option on the UMBEL Search web service endpoint. Often people know the concept they want to look at, but they don’t want to go to a search results page to select that concept. What they want is to get concept suggestions instantly based on the letters they are typing in a search box.

Such a feature requires a special kind of search which we call an “autocompletion search”. We added that special mode to the existing UMBEL search web service endpoint. Such a search query takes about 30ms to process. Most of that time is due to the latency of the network since the actual search function takes about 0.5 millisecond the complete.

To use that new mode, you only have to append /autocomplete to the base search web service endpoint URL.

Search Autocompletion Widget

Now that we have this new autocomplete mode for the Search endpoint, we also leveraged it to add autocompletion behavior on the top navigation search box on the UMBEL website.

Now, when you start typing characters in the top search box, you will get a list of possible reference concept matches based on the preferred labels of the concepts. If you select one of them, you will be redirected to their description page.

concept_autocomplete

Tagged Concepts Within Concept Descriptions

Finally, we improved the quality of the concept description reading experience by linking concepts that were mentioned in the descriptions to their respective concept pages. You will now see hyperlinks in the concept descriptions that link to other concepts.

linked_concepts

New UMBEL Concept Tagger Web Service

We just released a new UMBEL web service endpoint and online tool: the Concept Tagger Plain. umbel_ws

This plain tagger uses UMBEL reference concepts to tag an input text. The OBIE (Ontology-Based Information Extraction) method is used, driven by the UMBEL reference concept ontology. By plain we mean that the words (tokens) of the input text are matched to either the preferred labels or alternative labels of the reference concepts. The simple tagger is merely making string matches to the possible UMBEL reference concepts.

This tagger uses the plain labels of the reference concepts as matches against the input text. With this tagger, no manipulations are performed on the reference concept labels nor on the input text (like stemming, etc.). Also, there is NO disambiguation performed by the tagger if multiple concepts are tagged for a given keyword.

Intended Users

This tool is intended for those who want to focus on UMBEL and do not care about more complicated matches. The output of the tagger can be used as-is, but it is intended to be the initial input to more sophisticated reference concept matching and disambiguation methods. Expect additional tagging methods to follow (see conclusion).

The Web Service Endpoint

The web service endpoint is freely available. It can return its resultset in JSON, Clojure code or EDN (Extensible Data Notation).

This endpoint will return a list of matches on the preferred and alternative labels of the UMBEL reference concepts that match the tokens of an input text. It will also return the number of matches and the position of the tokens that match the concepts.

The Online Tool

We also provide an online tagging tool that people can use to experience interacting with the web service.

The results are presented in two sections depending on whether the preferred or alternative label(s) were matched. Multiple matches, either by concept or label type, are coded by color. Source words with matches and multiple source occurrences are ranked first; thereafter, all source words are presented alphabetically.

The tagged concepts can be clicked to have access to their full description.

reference_concept_tagger_uiEDN and ClojureScript

An interesting thing about this user interface is that it has been implemented in ClojureScript and the data serialization exchanged between this user interface and the tagger web service endpoint is in EDN. What is interesting about that is that when the UI receives the resultset from the endpoint, it only has to evaluate the EDN code using the ClojureScript reader (cljs.reader/read-string) to consider the output of the web service endpoint as native data to the application.

No parsing of non-native data format is necessary, which makes the code of the UI simpler and makes the data manipulation much more natural to the developer since no external API is necessary.

What is Next?

This is the first of a series of tagging web service endpoints that will be released. Our intent is to release UMBEL tagging services that have different level of sophistication. Depending on how someone wants to use UMBEL, he will have access to different tagging services that he could use and supplement with their own techniques to end up with their desired results.

The next taggers (not in order) that are planned to be released are:

  • Plaintagger – no weighting or classification except by occurrence count
    • Entity plain tagger (using the Wikidata dictionary)
    • Scones plain tagger – concept + entity
  • Nountagger – with POS, only tags the nouns; generally, the preferred, simplest baselinetagger
    • Concept noun tagger
    • Entity noun tagger
    • Scones noun tagger
  • N-gramtagger – a phrase-basedtagger
    • Concept n-gram tagger
    • Entity n-gram tagger
    • Scones n-gram tagger
  • Completetagger – combinations of above with different machine learning techniques
    • Concept complete tagger
    • Entity complete tagger
    • Scones complete tagger.

So, we welcome you to try out the system online and we welcome your comments and suggestions.

3.5 Million DBpedia Entities in Drupal 7

In the previous article Loading DBpedia into the Open Semantic Framework, we explained how we could load the 3.5 million DBpedia entities into a Open Semantic Framework instance. In this article, we will show how these million of entities can be used in Drupal for searching, browsing, mapping and templating these DBpedia entities.

Installing and Configuring OSF for Drupal

This article doesn’t cover how OSF for Drupal can be installed and configured. If you want to properly install and configure OSF for Drupal, you should install it using the OSF Installer by running this command:

[cc lang=’bash’ line_numbers=’false’]
[raw]
./osf-installer –install-osf-drupal
[/raw]
[/cc]

Then you should configure it using the first section of the OSF for Drupal user manual.

Once this is done, the only thing you will have to do is to register the OSF instance that hosts the DBpedia dataset. Then to register the DBpedia data into the Drupal instance. The only thing you will have to do is to make sure that the Drupal’s administator role has access to the DBpedia dataset. It can be done by using the PMT (Permissions Management Tool) by running the following command:

[cc lang=’bash’ line_numbers=’false’]
[raw]
pmt –create-access –access-dataset=”http://dbpedia.org” –access-group=”http://YOU-DRUPAL-DOMAIN/role/3/administrator” –access-perm-create=”true” –access-perm-read=”true” –access-perm-delete=”true” –access-perm-update=”true” –access-all-ws
[/raw]
[/cc]

Searching Entities using the Search API

All the DBpedia entities are searchable via the SearchAPI. This is possible because of the OSF SearchAPI connector module that interface the SearchAPI with OSF.

Here is an example of such a SearchAPI search query. Each of these result come from the OSF Search endpoint. Each of the result is templated using the generic search result template, or other entity type search templates.

What is interesting is that depending on the type of the entity to display in the results, its display can be different. So instead of having a endless list of results with titles and descriptions, we can have different displays depending on the type of the record, and the information we have about that record.

dbpedia_search_3

In this example, only the generic search template got used to display these results. Here is the generic search results template code:

[gist id=”8560305″]

Manipulating Entities using the Entity API

The Entity API is a powerful Drupal API that let developers and designers loading and manipulating entities that are indexed in the data store (in this case, OSF). The full Entity API is operational on the DBpedia entities because of the OSF Entities connector module.

As you can see in the template above (and in the other templates to follow), we can easily use the Entity API to load DBpedia entities. In these templates examples, what we are doing is to use this API to load the entities referenced by an entity. In this case, we do this to get their labels. Once we loaded the entity, we end-up with an Entity object that we can use like any other Drupal entities:

[gist id=”8585440″]

Mapping Entities using the sWebMap OSF Widget

Because a big number of DBpedia entities does have geolocation data, we wanted to test the sWebMap OSF Widget to be able to search, browse and locate all the geolocalized entities. What we did is to create a new Content Type. Then we created a new template for that content type that implements the sWebMap widget. The simple template we created for this purpose is available here:

[gist id=”8561181″]

Then, once we load a page of that Content Type, we can see the sWebMap widget populated with the geolocalized DBpedia entities. In the example below, we see the top 20 records in that region (USA):

dbpeida_swebmap_2

Then what we do is to filter these entities by type and attribute/values. In the following example, we filtered by RadioStation, and then we are selecting a filter to define the type of radio station we are looking for:

dbpeida_swebmap_3

Finally we add even more filtering options to drill-down the geolocalized information we are looking for.

dbpeida_swebmap_4

We end-up with all the classical radio station that broadcast in the region of Pittsburgh.

dbpeida_swebmap_5

Templating Entities using Drupal’s Templating Engine

Another thing we get out of the box with Drupal and OSF for Drupal, is the possibility to template the entities view pages and the search resultsets. In any case, the selection of the template is done depending on the type of the entity to display.

With OSF for Drupal, we created a template selection mechanism that uses the ontologies’ structure to select the proper templates. For example, if we have a Broadcaster template, then it could be used to template information about a RadioStation or a TelevisionStation, even if these templates are not existing.

Here is an example of a search resultset that displays information about different type of entities:

dbpedia_search_2

The first entity is an organization that has an image. It uses the generic template. The second one is a person which also use the generic template, but it has no image. Both are using the generic template because none of the Organization nor the Person templates have been created. However, the third result uses a different template. The third result is a RadioStation. However, it uses the Broadcaster template since the RadioStation class is a sub-class-of Broadcaster and because the Broadcaster template exists in the Drupal instance.

Here is the code of the Broadcaster search result template:

[gist id=”8581527″]

Now let’s take a look at the template that displays information about a specific Entity type:

dbpedia_entity_view

This minimal records displays some information about this radio station. The code of this template is:

[gist id=”8585895″]

Building Complex Search Queries using the OSF Query Builder

A system administrator can also use the OSF Query Builder to create more complex search queries. In the following query, we are doing a search for the keyword “radio“, we are filtering by type RadioStation, and we are boosting the scoring value of all the results that have the word “life” in their slogan.

dbpeida_querybuilder_1

The top result is a radio station of Moscow that has “Life in Motion!” as its slogan. We can also see the impact of the scoring booster on the score of that result.

Conclusion

As we can see with these two articles, it is relatively easy and fast to import the DBpedia dataset into a OSF instance. By doing so, we end-up with a series of tools to access, manage and publish this information. Then we can leverage the OSF platform to create all kind of web portals or other web services. All the tools are there, out-of-the-box.

This being said, this is not where lies the challenge. The thing is that there is more than 500 classes and 2000 properties that describes all the content present in the DBpedia Ontology. This means that more than 2000 filters may exists for the Search API, the sWebMap widget, etc. This also means that more than 500 Drupal bundles can be created with hundred of fields, etc.

All this need to be properly configured and managed by the Drupal site developer. However, there are mechanisms that have been developed to help them managing this amount of information such as the entity template selection mechanism that uses the ontologies’ structure to select the display templates to use. For example, you could focus on the entity Broadcaster, and create a single template for it. Automatically, this template could be used by sub-classes such as BroadcastNetwork, RadioStation, TelevisionStation and many others.

The Open Semantic Framework is really flexible and powerful as you may have noticed with this series of two articles. However, the challenge and most of the work lies into creating and configuring the portal that will use this information. The work lies into creating the search and entities templates. To properly define and manage the bundles and fields, etc.

Loading DBpedia into the Open Semantic Framework

dbpedia_osf

This first article or a series of two will show you how to load DBpedia into a Open Semantic Framework instance. A second article will be published that will show you how the 3.5 million entities present in DBpedia can be accessible from a Drupal 7 installation. All the entities will be searchable, templatable, viewable, mappable, editabled and revisionable directly within Drupal.
Loading DBPedia into a OSF instance is not overly complex. Someone can easily manage to do it using this tutorial, and ending up with a OSF instance loaded with the full DBpedia dataset.

Creating a Open Semantic Framework Instance

The first step is to create a OSF instance. This tutorial uses the AWS EC2 OSF image. However, you can easily perform the same steps except that you should use the OSF Installer to install OSF on your own Ubuntu 12.10 server.
To create the OSF instance we will use to load DBpedia, we use one of the following OSF 3.0 AMI:
Region arch root store AMI
us-east-1 64-bit EBS ami-afe4d1c6
us-west-1 64-bit EBS ami-d01b2895
us-west-2 64-bit EBS ami-c6f691f6
eu-west-1 64-bit EBS ami-883fd4ff
sa-east-1 64-bit EBS ami-6515b478
ap-southeast-2 64-bit EBS ami-4734ab7d
ap-southeast-1 64-bit EBS ami-364d1a64
ap-northeast-1 64-bit EBS ami-476a0646

Then to make things faster, we used a EC2 c3.4xlarge server with 75G of disk space.

In this tutorial, we are not re-configuring any passwords or settings for this vanilla instance. However, if you are to create an instance of your own, you should read the Creating and Configuring an Amazon EC2 AMI OSF Instance manual to configure it for you own purpose and to make it secure.

Note that most of the steps to load DBpedia into Virtuoso come from Jorn Hees’ article about this subject.

Also note that you should make sure to path the files in the following 3 commits. These issues have been found while writing this blog post, and haven’t (yet) made it into the AMI we use here: 88d6f1a782744a62bf83d52eceff695e0fee773b, 1389744b7dbf8f755a1bb9be468b3c51df75d6d8 and 719b4a776d43345e73847e6c785a4e9964b83a1c

Downloading DBpedia

The second step is to download all the DBpedia files that you want to use in your OSF instance. For this tutorial, we focus on the files where we can get the titles, abstracts, descriptions, all the mapped properties, the geolocalization of the entities, etc. You can download all these files by running the following commands:

[cc lang=’bash’ line_numbers=’false’]
[raw]

mkdir -p /usr/local/data/dbpedia/3.9/en

cd /usr/local/data/dbpedia/3.9/en

wget http://downloads.dbpedia.org/3.9/en/instance_types_en.nt.bz2
wget http://downloads.dbpedia.org/3.9/en/mappingbased_properties_en.nt.bz2
wget http://downloads.dbpedia.org/3.9/en/labels_en.nt.bz2
wget http://downloads.dbpedia.org/3.9/en/short_abstracts_en.nt.bz2
wget http://downloads.dbpedia.org/3.9/en/long_abstracts_en.nt.bz2
wget http://downloads.dbpedia.org/3.9/en/images_en.nt.bz2
wget http://downloads.dbpedia.org/3.9/en/geo_coordinates_en.nt.bz2

bzip2 -d *
[/raw]
[/cc]

Loading DBpedia into Virtuoso

The next step is to use the Virtuoso’s RDF Bulk Loader to load all the DBpedia triples into Virtuoso. To do so, the first step we have to do is to create a new OSF dataset where the DBpedia entities will be indexed. To create the new dataset, we use the DMT (Datasets Management Tool) to create it. Note that the DMT is already installed on that OSF AMI 3.0.

[cc lang=’bash’ line_numbers=’false’]
[raw]
dmt -n –osf-web-services=”http://localhost/ws/” –uri=”http://dbpedia.org” –creator=”http://localhost/wsf/users/admin” –title=”DBpedia 3.9″ –group=”http://localhost/wsf/groups/administrators”
[/raw]
[/cc]

Then we have to create and configure the RDF Bulk Loader. The first step is to create the procedure file that will be used to import the tables and procedures into Virtuoso:

[cc lang=’bash’ line_numbers=’false’]
[raw]
cd /tmp/
[/raw]
[/cc]

Then create a file called VirtBulkRDFLoaderScript.vsql and add the following code in that new file:

[cc lang=’sql’ line_numbers=’false’]
[raw]
CREATE TABLE load_list (
ll_file VARCHAR,
ll_graph VARCHAR,
ll_state INT DEFAULT 0, — 0 not started, 1 going, 2 done
ll_started DATETIME,
ll_done DATETIME,
ll_host INT,
ll_work_time INTEGER,
ll_error VARCHAR,
PRIMARY KEY (ll_file))
ALTER INDEX load_list ON load_list PARTITION (ll_file VARCHAR)
;

CREATE INDEX ll_state ON load_list (ll_state, ll_file, ll_graph) PARTITION (ll_state INT)
;

CREATE TABLE ldlock (id INT PRIMARY KEY)
ALTER INDEX ldlock ON ldlock PARTITION (id INT)
;

INSERT INTO ldlock VALUES (0);

CREATE PROCEDURE
ld_dir (IN path VARCHAR, IN mask VARCHAR, IN graph VARCHAR)
{
DECLARE ls ANY;
DECLARE inx INT;
ls := sys_dirlist (path, 1);
FOR (inx := 0; inx < LENGTH (ls); inx := inx + 1) { IF (ls[inx] LIKE mask) { SET ISOLATION = 'serializable'; IF (NOT (EXISTS (SELECT 1 FROM DB.DBA.LOAD_LIST WHERE LL_FILE = path || '/' || ls[inx] FOR UPDATE))) { DECLARE gfile, cgfile, ngraph VARCHAR; gfile := path || '/' || REPLACE (ls[inx], '.gz', '') || '.graph'; cgfile := path || '/' || regexp_replace (REPLACE (ls[inx], '.gz', ''), '\\-[0-9]+\\.n', '.n') || '.graph'; IF (file_stat (gfile) <> 0)
ngraph := TRIM (file_to_string (gfile), ‘ \r\n’);
ELSE IF (file_stat (cgfile) <> 0)
ngraph := TRIM (file_to_string (cgfile), ‘ \r\n’);
ELSE IF (file_stat (path || ‘/’ || ‘global.graph’) <> 0)
ngraph := TRIM (file_to_string (path || ‘/’ || ‘global.graph’), ‘ \r\n’);
ELSE
ngraph := graph;
IF (ngraph IS NOT NULL)
{
INSERT INTO DB.DBA.LOAD_LIST (ll_file, ll_graph) VALUES (path || ‘/’ || ls[inx], ngraph);
}
}

COMMIT WORK;
}
}
}
;

CREATE PROCEDURE
rdf_read_dir (IN path VARCHAR, IN mask VARCHAR, IN graph VARCHAR)
{
ld_dirr (path, mask, graph);
}
;

CREATE PROCEDURE
ld_dir_all (IN path VARCHAR, IN mask VARCHAR, IN graph VARCHAR)
{
DECLARE ls ANY;
DECLARE inx INT;
ls := sys_dirlist (path, 0);
ld_dir (path, mask, graph);
FOR (inx := 0; inx < LENGTH (ls); inx := inx + 1) { IF (ls[inx] <> ‘.’ AND ls[inx] <> ‘..’)
{
ld_dir_all (path||’/’||ls[inx], mask, graph);
}
}
}
;

CREATE PROCEDURE
ld_add (IN _fname VARCHAR, IN _graph VARCHAR)
{
–log_message (sprintf (‘ld_add: %s, %s’, _fname, _graph));

SET ISOLATION = ‘serializable’;

IF (NOT (EXISTS (SELECT 1 FROM DB.DBA.LOAD_LIST WHERE LL_FILE = _fname FOR UPDATE)))
{
INSERT INTO DB.DBA.LOAD_LIST (LL_FILE, LL_GRAPH) VALUES (_fname, _graph);
}
COMMIT WORK;
}
;

CREATE PROCEDURE
ld_ttlp_flags (IN fname VARCHAR)
{
IF (fname LIKE ‘%/btc-2009%’ OR fname LIKE ‘%.nq%’ OR fname LIKE ‘%.n4’)
RETURN 255 + 512;
RETURN 255;
}
;

CREATE PROCEDURE
ld_file (IN f VARCHAR, IN graph VARCHAR)
{
DECLARE gzip_name VARCHAR;
DECLARE exit handler FOR sqlstate ‘*’ {
ROLLBACK WORK;
UPDATE DB.DBA.LOAD_LIST
SET LL_STATE = 2,
LL_DONE = CURDATETIME (),
LL_ERROR = __sql_state || ‘ ‘ || __sql_message
WHERE LL_FILE = f;
COMMIT WORK;

log_message (sprintf (‘ File %s error %s %s’, f, __sql_state, __sql_message));
RETURN;
};

IF (f LIKE ‘%.grdf’ OR f LIKE ‘%.grdf.gz’)
{
load_grdf (f);
}
ELSE IF (f LIKE ‘%.gz’)
{
gzip_name := regexp_replace (f, ‘\.gz\x24’, ”);
IF (gzip_name LIKE ‘%.xml’ OR gzip_name LIKE ‘%.owl’ OR gzip_name LIKE ‘%.rdf’)
DB.DBA.RDF_LOAD_RDFXML (gz_file_open (f), graph, graph);
ELSE
TTLP (gz_file_open (f), graph, graph, ld_ttlp_flags (gzip_name));
}
ELSE
{
IF (f LIKE ‘%.xml’ OR f LIKE ‘%.owl’ OR f LIKE ‘%.rdf’)
DB.DBA.RDF_LOAD_RDFXML (file_open (f), graph, graph);
ELSE
TTLP (file_open (f), graph, graph, ld_ttlp_flags (f));
}

–log_message (sprintf (‘loaded %s’, f));
}
;

CREATE PROCEDURE
rdf_load_dir (IN path VARCHAR,
IN mask VARCHAR := ‘%.nt’,
IN graph VARCHAR := ‘http://dbpedia.org’)
{

DELETE FROM DB.DBA.LOAD_LIST WHERE LL_FILE = ‘##stop’;
COMMIT WORK;

ld_dir (path, mask, graph);

rdf_loader_run ();
}
;

CREATE PROCEDURE
ld_array ()
{
DECLARE first, last, arr, len, local ANY;
DECLARE cr CURSOR FOR
SELECT TOP 100 LL_FILE, LL_GRAPH
FROM DB.DBA.LOAD_LIST TABLE OPTION (INDEX ll_state)
WHERE LL_STATE = 0
FOR UPDATE;
DECLARE fill INT;
DECLARE f, g VARCHAR;
DECLARE r ANY;
WHENEVER NOT FOUND GOTO done;
first := 0;
last := 0;
arr := make_array (100, ‘any’);
fill := 0;
OPEN cr;
len := 0;
FOR (;;)
{
FETCH cr INTO f, g;
IF (0 = first) first := f;
last := f;
arr[fill] := VECTOR (f, g);
len := len + CAST (file_stat (f, 1) AS INT);
fill := fill + 1;
IF (len > 2000000)
GOTO done;
}
done:
IF (0 = first)
RETURN 0;
IF (1 <> sys_stat (‘cl_run_local_only’))
local := sys_stat (‘cl_this_host’);
UPDATE load_list SET ll_state = 1, ll_started = CURDATETIME (), LL_HOST = local
WHERE ll_file >= first AND ll_file <= last; RETURN arr; } ; CREATE PROCEDURE rdf_loader_run (IN max_files INTEGER := NULL, IN log_enable INT := 2) { DECLARE sec_delay float; DECLARE _f, _graph VARCHAR; DECLARE arr ANY; DECLARE xx, inx, tx_mode, ld_mode INT; ld_mode := log_enable; IF (0 = sys_stat ('cl_run_local_only')) { IF (log_enable = 2 AND cl_this_host () = 1) { cl_exec ('checkpoint_interval (0)'); cl_exec ('__dbf_set (''cl_non_logged_write_mode'', 1)'); } IF (cl_this_host () = 1) cl_exec('__dbf_set(''cl_max_keep_alives_missed'',3000)'); } tx_mode := bit_and (1, log_enable); log_message ('Loader started'); DELETE FROM DB.DBA.LOAD_LIST WHERE LL_FILE = '##stop'; COMMIT WORK; WHILE (1) { SET ISOLATION = 'repeatable'; DECLARE exit handler FOR sqlstate '40001' { ROLLBACK WORK; sec_delay := RND(1000)*0.001; log_message(sprintf('deadlock in loader, waiting %d milliseconds', CAST (sec_delay * 1000 AS INTEGER))); delay(sec_delay); GOTO again; }; again:; IF (EXISTS (SELECT 1 FROM DB.DBA.LOAD_LIST WHERE LL_FILE = '##stop')) { log_message ('File load stopped by rdf_load_stop.'); RETURN; } log_enable (tx_mode, 1); IF (max_files IS NOT NULL AND max_files <= 0) { COMMIT WORK; log_message ('Max_files reached. Finishing.'); RETURN; } WHENEVER NOT FOUND GOTO looks_empty; -- log_message ('Getting next file.'); SET ISOLATION = 'serializable'; SELECT id INTO xx FROM ldlock WHERE id = 0 FOR UPDATE; arr := ld_array (); COMMIT WORK; IF (0 = arr) GOTO looks_empty; log_enable (ld_mode, 1); FOR (inx := 0; inx < 100; inx := inx + 1) { IF (0 = arr[inx]) GOTO arr_done; ld_file (arr[inx][0], arr[inx][1]); UPDATE DB.DBA.LOAD_LIST SET LL_STATE = 2, LL_DONE = CURDATETIME () WHERE LL_FILE = arr[inx][0]; } arr_done: log_enable (tx_mode, 1); IF (max_files IS NOT NULL) max_files := max_files - 100; COMMIT WORK; } looks_empty: COMMIT WORK; log_message ('No more files to load. Loader has finished,'); RETURN; } ; CREATE PROCEDURE rdf_load_stop (IN force INT := 0) { INSERT INTO DB.DBA.LOAD_LIST (LL_FILE) VALUES ('##stop'); COMMIT WORK; IF (force) cl_exec ('txn_killall (1)'); } ; CREATE PROCEDURE RDF_LOADER_RUN_1 (IN x INT, IN y INT) { rdf_loader_run (x, y); } ; CREATE PROCEDURE rdf_ld_srv (IN log_enable INT) { DECLARE aq ANY; aq := async_queue (1); aq_request (aq, 'DB.DBA.RDF_LOADER_RUN_1', VECTOR (NULL, log_enable)); aq_wait_all (aq); } ; CREATE PROCEDURE load_grdf (IN f VARCHAR) { DECLARE line ANY; DECLARE inx INT; DECLARE ses ANY; DECLARE gr VARCHAR; IF (f LIKE '%.gz') ses := gz_file_open (f); ELSE ses := file_open (f); inx := 0; line := ''; WHILE (line <> 0)
{
gr := ses_read_line (ses, 0, 0, 1);
IF (gr = 0) RETURN;
line := ses_read_line (ses, 0, 0, 1);
IF (line = 0) RETURN;
DB.DBA.RDF_LOAD_RDFXML (line, gr, gr);
inx := inx + 1;
}
}
;

— cl_exec (‘set lock_escalation_pct = 110’);
— cl_exec (‘DB.DBA.RDF_LD_SRV (1)’) &
— cl_exec (‘DB.DBA.RDF_LD_SRV (2)’) &
[/raw]
[/cc]

Then we have to load it into Virtuoso using the following command:

[cc lang=’bash’ line_numbers=’false’]
[raw]
/usr/bin/isql-vt localhost dba dba VirtBulkRDFLoaderScript.vsql
[/raw]
[/cc]

Then we have to configure the RDF Bulk Loader. First enter in the isql interface:

[cc lang=’bash’ line_numbers=’false’]
[raw]
/usr/bin/isql-vt
[/raw]
[/cc]

Then copy/paste the following SQL code into the isql interface:

[cc lang=’sql’ line_numbers=’false’]
[raw]
— load the files to bulk-load
ld_dir_all(‘/usr/local/data/dbpedia/3.9’, ‘*.*’, ‘http://dbpedia.org’);

— list all the files that will be loaded
SELECT * FROM DB.DBA.LOAD_LIST;

— if unsatisfied use:
— delete from DB.DBA.LOAD_LIST and redo;
EXIT;
[/raw]
[/cc]

Then enter the isql interface again:

[cc lang=’bash’ line_numbers=’false’]
[raw]
/usr/bin/isql-vt
[/raw]
[/cc]

And copy/paste the following SQL lines:

[cc lang=’sql’ line_numbers=’false’]
[raw]
rdf_loader_run();

— will take approx. 2 hours with that EC2 server

checkpoint;
commit WORK;
checkpoint;
EXIT;
[/raw]
[/cc]

Configure the Datasets Management Tool

The next step is to properly configure the DMT to bulk load all the DBpedia entities into OSF.

Let’s step back, and explain what we are doing here. What we did with the steps above, is to use a fast method to import all the 3.5 million DBpedia records into Virtuoso. What we are doing now is to take these records, and to index them in the other underlying OSF systems (namely, the Solr full text search & faceting server). What the following steps will be doing is to load all these entities into the Solr index using the CRUD: Create web service endpoint. Once this step is finished, it means that all the DBpedia entities will be searchable and facetable using the OSF Search endpoint.

The first step is to edit the dmt.ini file to add information about the dataset to update:

[cc lang=’bash’ line_numbers=’false’]
[raw]
vim /usr/share/datasets-management-tool/dmt.ini
[/raw]
[/cc]

Then add the following section at the end of the file:

[cc lang=’ini’ line_numbers=’false’]
[raw]
[DBpedia]
datasetURI = “http://dbpedia.org”
baseURI = “http://dbpedia.org/”
datasetLocalPath = “/usr/local/data/dbpedia/3.9/en/”
converterPath = “/usr/share/datasets-management-tool/converters/default/”
converterScript = “defaultConverter.php”
converterFunctionName = “defaultConverter”
baseOntologyURI = “http://dbpedia.org/ontology/”
sliceSize = “500”
targetOSFWebServices = “http://localhost/ws/”
filteredFiles = “instance_types_en.nt”
forceReloadSolrIndex = “true”
[/raw]
[/cc]

Other Configurations to Speed-Up the Process

Now we will cover a few more configurations that can be performed in order to improve the speed of the indexation into OSF. You can skip these additional configuration steps, but if you do so, do not index more than 200 records per slice.

First search and edit the virtuoso.ini file. Then find the ResultSetMaxRows setting and configure it for 1000000 rows.

Then we have to increase the maximum memory allocated for the CRUD: Create web service endpoint. You have to edit the index.php file:

[cc lang=’bash’ line_numbers=’false’]
[raw]
vim /usr/share/osf/StructuredDynamics/osf/ws/crud/create/index.php
[/raw]
[/cc]

Then check around line #17 and increase the memory (memory_limit) to 1000M.

Then we have to change the maximum number of URIs that the CRUD: Read web service endpoint can get as input. By default it is 64, we will ramp it up to 500.

[cc lang=’bash’ line_numbers=’false’]
[raw]
vim /usr/share/osf/StructuredDynamics/osf/ws/crud/read/interfaces /DefaultSourceInterface.php
[/raw]
[/cc]

Then change 64 to 500 at line #25

Importing the DBpedia Ontology

before we start the process of importing the DBpedia dataset into OSF, we have to import the DBpedia Ontology into OSF such that it uses what is defined in the ontology to optimally index the content into the Solr index. To import the ontology, we use the OMT (Ontologies Management Tool).

[cc lang=’bash’ line_numbers=’false’]
[raw]
cd /data/ontologies/files/

wget http://downloads.dbpedia.org/3.9/dbpedia_3.9.owl.bz2

bzip2 -d dbpedia_3.9.owl.bz2

# Load the DBpedia Ontology
omt –load=”file://localhost/data/ontologies/files/dbpedia_3.9.owl” –osf-web-services=”http://localhost/ws/”

# Create the permissions access record for the administrator group to access this ontology
pmt –create-access –access-dataset=”file://localhost/data/ontologies/files/dbpedia_3.9.owl” –access-group=”http://localhost/wsf/groups/administrators” –access-perm-create=”true” –access-perm-read=”true” –access-perm-delete=”true” –access-perm-update=”true” –access-all-ws

# Regenerate the underlying ontological structures
omt –generate-structures=”/data/ontologies/structure/” –osf-web-services=”http://localhost/ws/”
[/raw]
[/cc]

Import DBpedia Into OSF

This is the final step: importing the DBpedia dataset into the OSF full text search index (Solr). To do so, we will use the DMT (Datasets Management Tool) that we previously configured to fully index the DBpedia entities into OSF:

[cc lang=’bash’ line_numbers=’false’]
[raw]
dmt -s -c dmt.ini –config-id=”DBpedia”
[/raw]
[/cc]

This process should take up to 24h with that kind of server.

Conclusion

At that point, the DBpedia dataset, composed of 3.5 million entities, is fully indexed into OSF. What that means is that all the 27 OSF web service endpoints can be used to query, manipulate and use these millions of entities.

However, there is even much more that come out-of-the-box by having DBpedia loaded into OSF. In fact, as we will see in the next article, this means that DBpedia becomes readily available to Drupal 7 if the OSF for Drupal module is installed on that Drupal 7 instance.

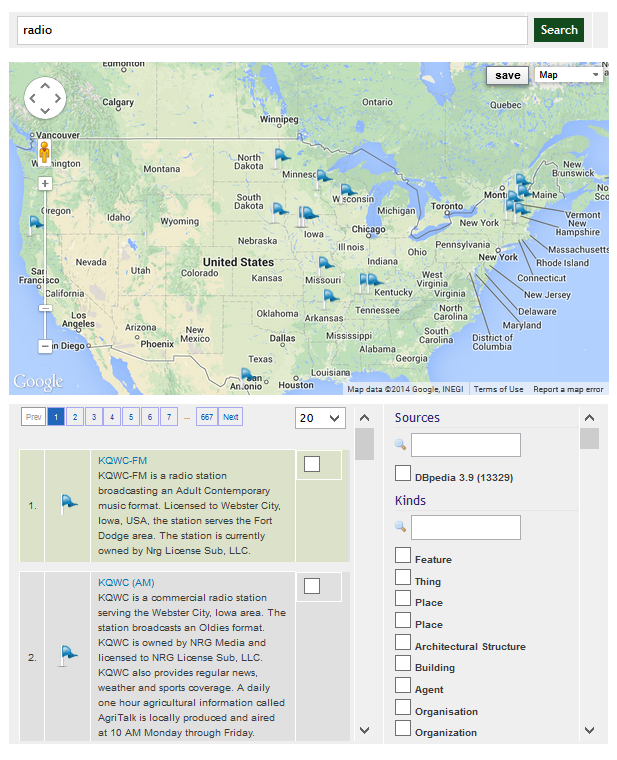
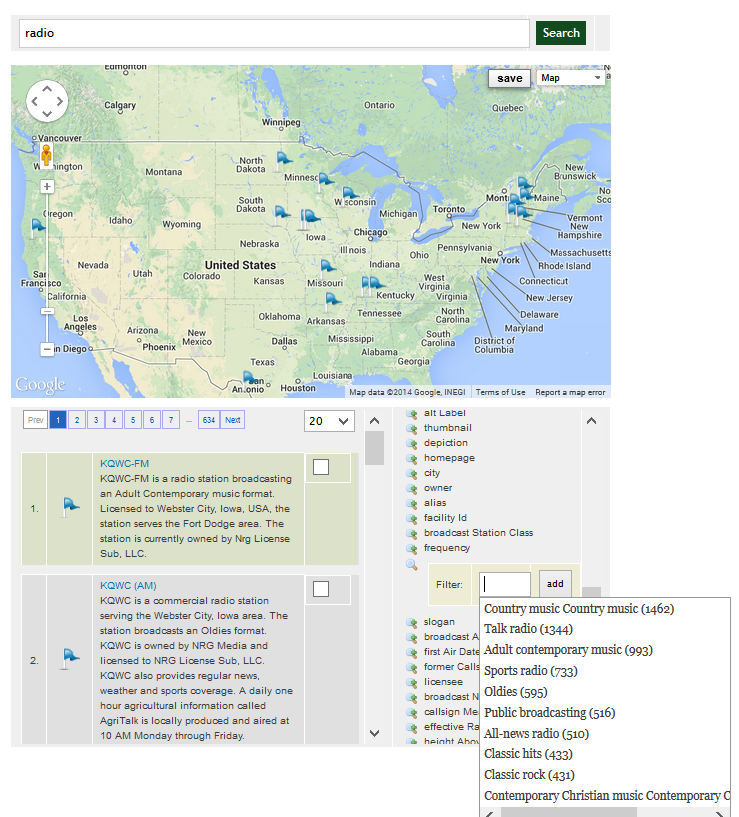
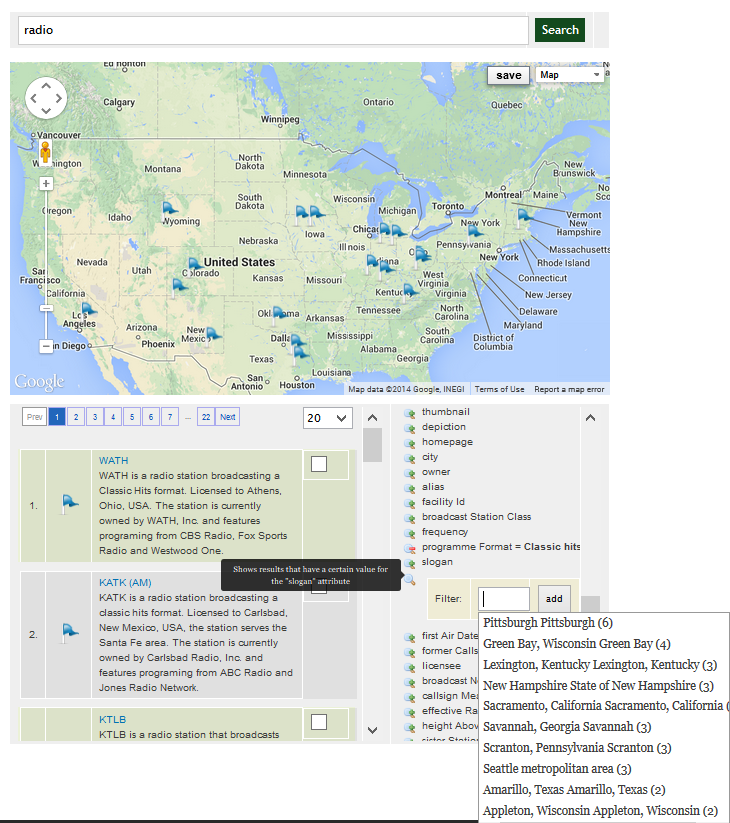
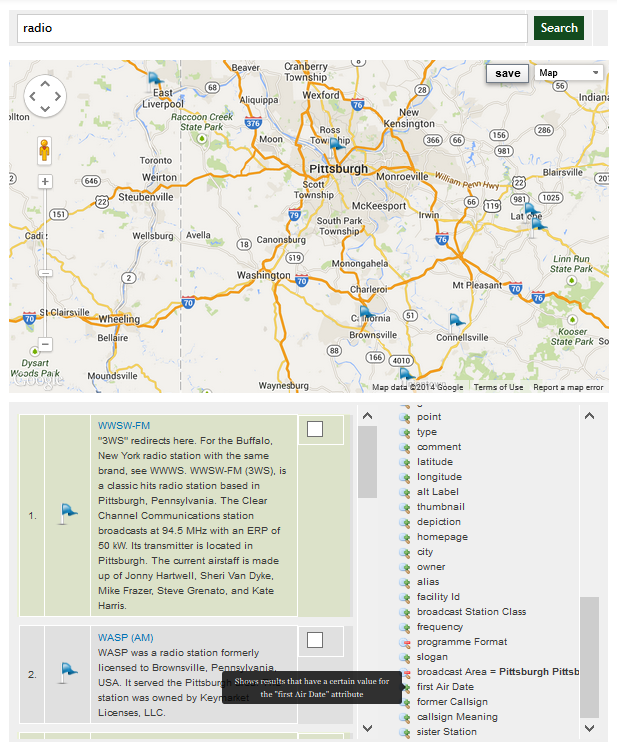
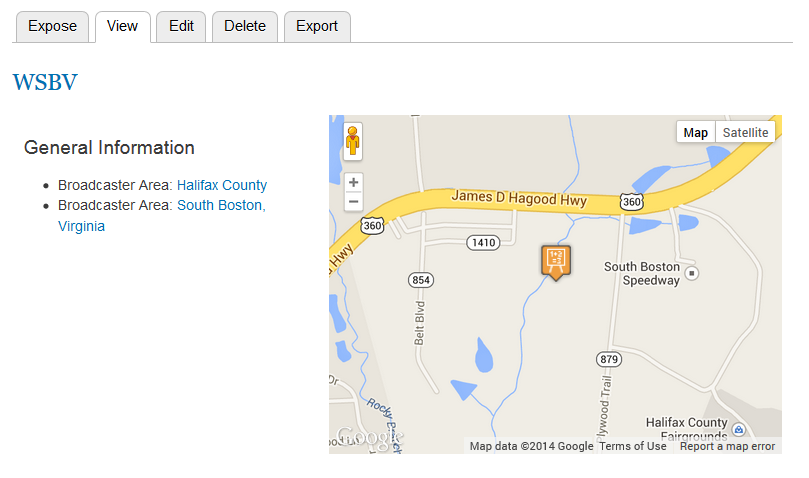
What that means is that the 3.5 million DBpedia entities can be searched via the Search API, can be manipulated via the Entity API, can be templated using the Drupal templating engine, etc. Then they can be searched and faceted directly on a map using the sWebMap OSF Widget. Then will be queriable via the OSF QueryBuilder that can be used to create all kind of complex search queries. Etc.

All this out-of-the-box.