For more than a year we have been developing a completely new version of conStruct for Drupal 7 for one of our clients.
conStruct for Drupal 6 is really decoupled from Drupal and all the other contributed modules; in a word, it was not playing nice with Drupal. The goal of this new version has been to change that situation. The focus of this completely new conStruct module has been to create a series of connector modules that bridge most of Drupal’s core functionalities with remote structWSF instances.
We wanted to make sure that Drupal developers could manipulate content, within Drupal, that is hosted in structWSF instance(s). The best way to start aiming for that goal was to make sure that all of the core Drupal APIs commonly used by Drupal developers could be used to manipulate structWSF data like if it was native in Drupal. This is what these connectors are about.
The development of conStruct for Drupal 7 is not finished, but it is available in the Git repository. There is still refactoring and improvements required, mainly to make it easier to use and understand, but all of the code is working properly and is already used on production sites.
conStruct As a Large Scale Drupal Implementation
Those who follow the evolution of conStruct know that conStruct’s main goal is to use Drupal as a user interface for structWSF for administrative purposes, or for creating complete portals like the NOW portal. However, in our initial versions, Structured Dynamics’ purpose was to not tightly integrate with Drupal. Over time, though, we have seen broad acceptance for the Drupal front end and Drupal itself is evolving in ways compatible with semantic technologies.
What is changing with conStruct for Drupal 7, with all these connectors, is that we are now using conStruct to bridge Drupal with structWSF server instances. We supercharge Drupal 7’s capabilities with structWSF. Our evolution to a tighter Drupal coupling means the ability to manage, query, search, data mine, million of entities; to have vocabularies of tens of thousands of concepts; and to enable the querying of all of these entities and their content from any kind of devices or systems via a family of web services endpoints.
This is the initial version of what is (or should be) Drupal LSD for Structured Dynamics: A semantic web service framework backend system for Drupal.
conStruct’s Drupal Connectors
Here is the initial list of the connectors that exists:
structFieldStorage: this module creates a new structfieldstorage field storage system that can be used by Drupal fields to save the fields’ data into a remote structWSF instance. This is used to enable the Content Type entities to be saved into a structWSF instance. It is an extension of the Drupal field storage system
structEntities: this module creates a new Entity Type called the Resource Type that is used to see all the structWSF indexed records as native Entities in Drupal. This means that the Entity API can be used to manipulate any content in structWSF
structViews: this module creates a new data source for Views 3. This means that the Views 3 user interface is used to generate structWSF Search endpoint queries instead of SQL queries
structSearchAPI: this module exposes new search indexes to the Search API. This means that the Search API can be used to query a structWSF instance.
I will write about all these connectors individually in upcoming blog posts. I will cover their design, architecture and usage.
I am proud to announce the new NOW (Neighbourhoods Of Winnipeg) semantic web portal! This new and innovative semantic web portal was publicly announced by the Mayor of Winnipeg City last week.
The NOW (Neighbourhoods of Winnipeg) portal is “a new Web portal (the “Portal”) produced by the City of Winnipeg to provide broad, dynamic and interactive access to local and neighbourhood information. Designed for easy access and use by all citizens, businesses, community organizations and Governments, the information on the site includes municipal data, census and demographic information, economic development information, historical data, much spatial and mapping information, and facilities for including and sharing data by external groups and constituencies.”
I would suggest you to read Mike Bergman’s blog post about this new semantic web portal to have the proper background about that initiative by the city of Winnipeg and how it uses the OSF (Open Semantic Framework) as its foundational technology stack.
This project has been the springboard that led to the Open Semantic Framework version 1.1. Multiple pieces of the framework have been developed in relation to this project, and more particularly pieces like the sWebMap semantic component and several improvements to the structWSF web services endpoints and conStruct modules for Drupal 6.
Development of the Portal
The development plan of this portal is composed of four major areas:
Development of the data structure of the municipal domain by creating a series of ontologies
Conversion of existing data asset using this new data structure
Creation of the web portal by creating its design and by developing all the display templates
Creation of new tools to let users interact with the data available on the portal
Structured Dynamics has been involved in #1, #2 and #4 by providing design and development resources, technology transfer sessions and material and supporting internal teams to create, maintain and deploy their 57 publicly available datasets.
The Data Structure
This technology stack does not have any meaning without the proper data and data structures (ontologies) in place. This gold mine of information is what drives the functionality of the portal.
The portal is driven by 12 ontologies: 2 internal and 10 external. The content of the 57 publicly available datasets is defined by the classes and properties defined in one of these ontologies.
The two internal ontologies have been created jointly by Structured Dynamics and the City of Winnipeg, but they are extended and maintained by the city only.
These ontologies are maintained using two different kind of tools:
Protege is used for the big development tasks such as creating a big number of classes and properties, to do a big reorganization of the classes structure, etc.
structOntology is used for quick ontological changes to have an immediate impact on the behaviors of the portals such as label changes, SCO ontology property assignments to change the behavior of some of the tools that exist in the portal, etc.
structOntology can also be used by portal users to understand the underlying data structure used to define the data available on the portal. All users have access to the reading mode of the tool which let them browse, search and export the loaded ontologies on the portal.
The Data
Except for rare exceptions such as the historical photos, no new data has been created by the City of Winnipeg to populate this NOW portal. Most of its content comes from existing internal sources of data such as:
Conventional relational databases
GIS (Geographic Information System) on-top of relational databases
Spreadsheets
All of the conventional relation databases and legacy data from the GIS systems has been converted into RDF using the FME WorkbenchETL system. All of the FME workbench templates are mapping the relational data into RDF using the ontologies loaded into the portal. All of the geolocated records that exist in the portal come from this ETL process and have been converted using FME.
Some smaller datasets come from internal spreadsheets that got modified to comply with the commON spreadsheet format that is used to convert spreadsheet (CSV/TSV) data files into RDF.
All of the dataset creation and maintenance is managed internally by the City of Winnipeg using one of these two data conversion and importation processes.
Here are some internal statistics of the content that is currently accessible on the NOW portal.
General Portal
These are statistics related to different functionalities of the portal.
Number of neighbourhoods: 236
Number of community areas: 14
Number of wards: 15
Number of neighbourhood clusters: 23
Number of major site sections: 7
Total number of site pages: 428,019
Static pages: 2,245
Record-oriented pages: 425,874
Dynamic (search-based) pages: infinite
Number of documents: 1,017
Number of images: 2,683
Number of search facets: 1,392
Number of display templates: 54
Number of links: 1,067
External links: 784
Internal links: 283
Site Data
These statistics show the things that are available via the portal, what are their types, their properties, what is the quantity of data that is searchable, manipulable and exportable from the portal.
Number of datasets: 57
Number of records: 425,874
Number of geolocational records: 418,869
Point of interest (POI) records: 193,272
Polygon records: 218,602
Path (route) records: 6,995
Number of classes (types): 84
Number of properties: 1,308
Number of triple assertions: 8,683,103
Sharing Content
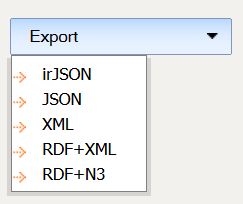
An important aspect of this portal is that all of the content is contextually available, in different formats, to all of the users of the portal. Whether you are browsing content within datasets, searching for specific pieces of content, or looking at a specific record page, you always have the possibility to get your hands on the content that is being displayed to you, the user, with a choice of five different data formats:
All content pages can be exported in one of the formats outlined above. In the bottom right corner of these pages you will see a Export button that you can click to get the content of that page in one of these formats.
Export Search Content
Every time you do a search on the portal, you can export the results of that search in one of the formats outlined above. You can do that by selecting the Export tab, and by selecting one of the formats you want to use for exporting the data.
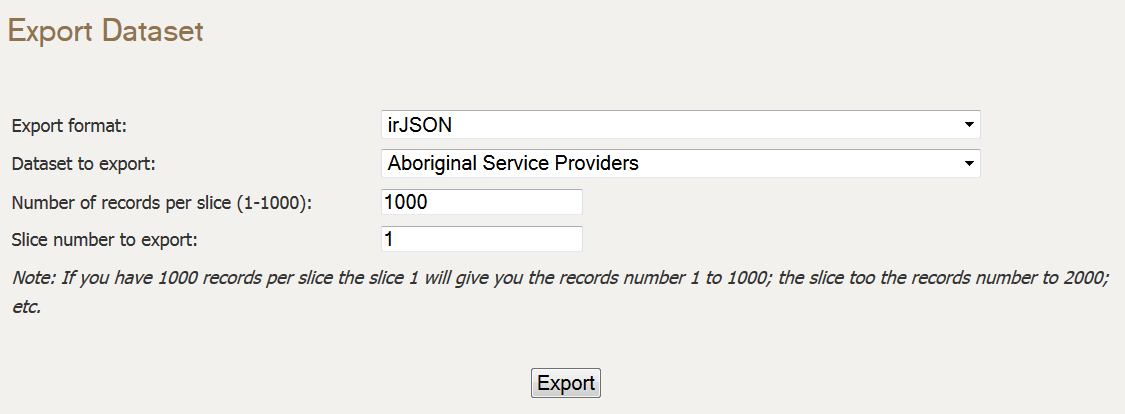
Export Datasets
You can export any publicly available dataset from the portal. These datasets have to be exported in slices if they are too big to fit in a single slice. The datasets can be exported in one of the formats mentioned above.
Export Census
Users also have the possibility to export census data, from the census section of the portal, in spreadsheets. They only have to select the Tables tab, and then to click the Export Spreadsheet button.
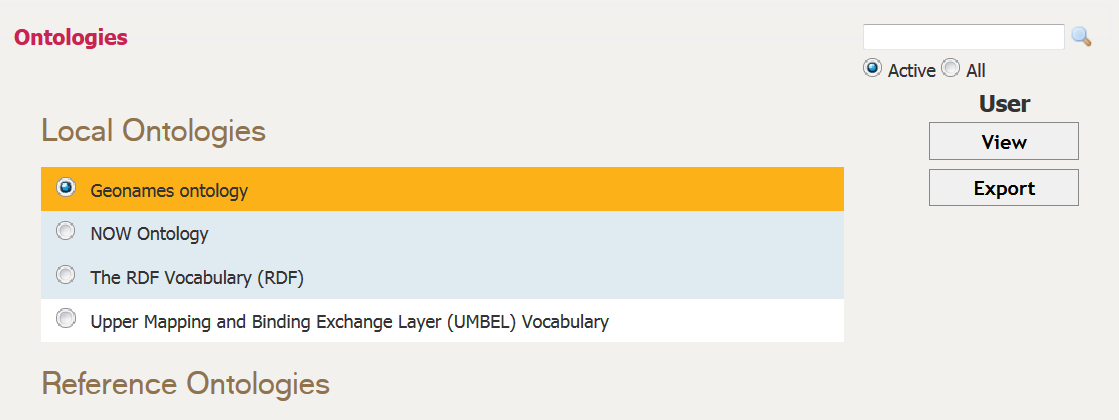
Export Ontologies
The export functionality would not be complete without the ability to consult and export the ontologies that are used to describe the content exposed by the portal. These ontologies can be read from the ontologies reader user interface, or can be exported from the portal to be read by external ontologies management tools such as Protege.
Portal Design
The portal is using Drupal 6 as its CMS (Content Management System). The Drupal 6 instance communicates with structWSF using the conStruct module, which acts as a bridge between a Druapal portal and a structWSF web service network.
Here are the main design phases that have been required to create the portal:
Creation of the portal’s design, and the Drupal 6 theme that implements it
Creation of the Search and Browse results templates
Creation of the individual records’ page design and templates based on their type
Creation of the sWebMap search results templates.
The portal’s design has been created internally by the City of Winnipeg and by Tactica based on the Citizen DAN demo. Tactica also worked on another Citizen DAN like portal called MyPeg.ca.
Semantic Components
The NOW Web portal is using a series of tools that are called the Semantic Components. These are a set of Flash and JavaScript tools that can be embedded within any web page and that can easily communicate with structWSF instance(s). They display information in all kinds of charts, they can display document reading widgets, they can create dashboards of structured data, etc. The initial set of Semantic Components was developed for the MyPeg.ca project back in November 2010. This was before Steve Jobs announced that Apple would not support Adobe Flash, and far before Google announced that it would drop support for it as well.
Since the NOW portal wanted to re-use as much as possible to lower the development cost related to the portal, they choose to use the complete OSF stack which includes these Semantic Components.
However, when we participated in developing this new NOW portal, we did extended the set of Semantic Components by creating the most complex Semantic Component: the sWebMap. However, because of the two announcements mentioned above, we choose to move forward and to create the sWebMap Semantic Component using JavaScript instead of Flash. The other Semantic Component tools that have been developed in Flash have not yet been ported into JavaScript.
Conclusion
The new NOW semantic web portal’s main asset is its data: how it can be searched (with traditional search engines or using a semantic component to search, browse, filter and localize results), displayed and exported. This portal has been developed using a completely free and open source semantic platform that has been developed from previous projects that open sourced their code.
I consider this portal a pioneer in the way municipal organization will provide new online services to their citizens and to the commercial enterprises based on the quality of the data that will be exposed via such Web portals.
We are excited to introduce the first Open Semantic Framework installation script. This new installer application will install and configure the entire Open Semantic Framework stack for you. It will take about 10 minutes of your time, and will process in the background for a few hours while everything necessary to build the OSF stack is downloaded and compiled.
The only thing you have to do to run the OSF Installer is to issue the few commands outlined below, and then to answer a few questions in the process (which, since most of them use the standard default values, is pretty easy).
The OSF Installer is a major addition to the Open Semantic Framework since it now enables a greater number of people (mere mortals) to install and use the stack, and it enables much faster deployment of the system.
The full installation manual, where each of the steps performed by the installer is explained in detail, is available as a reference here.
Requirements
The current version of the Open Semantic Framework Installer is fully operational on:
Ubuntu 10.04 (Lucid)
32 Bits Operating System
Access to internet from the server
5GIG of disk space on the partition where you are installing OSF
Eventually this installer will be upgraded for 64-bits operating systems, and for other Linux distributions. Also, the current installer should work on newer versions of Ubuntu, but it has only been tested to date on the latest LTS version.
Installing the Open Semantic Framework
The only manual steps need to do to install the Open Semantic Framework are to:
Create a folder where to install OSF on your server
Download the osf-install.zip installation package
Make the osf-install.sh installation script executable
Run the osf-install.sh installation script
Answer the questions asked by the installer
Here are the commands you have to run:
[cc lang=’bash’ line_numbers=’true’ ]
cd /mnt/
sudo wget https://github.com/downloads/structureddynamics/Open-Semantic-Framework-Installer/osf-installer-v1.0a4.zip
sudo unzip osf-installer-v1.0a4.zip
cd `ls -d structureddynamics*/`
sudo chmod 755 osf-install.sh
./osf-install.sh
[/cc]
conStruct and structWSF Upgrades
In the process, both conStruct and structWSF have been enhanced to enable automatic upgrading in the future. Starting with structWSF version 1.0a92 and conStruct version 6.x-1.0-beta9, future upgrades should be done automatically using automatic upgrading procedures.
However, to enable this, existing users will have to upgrade their current versions manually to establish the new automatic upgrades baseline.
Next Steps
Once you have installed the OSF stack, you next query the structWSF Web service endpoints, and import datasets using conStruct. Here are a few things you can do to start exploring the Open Semantic Framework:
Since everything is installed on your server, so you only have to play with the stack now. If you break something, just ping us on the mailing list or re-install it without worrying about each installation steps!
Help
It may be possible that you experience some issues with this new OSF Installer. If that is the case, I would suggest your to make an outreach to the Open Semantic Web Mailing List so that we fix it on the Git repository.
Just write an email that includes the specifications of the server where you are trying to install OSF on. Then tell us where the issue happens in the installation process. Also add any logs that could be helpful in debugging the issue.
Conclusion
This is the first version of the OSF installer, but this is a real balm for installing OSF. As noted, this installer will eventually be upgraded to support 64-bit servers and other Linux distributions. Also, any help improving this installer from Bash wizards would naturally be greatly welcomed.
Ontologies are to the Open Semantic Framework what humans were to the Mechanical Turk. The hidden human in the Mechanical Turk was orchestrating all and every chess move. However, to the observers, the automated chess machine was looking just like it: a new kind of intelligent machine. We were in 1770.
Ontologies plays exactly the same role for the Open Semantic Framework (OSF): they orchestrate all and every moves for all the pieces within OSF. They are what instructs structWSF, the Semantic Components, conStruct, and all other derivate pieces of user interfaces how to behave.
In this (lengthy) blog post, I will present the main ontologies that have an impact on different parts of OSF. We will see how different ontology classes and properties, and how the description of the records indexed in the system, can impact the behaviors of OSF.
In addition to this post, Mike has also published a blog post today that overviews the overall OSF ontology modularization and architecture.
Last week we slowly migrated Structured Dynamics‘ Google Code Projects to GitHub.We have been thinking about moving to GitHub for some time now, but we only wanted to move projects to it if no prior history and commits were dropped in the process. One motivation for the possible change has been the seeming lack of support by Google for certain long-standing services: we are seeing disturbing trends across a number of existing services. We also needed a migration process that would work with all of our various projects, without losing a trunk, branch, tag or commits (and their related comments).
It was not until recently that I found a workable process. Other people have successfully migrated Google Code SVN projects to GitHub, but I had yet to find a consolidated guide to do it. It is for this last reason that I write this blog post: to help people, if they desire, to move projects from Google Code to GitHub.
Moving from Google Code to GitHub
The protocol outlined below may appear complex, but it looks more intimidating than it really is. Moving a project takes about two to five minutes once your GitHub account and your migration computer is properly configured.
You need four things to move a Google Code SVN project to GitHub:
A Google Code project to move
A GitHub user account
SSH keys, and
A migration computer that is configured to migrate the project from Google Code to GitHub. (in this tutorial, we will use a Ubuntu server; but any other Linux/Windows/Mac computer, properly configured, should do the job)
Create GitHub Account
If you don’t already own a GitHub account, the first step is to create one here.
Create & Configure SSH Keys
Once your account has been created, you have to create and setup the SSH keys that you will use to commit the code into the Git Repository on GitHub:
The next step is to configure the computer that will be used to migrate the project. For this tutorial, I use a Ubuntu server to do the migration, but any Windows, Linux or Mac computer should do the job if properly configured.
The first step is to install Git and Ruby on that computer:
To perform the migration of a Google Code SVN project to GitHub, we are using a Ruby application called svn2git that is now developed by Kevin Menard. The next step is to install svn2git on that computer:
Before migrating your project, you have to link the Google Code committers to GitHub accounts. This is done by populating a simple text file that will be given as input to svn2git.
Open the authors.txt file into a temporary folder:
[cc lang=’bash’ line_numbers=’true’] sudo vim /tmp/authors.txt[/cc]
Then, for each author, you have to add the mapping between their Google Code and GitHub accounts. If a Google Code committer does not exist on GitHub, then you should map it to your own GitHub account.
[cc lang=’text’ line_numbers=’true’]
[raw]
(no author) = Frederick Giasson
fred@f…com = Frederick Giasson
[/raw]
[/cc]
The format of this authors.txt file is:
[cc lang=’text’ line_numbers=’true’ ][raw] Google-Account-Username = Name-Of-Author-On-GitHub (no author) mapping. This link is required for every authors.txt file. This placeholder is used to map the initial commit performed by the Google Code system. (When Google Code initializes a new project, it uses that username for creating the first commit of any project.)
When you are done, save the file.
Now that set up is complete, you are ready to migrate your project. First, let’s create the folder that will be used to checkout the SVN project on the server, and then to push it on GitHub.
[cc lang=’bash’ line_numbers=’true’]
cd /tmp/
mkdir myproject
cd myproject
[/cc]
In this tutorial, we have a normal migration scenario. However, your migration scenario may differ from this one. It is why I would suggest you check out the different scenarios that are supported by svn2git document. Change the following command accordingly. Let’s migrate the Google Code SVN Project into the local Git repository:
Make sure that no errors have been reported during the process. If it is the case, then refer to the Possible Errors and Fixes section below to troubleshoot your issue.
The next step is to create a new GitHub repository where to migrate the SVN project. Go to this GitHub page to create your new repository. Then you have to configure Git to add a remote link, from the local Git repository you created on your migration computer, to this remote GitHub repository:
Finally, let’s push the local Git repository master, branches and tags to GitHub. The first thing to push onto GitHub is the SVN’s trunk. It is done by running that command:
Then, if your project has multiple branches and tags, you can push them, one by one, using the same command. However, you will have to replace master by the name of that branch or tag. If you don’t know what is the exact name of these branches or tags, you can easily list all of them using this Git command:
Once you have progressed through all branches and tags, you are done. If you take a look at your GitHub project’s page, you should see that the trunk, branches, tags and commits are now properly imported into that project.
Possible Errors And Fixes
Fatal Error: Not a valid object name
There are a few things that can go wrong while trying to migrate your project(s).
One of the errors I experienced is a "fatal" error message "Not a valid object name". To fix this, we have to fix a line of code in svn2git. Open the migration.rb file. Check around the line 227 for the method fix_branches(). Remove the first line of that method, and replace the second one by:
While running the svn2git application, the process may finish prematurely. If you check the output, you may see that it can’t find the match for an author. What you will have to do is to add that author to your authors file and re-run svn2git. Otherwise you won’t be able to fully migrate the project.
I’m not quite sure why these minor glitches occurred during my initial migrate, but with the simple fixes above you should be good to go.